Module zendesk

ballerinax/zendesk Ballerina library
Overview
Zendesk is a customer service software company that provides a cloud-based customer support platform. It is designed to offer a seamless and efficient customer service experience, enabling businesses to manage customer interactions across multiple channels, including email, chat, phone, and social media.
The Ballerina Zendesk Connector allows developers to interact with the Zendesk REST API V2, making it easier to integrate customer support features into Ballerina applications. This connector enables the automation of Zendesk Support operations such as ticket management, user and organization management, and more.
Setup guide
To use the Zendesk Connector in Ballerina, you must have a Zendesk account and an API token for authentication. Follow the steps below to set up the connector with your Zendesk account. If you don't have an account, you can create one by visiting Zendesk Sign Up page and completing the registration process.
Step 1: Log in to Zendesk
- Sign in to your Zendesk account.
- Navigate to the dashboard.
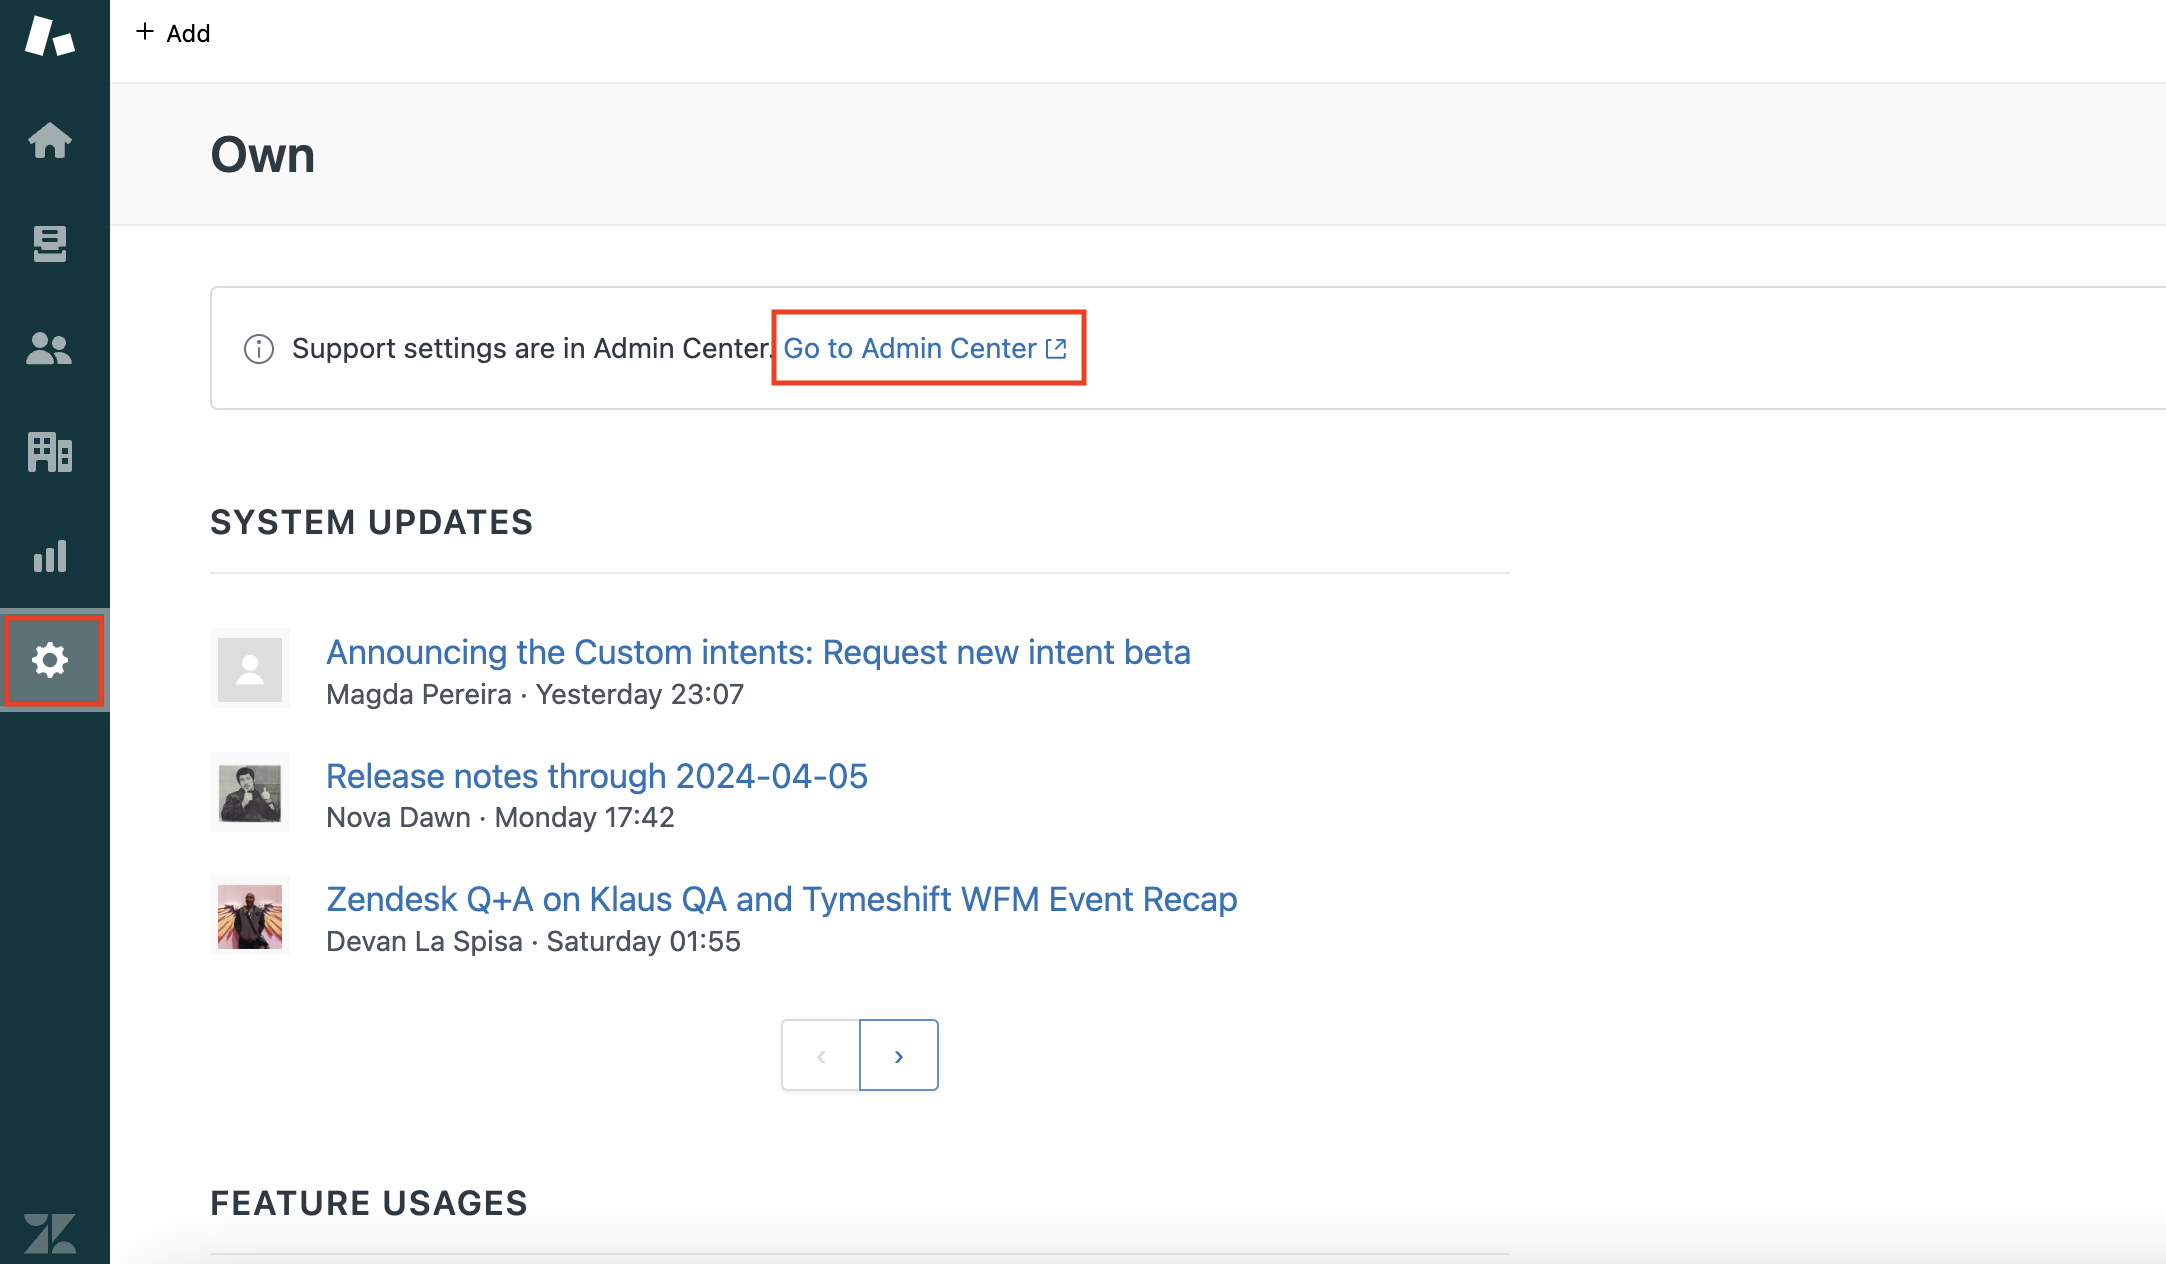
Step 2: Access admin center
-
Click on the Settings icon in the sidebar.
-
Click on Go to Admin Center.
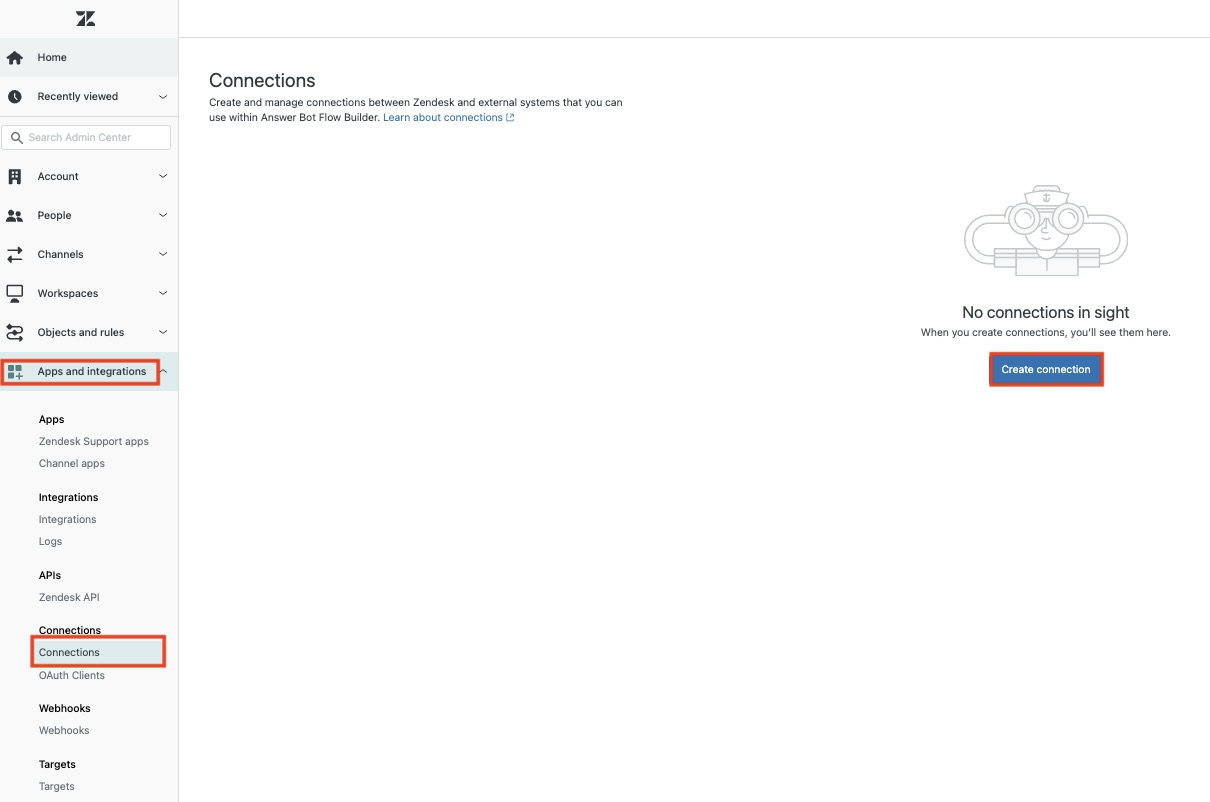
Step 3: Create a new connection
-
In the Admin Center, click on Apps and integrations.
-
Click on Connections under the Connections section.
-
Click on Create connection to create a new connection.
Step 4: Configure connection settings
When creating a new connection, you will be prompted to provide the following details:
-
Connection name: A descriptive name for the connection.
-
Authentication type: Possible options are
API key,Basic Auth,Bearer Token, andOAuth 2.0. -
Allowed domain: The domain that the connection is allowed to access. You can use a wildcard to allow requests made to any subdomain by adding an asterisk (*) at the start.
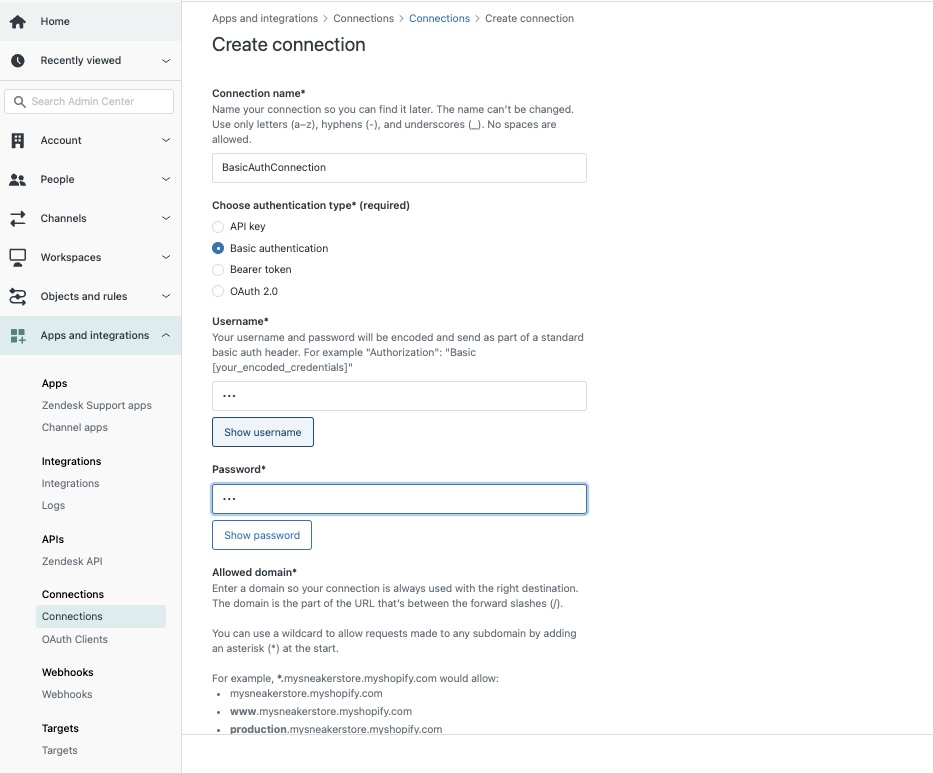
Note: The rest of the fields (e.g.
username,password,token) will appear based on the selected authentication type.
Quickstart
To begin using the Zendesk connector in your Ballerina application, you'll need to follow these steps:
Step 1: Import the connector
First, import the ballerinax/zendesk package into your Ballerina project.
import ballerinax/zendesk;
Step 2: Instantiate a new connector
Create a zendesk:ConnectionConfig object with your domain and API token, and initialize the connector.
zendesk:ConnectionConfig zendeskConfig = { auth: { username: "<username>", password: "<password>" } }; zendesk:Client zendesk = check new (zendeskConfig, "https://<your-domain>.zendesk.com");
Step 3: Invoke the connector operation
Utilize the connector's operations to manage tickets, users, organizations, etc.
Create a ticket
zendesk:TicketCreateRequest ticket = { ticket: { subject: "Subject of the ticket", comment: { body: "Body of the ticket comment" } } }; zendesk:TicketResponse createResponse = check zendesk->/api/v2/tickets.post(ticket);
List tickets
zendesk:TicketsResponse tickets = check zendesk->/api/v2/tickets;
Examples
The Zendesk connector provides practical examples illustrating usage in various scenarios. Explore these examples, covering the following use cases:
- Multi channel support integration - Integrate Zendesk with multiple customer support channels to streamline ticket management.
- Customer satisfaction survey analysis - Analyze customer satisfaction survey responses to improve support services.
Clients
zendesk: Client
Zendesk Support API endpoints
Constructor
Gets invoked to initialize the connector.
init (ConnectionConfig config, string serviceUrl)- config ConnectionConfig - The configurations to be used when initializing the
connector
- serviceUrl string - URL of the target service
get api/lotus/assignables/autocomplete.json
function get api/lotus/assignables/autocomplete\.json(string name, string accept) returns AssigneeFieldAssignableGroupsAndAgentsSearchResponse|errorList assignable groups and agents based on query matched against name
Parameters
- name string - Query string used to search assignable groups & agents in the AssigneeField
- accept string (default "application/json") -
Return Type
- AssigneeFieldAssignableGroupsAndAgentsSearchResponse|error - Success response
get api/lotus/assignables/groups.json
function get api/lotus/assignables/groups\.json() returns AssigneeFieldAssignableGroupsResponse|errorList assignable groups on the AssigneeField
Return Type
- AssigneeFieldAssignableGroupsResponse|error - Success response
get api/lotus/assignables/groups/[int group_id]/agents.json
function get api/lotus/assignables/groups/[int group_id]/agents\.json(string accept) returns AssigneeFieldAssignableGroupAgentsResponse|errorList assignable agents from a group on the AssigneeField
Parameters
- accept string (default "application/json") -
Return Type
- AssigneeFieldAssignableGroupAgentsResponse|error - Success response
get api/v2/[string target_type]/[int target_id]/relationship_fields/[int field_id]/[string source_type]
function get api/v2/[string target_type]/[int target_id]/relationship_fields/[int field_id]/[string source_type](string accept) returns ReverseLookupResponse|errorGet sources by target
Parameters
- accept string (default "application/json") -
Return Type
- ReverseLookupResponse|error - Success response
get api/v2/account/settings
function get api/v2/account/settings() returns AccountSettingsResponse|errorShow Settings
Return Type
- AccountSettingsResponse|error - Success response
put api/v2/account/settings
function put api/v2/account/settings() returns AccountSettingsResponse|errorUpdate Account Settings
Return Type
- AccountSettingsResponse|error - Success response
post api/v2/accounts
function post api/v2/accounts() returns TrialAccountResponse|errorCreate Trial Account
Return Type
- TrialAccountResponse|error - Created response
get api/v2/accounts/available
function get api/v2/accounts/available(string subdomain, string accept) returns Inline_response_200|errorVerify Subdomain Availability
Parameters
- subdomain string - Specify the name of the subdomain you want to verify. The name can't contain underscores, hyphens, or spaces.
- accept string (default "application/json") -
Return Type
- Inline_response_200|error - Success response
get api/v2/activities
function get api/v2/activities(string accept, string? since) returns ActivitiesResponse|errorList Activities
Parameters
- accept string (default "application/json") -
- since string? (default ()) - A UTC time in ISO 8601 format to return ticket activities since said date.
Return Type
- ActivitiesResponse|error - Success response
get api/v2/activities/[int activity_id]
function get api/v2/activities/[int activity_id](string accept) returns ActivityResponse|errorShow Activity
Parameters
- accept string (default "application/json") -
Return Type
- ActivityResponse|error - Success response
get api/v2/activities/count
function get api/v2/activities/count() returns ActivitiesCountResponse|errorCount Activities
Return Type
- ActivitiesCountResponse|error - Count of ticket activities
post api/v2/any_channel/channelback/report_error
Report Channelback Error to Zendesk
post api/v2/any_channel/push
function post api/v2/any_channel/push() returns ChannelFrameworkPushResultsResponse|errorPush Content to Support
Return Type
- ChannelFrameworkPushResultsResponse|error - Success response
post api/v2/any_channel/validate_token
Validate Token
get api/v2/attachments/[int attachment_id]
function get api/v2/attachments/[int attachment_id](string accept) returns AttachmentResponse|errorShow Attachment
Parameters
- accept string (default "application/json") -
Return Type
- AttachmentResponse|error - Success Response
put api/v2/attachments/[int attachment_id]
function put api/v2/attachments/[int attachment_id](AttachmentUpdateRequest payload, string accept) returns AttachmentResponse|errorUpdate Attachment for Malware
Return Type
- AttachmentResponse|error - Success response
get api/v2/audit_logs
function get api/v2/audit_logs(string accept, string? filterSource_type, int? filterSource_id, int? filterActor_id, string? filterIp_address, string? filterCreated_at, string? filterAction, string? sort_by, string? sort_order, string? sort) returns AuditLogsResponse|errorList Audit Logs
Parameters
- accept string (default "application/json") -
- filterSource_type string? (default ()) - Filter audit logs by the source type. For example, user or rule
- filterSource_id int? (default ()) - Filter audit logs by the source id. Requires
filter[source_type]to also be set
- filterActor_id int? (default ()) - Filter audit logs by the actor id
- filterIp_address string? (default ()) - Filter audit logs by the ip address
- filterCreated_at string? (default ()) - Filter audit logs by the time of creation. When used, you must specify
filter[created_at]twice in your request, first with the start time and again with an end time
- filterAction string? (default ()) - Filter audit logs by the action
- sort_by string? (default ()) - Offset pagination only. Sort audit logs. Default is
sort_by=created_at
- sort_order string? (default ()) - Offset pagination only. Sort audit logs. Default is
sort_order=desc
- sort string? (default ()) - Cursor pagination only. Sort audit logs. Default is
sort=-created_at
Return Type
- AuditLogsResponse|error - Success response
get api/v2/audit_logs/[int audit_log_id]
function get api/v2/audit_logs/[int audit_log_id](string accept) returns AuditLogResponse|errorShow Audit Log
Parameters
- accept string (default "application/json") -
Return Type
- AuditLogResponse|error - Success response
post api/v2/audit_logs/export
function post api/v2/audit_logs/export(string accept, string? filterSource_type, int? filterSource_id, int? filterActor_id, string? filterIp_address, string? filterCreated_at, string? filterAction) returns string|errorExport Audit Logs
Parameters
- accept string (default "application/json") -
- filterSource_type string? (default ()) - Filter audit logs by the source type. For example, user or rule
- filterSource_id int? (default ()) - Filter audit logs by the source id. Requires
filter[source_type]to also be set.
- filterActor_id int? (default ()) - Filter audit logs by the actor id
- filterIp_address string? (default ()) - Filter audit logs by the ip address
- filterCreated_at string? (default ()) - Filter audit logs by the time of creation. When used, you must specify
filter[created_at]twice in your request, first with the start time and again with an end time
- filterAction string? (default ()) - Filter audit logs by the action
get api/v2/autocomplete/tags
function get api/v2/autocomplete/tags(string accept, string? name) returns TagsByObjectIdResponse|errorSearch Tags
Parameters
- accept string (default "application/json") -
- name string? (default ()) - A substring of a tag to search for
Return Type
- TagsByObjectIdResponse|error - Success response
get api/v2/automations
function get api/v2/automations() returns AutomationsResponse|errorList Automations
Return Type
- AutomationsResponse|error - Success response
post api/v2/automations
function post api/v2/automations() returns AutomationResponse|errorCreate Automation
Return Type
- AutomationResponse|error - Created response
get api/v2/automations/[int automation_id]
function get api/v2/automations/[int automation_id](string accept) returns AutomationResponse|errorShow Automation
Parameters
- accept string (default "application/json") -
Return Type
- AutomationResponse|error - Success response
put api/v2/automations/[int automation_id]
function put api/v2/automations/[int automation_id](string accept) returns AutomationResponse|errorUpdate Automation
Parameters
- accept string (default "application/json") -
Return Type
- AutomationResponse|error - Success response
delete api/v2/automations/[int automation_id]
Delete Automation
Parameters
- accept string (default "application/json") -
Return Type
- error? - No Content response
get api/v2/automations/active
function get api/v2/automations/active() returns AutomationsResponse|errorList Active Automations
Return Type
- AutomationsResponse|error - Success response
delete api/v2/automations/destroy_many
Bulk Delete Automations
Parameters
- accept string (default "application/json") -
- ids int[]? (default ()) - The IDs of the automations to delete
Return Type
- error? - No Content response
get api/v2/automations/search
function get api/v2/automations/search(string query, string accept, boolean? active, string? sort_by, string? sort_order, string? include) returns AutomationsResponse|errorSearch Automations
Parameters
- query string - Query string used to find all automations with matching title
- accept string (default "application/json") -
- active boolean? (default ()) - Filter by active automations if true or inactive automations if false
- sort_by string? (default ()) - Possible values are "alphabetical", "created_at", "updated_at", and "position". If unspecified, the automations are sorted by relevance
- sort_order string? (default ()) - One of "asc" or "desc". Defaults to "asc" for alphabetical and position sort, "desc" for all others
Return Type
- AutomationsResponse|error - Success response
put api/v2/automations/update_many
function put api/v2/automations/update_many() returns AutomationsResponse|errorUpdate Many Automations
Return Type
- AutomationsResponse|error - Success response
get api/v2/bookmarks
function get api/v2/bookmarks() returns BookmarksResponse|errorList Bookmarks
Return Type
- BookmarksResponse|error - Successful response
post api/v2/bookmarks
function post api/v2/bookmarks(BookmarkCreateRequest payload) returns BookmarkResponse|errorCreate Bookmark
Parameters
- payload BookmarkCreateRequest -
Return Type
- BookmarkResponse|error - Successfully created
delete api/v2/bookmarks/[int bookmark_id]
Delete Bookmark
Parameters
- accept string (default "application/json") -
Return Type
- error? - No content
get api/v2/brands
function get api/v2/brands() returns BrandsResponse|errorList Brands
Return Type
- BrandsResponse|error - Successful response
post api/v2/brands
function post api/v2/brands(BrandCreateRequest payload) returns BrandResponse|errorCreate Brand
Parameters
- payload BrandCreateRequest -
Return Type
- BrandResponse|error - Successful response
get api/v2/brands/[int brand_id]
function get api/v2/brands/[int brand_id](string accept) returns BrandResponse|errorShow a Brand
Parameters
- accept string (default "application/json") -
Return Type
- BrandResponse|error - Successful response
put api/v2/brands/[int brand_id]
function put api/v2/brands/[int brand_id](BrandUpdateRequest payload, string accept) returns BrandResponse|errorUpdate a Brand
Return Type
- BrandResponse|error - Successful response
delete api/v2/brands/[int brand_id]
Delete a Brand
Parameters
- accept string (default "application/json") -
Return Type
- error? - No Content response
get api/v2/brands/[int brand_id]/check_host_mapping
function get api/v2/brands/[int brand_id]/check_host_mapping(string accept) returns HostMappingObject|errorCheck Host Mapping Validity for an Existing Brand
Parameters
- accept string (default "application/json") -
Return Type
- HostMappingObject|error - Successful response
get api/v2/brands/check_host_mapping
function get api/v2/brands/check_host_mapping(string host_mapping, string subdomain, string accept) returns HostMappingObject|errorCheck Host Mapping Validity
Parameters
- host_mapping string - The hostmapping to a brand, if any (only admins view this key)
- subdomain string - Subdomain for a given Zendesk account address
- accept string (default "application/json") -
Return Type
- HostMappingObject|error - Successful response
get api/v2/channels/twitter/monitored_twitter_handles
function get api/v2/channels/twitter/monitored_twitter_handles() returns TwitterChannelsResponse|errorList Monitored Twitter Handles
Return Type
- TwitterChannelsResponse|error - Success response
get api/v2/channels/twitter/monitored_twitter_handles/[int monitored_twitter_handle_id]
function get api/v2/channels/twitter/monitored_twitter_handles/[int monitored_twitter_handle_id](string accept) returns TwitterChannelResponse|errorShow Monitored Twitter Handle
Parameters
- accept string (default "application/json") -
Return Type
- TwitterChannelResponse|error - Success response
post api/v2/channels/twitter/tickets
Create Ticket from Tweet
get api/v2/channels/twitter/tickets/[int comment_id]/statuses
function get api/v2/channels/twitter/tickets/[int comment_id]/statuses(string accept, string? ids) returns TwitterChannelTwicketStatusResponse|errorList Twicket statuses
Parameters
- accept string (default "application/json") -
- ids string? (default ()) - Optional comment ids to retrieve tweet information for only particular comments
Return Type
- TwitterChannelTwicketStatusResponse|error - Success response
post api/v2/channels/voice/agents/[int agent_id]/tickets/[int ticket_id]/display
function post api/v2/channels/voice/agents/[int agent_id]/tickets/[int ticket_id]/display(string accept) returns string|errorOpen Ticket in Agent's Browser
Parameters
- accept string (default "application/json") -
post api/v2/channels/voice/agents/[int agent_id]/users/[int user_id]/display
function post api/v2/channels/voice/agents/[int agent_id]/users/[int user_id]/display(string accept) returns string|errorOpen a User's Profile in an Agent's Browser
Parameters
- accept string (default "application/json") -
post api/v2/channels/voice/tickets
function post api/v2/channels/voice/tickets(TicketCreateVoicemailTicketRequest payload, string accept) returns TicketResponse|errorCreate Ticket or Voicemail Ticket
Return Type
- TicketResponse|error - Successful response
put api/v2/chat_file_redactions/[int ticket_id]
function put api/v2/chat_file_redactions/[int ticket_id](string accept) returns TicketChatCommentRedactionResponse|errorRedact Chat Comment Attachment
Parameters
- accept string (default "application/json") -
Return Type
- TicketChatCommentRedactionResponse|error - Success response
put api/v2/chat_redactions/[int ticket_id]
function put api/v2/chat_redactions/[int ticket_id](string accept) returns TicketChatCommentRedactionResponse|errorRedact Chat Comment
Parameters
- accept string (default "application/json") -
Return Type
- TicketChatCommentRedactionResponse|error - Success response
put api/v2/comment_redactions/[int ticket_comment_id]
function put api/v2/comment_redactions/[int ticket_comment_id](string accept) returns TicketCommentResponse|errorRedact Ticket Comment In Agent Workspace
Parameters
- accept string (default "application/json") -
Return Type
- TicketCommentResponse|error - Success response
get api/v2/custom_objects
function get api/v2/custom_objects() returns CustomObjectsResponse|errorList Custom Objects
Return Type
- CustomObjectsResponse|error - Success response
post api/v2/custom_objects
function post api/v2/custom_objects(CustomObjectsCreateRequest payload) returns CustomObjectResponse|errorCreate Custom Object
Parameters
- payload CustomObjectsCreateRequest -
Return Type
- CustomObjectResponse|error - Created
get api/v2/custom_objects/[string custom_object_key]
function get api/v2/custom_objects/[string custom_object_key](string accept) returns CustomObjectResponse|errorShow Custom Object
Parameters
- accept string (default "application/json") -
Return Type
- CustomObjectResponse|error - Custom Object
delete api/v2/custom_objects/[string custom_object_key]
Delete Custom Object
Parameters
- accept string (default "application/json") -
Return Type
- error? - No content response
patch api/v2/custom_objects/[string custom_object_key]
function patch api/v2/custom_objects/[string custom_object_key](string accept) returns CustomObjectResponse|errorUpdate Custom Object
Parameters
- accept string (default "application/json") -
Return Type
- CustomObjectResponse|error - Success response
get api/v2/custom_objects/[string custom_object_key]/fields
function get api/v2/custom_objects/[string custom_object_key]/fields(string accept, boolean? include_standard_fields) returns CustomObjectFieldsResponse|errorList Custom Object Fields
Parameters
- accept string (default "application/json") -
- include_standard_fields boolean? (default ()) - Include standard fields if true. Exclude them if false
Return Type
- CustomObjectFieldsResponse|error - Success response
post api/v2/custom_objects/[string custom_object_key]/fields
function post api/v2/custom_objects/[string custom_object_key]/fields(CustomObjectFieldsCreateRequest payload, string accept) returns CustomObjectFieldResponse|errorCreate Custom Object Field
Return Type
- CustomObjectFieldResponse|error - Created
get api/v2/custom_objects/[string custom_object_key]/fields/[string custom_object_field_key_or_id]
function get api/v2/custom_objects/[string custom_object_key]/fields/[string custom_object_field_key_or_id](string accept) returns CustomObjectFieldResponse|errorShow Custom Object Field
Parameters
- accept string (default "application/json") -
Return Type
- CustomObjectFieldResponse|error - Custom Object Field
delete api/v2/custom_objects/[string custom_object_key]/fields/[string custom_object_field_key_or_id]
function delete api/v2/custom_objects/[string custom_object_key]/fields/[string custom_object_field_key_or_id](string accept) returns error?Delete Custom Object Field
Parameters
- accept string (default "application/json") -
Return Type
- error? - No content response
patch api/v2/custom_objects/[string custom_object_key]/fields/[string custom_object_field_key_or_id]
function patch api/v2/custom_objects/[string custom_object_key]/fields/[string custom_object_field_key_or_id](string accept) returns CustomObjectFieldResponse|errorUpdate Custom Object Field
Parameters
- accept string (default "application/json") -
Return Type
- CustomObjectFieldResponse|error - Success response
put api/v2/custom_objects/[string custom_object_key]/fields/reorder
function put api/v2/custom_objects/[string custom_object_key]/fields/reorder(string accept) returns string|errorReorder Custom Fields of an Object
Parameters
- accept string (default "application/json") -
post api/v2/custom_objects/[string custom_object_key]/jobs
function post api/v2/custom_objects/[string custom_object_key]/jobs(CustomObjectRecordsBulkCreateRequest payload, string accept) returns CustomObjectRecordsJobsResponse|errorCustom Object Record Bulk Jobs
Parameters
- payload CustomObjectRecordsBulkCreateRequest -
- accept string (default "application/json") -
Return Type
- CustomObjectRecordsJobsResponse|error - Created
get api/v2/custom_objects/[string custom_object_key]/limits/field_limit
function get api/v2/custom_objects/[string custom_object_key]/limits/field_limit(string accept) returns CustomObjectLimitsResponse|errorCustom Object Fields Limit
Parameters
- accept string (default "application/json") -
Return Type
- CustomObjectLimitsResponse|error - Success response
get api/v2/custom_objects/[string custom_object_key]/records
function get api/v2/custom_objects/[string custom_object_key]/records(string accept, string? filterIds, string? filterExternal_ids, string? sort, string? pageBefore, string? pageAfter, int? pageSize) returns CustomObjectRecordsResponse|errorList Custom Object Records
Parameters
- accept string (default "application/json") -
- filterIds string? (default ()) - Optional comma-separated list of ids to filter records by. If one or more ids are specified, only matching records are returned. The ids must be unique and are case sensitive.
- filterExternal_ids string? (default ()) - Optional comma-separated list of external ids to filter records by. If one or more ids are specified, only matching records are returned. The ids must be unique and are case sensitive.
- sort string? (default ()) - One of
id,updated_at,-id, or-updated_at. The-denotes the sort will be descending.
- pageBefore string? (default ()) - A pagination cursor that tells the endpoint which page to start on. It should be a
meta.before_cursorvalue from a previous request. Note:page[before]andpage[after]can't be used together in the same request.
- pageAfter string? (default ()) - A pagination cursor that tells the endpoint which page to start on. It should be a
meta.after_cursorvalue from a previous request. Note:page[before]andpage[after]can't be used together in the same request.
- pageSize int? (default ()) - Specifies how many records should be returned in the response. You can specify up to 100 records per page.
Return Type
- CustomObjectRecordsResponse|error - Success response
post api/v2/custom_objects/[string custom_object_key]/records
function post api/v2/custom_objects/[string custom_object_key]/records(CustomObjectRecordsCreateRequest payload, string accept) returns CustomObjectRecordResponse|errorCreate Custom Object Record
Return Type
- CustomObjectRecordResponse|error - Created
delete api/v2/custom_objects/[string custom_object_key]/records
function delete api/v2/custom_objects/[string custom_object_key]/records(string external_id, string accept) returns error?Delete Custom Object Record by External Id
Parameters
- external_id string - The external id of a custom object record
- accept string (default "application/json") -
Return Type
- error? - No content response
patch api/v2/custom_objects/[string custom_object_key]/records
function patch api/v2/custom_objects/[string custom_object_key]/records(string external_id, CustomObjectRecordsUpsertRequest payload, string accept) returns CustomObjectRecordResponse|errorSet Custom Object Record by External Id
Parameters
- external_id string - The external id of a custom object record
- payload CustomObjectRecordsUpsertRequest -
- accept string (default "application/json") -
Return Type
- CustomObjectRecordResponse|error - Success
get api/v2/custom_objects/[string custom_object_key]/records/[string custom_object_record_id]
function get api/v2/custom_objects/[string custom_object_key]/records/[string custom_object_record_id](string accept) returns CustomObjectRecordResponse|errorShow Custom Object Record
Parameters
- accept string (default "application/json") -
Return Type
- CustomObjectRecordResponse|error - Custom Object Record
delete api/v2/custom_objects/[string custom_object_key]/records/[string custom_object_record_id]
function delete api/v2/custom_objects/[string custom_object_key]/records/[string custom_object_record_id](string accept) returns error?Delete Custom Object Record
Parameters
- accept string (default "application/json") -
Return Type
- error? - No content response
patch api/v2/custom_objects/[string custom_object_key]/records/[string custom_object_record_id]
function patch api/v2/custom_objects/[string custom_object_key]/records/[string custom_object_record_id](string accept) returns CustomObjectRecordResponse|errorUpdate Custom Object Record
Parameters
- accept string (default "application/json") -
Return Type
- CustomObjectRecordResponse|error - Success response
get api/v2/custom_objects/[string custom_object_key]/records/autocomplete
function get api/v2/custom_objects/[string custom_object_key]/records/autocomplete(string accept, string? name, string? pageBefore, string? pageAfter, int? pageSize, string? field_id, string? 'source) returns CustomObjectRecordsResponse|errorAutocomplete Custom Object Record Search
Parameters
- accept string (default "application/json") -
- name string? (default ()) - Part of a name of the record you are searching for
- pageBefore string? (default ()) - A pagination cursor that tells the endpoint which page to start on. It should be a
meta.before_cursorvalue from a previous request. Note:page[before]andpage[after]can't be used together in the same request.
- pageAfter string? (default ()) - A pagination cursor that tells the endpoint which page to start on. It should be a
meta.after_cursorvalue from a previous request. Note:page[before]andpage[after]can't be used together in the same request.
- pageSize int? (default ()) - The number of records to return in the response. You can specify up to 100 records per page.
- field_id string? (default ()) - The id of the lookup field. If the field has a relationship filter, the filter is applied to the results. Must be used with
sourceparam.
- 'source string? (default ()) - One of "zen:user", "zen:ticket", "zen:organization", or "zen:custom_object:CUSTOM_OBJECT_KEY". Represents the object
field_idbelongs to. Must be used with field_id param.
Return Type
- CustomObjectRecordsResponse|error - Success response
get api/v2/custom_objects/[string custom_object_key]/records/count
function get api/v2/custom_objects/[string custom_object_key]/records/count(string accept) returns Inline_response_200_1|errorCount Custom Object Records
Parameters
- accept string (default "application/json") -
Return Type
- Inline_response_200_1|error - Success response
get api/v2/custom_objects/[string custom_object_key]/records/search
function get api/v2/custom_objects/[string custom_object_key]/records/search(string accept, string? query, string? sort, string? pageBefore, string? pageAfter, int? pageSize) returns CustomObjectRecordsResponse|errorSearch Custom Object Records
Parameters
- accept string (default "application/json") -
- query string? (default ()) - The query parameter is used to search text-based fields for records that match specific query terms.
The query can be multiple words or numbers. Every record that matches the beginning of any word or number in the query string is returned.<br/><br/>
For example, you might want to search for records related to Tesla vehicles:
query=Tesla. In this example the API would return every record for the given custom object where any of the text fields contain the word 'Tesla'.<br/><br/> If needed, you could include multiple words or numbers in your search. For example:query=Tesla Honda 2020. This would be URL encoded asquery=Tesla%20Honda%202020. In this example, the API would return every record for the custom object for which any of the text fields contained 'Tesla', 'Honda', or '2020'.
- sort string? (default ()) - One of
name,created_at,updated_at,-name,-created_at, or-updated_at. The-denotes the sort will be descending. Defaults to sorting by relevance.
- pageBefore string? (default ()) - A pagination cursor that tells the endpoint which page to start on. It should be a
meta.before_cursorvalue from a previous request. Note:page[before]andpage[after]can't be used together in the same request.
- pageAfter string? (default ()) - A pagination cursor that tells the endpoint which page to start on. It should be a
meta.after_cursorvalue from a previous request. Note:page[before]andpage[after]can't be used together in the same request.
- pageSize int? (default ()) - Specifies how many records should be returned in the response. You can specify up to 100 records per page.
Return Type
- CustomObjectRecordsResponse|error - Success response
get api/v2/custom_objects/limits/object_limit
function get api/v2/custom_objects/limits/object_limit() returns CustomObjectLimitsResponse|errorCustom Objects Limit
Return Type
- CustomObjectLimitsResponse|error - Success response
get api/v2/custom_objects/limits/record_limit
function get api/v2/custom_objects/limits/record_limit() returns CustomObjectLimitsResponse|errorCustom Object Records Limit
Return Type
- CustomObjectLimitsResponse|error - Success response
get api/v2/custom_roles
function get api/v2/custom_roles() returns CustomRolesResponse|errorList Custom Roles
Return Type
- CustomRolesResponse|error - Success response
post api/v2/custom_roles
function post api/v2/custom_roles() returns CustomRoleResponse|errorCreate Custom Role
Return Type
- CustomRoleResponse|error - Created response
get api/v2/custom_roles/[int custom_role_id]
function get api/v2/custom_roles/[int custom_role_id](string accept) returns CustomRoleResponse|errorShow Custom Role
Parameters
- accept string (default "application/json") -
Return Type
- CustomRoleResponse|error - Success response
put api/v2/custom_roles/[int custom_role_id]
function put api/v2/custom_roles/[int custom_role_id](string accept) returns CustomRoleResponse|errorUpdate Custom Role
Parameters
- accept string (default "application/json") -
Return Type
- CustomRoleResponse|error - Success response
delete api/v2/custom_roles/[int custom_role_id]
Delete Custom Role
Parameters
- accept string (default "application/json") -
Return Type
- error? - No Contetnt response
put api/v2/custom_status/default
function put api/v2/custom_status/default(BulkUpdateDefaultCustomStatusRequest payload) returns BulkUpdateDefaultCustomStatusResponse|errorBulk Update Default Custom Ticket Status
Parameters
- payload BulkUpdateDefaultCustomStatusRequest -
Return Type
- BulkUpdateDefaultCustomStatusResponse|error - Updated
get api/v2/custom_statuses
function get api/v2/custom_statuses(string accept, string? status_categories, boolean? active, boolean? default) returns CustomStatusesResponse|errorList Custom Ticket Statuses
Parameters
- accept string (default "application/json") -
- status_categories string? (default ()) - Filter the list of custom ticket statuses by a comma-separated list of status categories
- active boolean? (default ()) - If true, show only active custom ticket statuses. If false, show only inactive custom ticket statuses. If the filter is not used, show all custom ticket statuses
- default boolean? (default ()) - If true, show only default custom ticket statuses. If false, show only non-default custom ticket statuses. If the filter is not used, show all custom ticket statuses
Return Type
- CustomStatusesResponse|error - List custom ticket statuses
post api/v2/custom_statuses
function post api/v2/custom_statuses(CustomStatusCreateRequest payload) returns CustomStatusResponse|errorCreate Custom Ticket Status
Parameters
- payload CustomStatusCreateRequest -
Return Type
- CustomStatusResponse|error - Created
get api/v2/custom_statuses/[int custom_status_id]
function get api/v2/custom_statuses/[int custom_status_id](string accept) returns CustomStatusResponse|errorShow Custom Ticket Status
Parameters
- accept string (default "application/json") -
Return Type
- CustomStatusResponse|error - Custom Status
put api/v2/custom_statuses/[int custom_status_id]
function put api/v2/custom_statuses/[int custom_status_id](CustomStatusUpdateRequest payload, string accept) returns CustomStatusResponse|errorUpdate Custom Ticket Status
Return Type
- CustomStatusResponse|error - Updated
get api/v2/deleted_tickets
function get api/v2/deleted_tickets(string accept, "id"|"subject"|"deleted_at"? sort_by, "asc"|"desc"? sort_order) returns ListDeletedTicketsResponse|errorList Deleted Tickets
Parameters
- accept string (default "application/json") -
- sort_by "id"|"subject"|"deleted_at"? (default ()) - Sort by
- sort_order "asc"|"desc"? (default ()) - Sort order. Defaults to "asc"
Return Type
- ListDeletedTicketsResponse|error - Successful response
delete api/v2/deleted_tickets/[int ticket_id]
function delete api/v2/deleted_tickets/[int ticket_id](string accept) returns JobStatusResponse|errorDelete Ticket Permanently
Parameters
- accept string (default "application/json") -
Return Type
- JobStatusResponse|error - Successful response
put api/v2/deleted_tickets/[int ticket_id]/restore
Restore a Previously Deleted Ticket
Parameters
- accept string (default "application/json") -
delete api/v2/deleted_tickets/destroy_many
function delete api/v2/deleted_tickets/destroy_many(string ids, string accept) returns JobStatusResponse|errorDelete Multiple Tickets Permanently
Parameters
- ids string - Comma-separated list of ticket ids
- accept string (default "application/json") -
Return Type
- JobStatusResponse|error - Successful response
put api/v2/deleted_tickets/restore_many
Restore Previously Deleted Tickets in Bulk
Parameters
- ids string - Comma-separated list of ticket ids
- accept string (default "application/json") -
get api/v2/deleted_users
function get api/v2/deleted_users() returns DeletedUsersResponse|errorList Deleted Users
Return Type
- DeletedUsersResponse|error - Success response
get api/v2/deleted_users/[int deleted_user_id]
function get api/v2/deleted_users/[int deleted_user_id](string accept) returns DeletedUserResponse|errorShow Deleted User
Parameters
- accept string (default "application/json") -
Return Type
- DeletedUserResponse|error - Success response
delete api/v2/deleted_users/[int deleted_user_id]
function delete api/v2/deleted_users/[int deleted_user_id](string accept) returns DeletedUserResponse|errorPermanently Delete User
Parameters
- accept string (default "application/json") -
Return Type
- DeletedUserResponse|error - Success response
get api/v2/deleted_users/count
function get api/v2/deleted_users/count() returns CountResponse|errorCount Deleted Users
Return Type
- CountResponse|error - Success response
get api/v2/dynamic_content/items
function get api/v2/dynamic_content/items() returns DynamicContentsResponse|errorList Items
Return Type
- DynamicContentsResponse|error - Success response
post api/v2/dynamic_content/items
function post api/v2/dynamic_content/items() returns DynamicContentResponse|errorCreate Item
Return Type
- DynamicContentResponse|error - Created response
get api/v2/dynamic_content/items/[int dynamic_content_item_id]
function get api/v2/dynamic_content/items/[int dynamic_content_item_id](string accept) returns DynamicContentResponse|errorShow Item
Parameters
- accept string (default "application/json") -
Return Type
- DynamicContentResponse|error - Success response
put api/v2/dynamic_content/items/[int dynamic_content_item_id]
function put api/v2/dynamic_content/items/[int dynamic_content_item_id](string accept) returns DynamicContentResponse|errorUpdate Item
Parameters
- accept string (default "application/json") -
Return Type
- DynamicContentResponse|error - Success response
delete api/v2/dynamic_content/items/[int dynamic_content_item_id]
function delete api/v2/dynamic_content/items/[int dynamic_content_item_id](string accept) returns error?Delete Item
Parameters
- accept string (default "application/json") -
Return Type
- error? - No Content response
get api/v2/dynamic_content/items/[int dynamic_content_item_id]/variants
function get api/v2/dynamic_content/items/[int dynamic_content_item_id]/variants(string accept) returns DynamicContentVariantsResponse|errorList Variants
Parameters
- accept string (default "application/json") -
Return Type
- DynamicContentVariantsResponse|error - Success response
post api/v2/dynamic_content/items/[int dynamic_content_item_id]/variants
function post api/v2/dynamic_content/items/[int dynamic_content_item_id]/variants(string accept) returns DynamicContentVariantResponse|errorCreate Variant
Parameters
- accept string (default "application/json") -
Return Type
- DynamicContentVariantResponse|error - Created response
get api/v2/dynamic_content/items/[int dynamic_content_item_id]/variants/[int dynammic_content_variant_id]
function get api/v2/dynamic_content/items/[int dynamic_content_item_id]/variants/[int dynammic_content_variant_id](string accept) returns DynamicContentVariantResponse|errorShow Variant
Parameters
- accept string (default "application/json") -
Return Type
- DynamicContentVariantResponse|error - Success response
put api/v2/dynamic_content/items/[int dynamic_content_item_id]/variants/[int dynammic_content_variant_id]
function put api/v2/dynamic_content/items/[int dynamic_content_item_id]/variants/[int dynammic_content_variant_id](string accept) returns DynamicContentVariantResponse|errorUpdate Variant
Parameters
- accept string (default "application/json") -
Return Type
- DynamicContentVariantResponse|error - Success response
delete api/v2/dynamic_content/items/[int dynamic_content_item_id]/variants/[int dynammic_content_variant_id]
function delete api/v2/dynamic_content/items/[int dynamic_content_item_id]/variants/[int dynammic_content_variant_id](string accept) returns error?Delete Variant
Parameters
- accept string (default "application/json") -
Return Type
- error? - No Content response
post api/v2/dynamic_content/items/[int dynamic_content_item_id]/variants/create_many
function post api/v2/dynamic_content/items/[int dynamic_content_item_id]/variants/create_many(string accept) returns DynamicContentVariantsResponse|errorCreate Many Variants
Parameters
- accept string (default "application/json") -
Return Type
- DynamicContentVariantsResponse|error - Created response
put api/v2/dynamic_content/items/[int dynamic_content_item_id]/variants/update_many
function put api/v2/dynamic_content/items/[int dynamic_content_item_id]/variants/update_many(string accept) returns DynamicContentVariantsResponse|errorUpdate Many Variants
Parameters
- accept string (default "application/json") -
Return Type
- DynamicContentVariantsResponse|error - Success response
get api/v2/dynamic_content/items/show_many
function get api/v2/dynamic_content/items/show_many(string accept, string? identifiers) returns DynamicContentsResponse|errorShow Many Items
Parameters
- accept string (default "application/json") -
- identifiers string? (default ()) - Identifiers for the dynamic contents
Return Type
- DynamicContentsResponse|error - Success response
get api/v2/group_memberships
function get api/v2/group_memberships() returns GroupMembershipsResponse|errorList Memberships
Return Type
- GroupMembershipsResponse|error - Success response
post api/v2/group_memberships
function post api/v2/group_memberships() returns GroupMembershipResponse|errorCreate Membership
Return Type
- GroupMembershipResponse|error - Created response
get api/v2/group_memberships/[int group_membership_id]
function get api/v2/group_memberships/[int group_membership_id](string accept) returns GroupMembershipResponse|errorShow Membership
Parameters
- accept string (default "application/json") -
Return Type
- GroupMembershipResponse|error - Success response
delete api/v2/group_memberships/[int group_membership_id]
Delete Membership
Parameters
- accept string (default "application/json") -
Return Type
- error? - No content response
get api/v2/group_memberships/assignable
function get api/v2/group_memberships/assignable() returns GroupMembershipsResponse|errorList Assignable Memberships
Return Type
- GroupMembershipsResponse|error - Success response
post api/v2/group_memberships/create_many
function post api/v2/group_memberships/create_many() returns JobStatusResponse|errorBulk Create Memberships
Return Type
- JobStatusResponse|error - Success response
delete api/v2/group_memberships/destroy_many
function delete api/v2/group_memberships/destroy_many(string accept, string? ids) returns JobStatusResponse|errorBulk Delete Memberships
Parameters
- accept string (default "application/json") -
- ids string? (default ()) - Id of the group memberships to delete. Comma separated
Return Type
- JobStatusResponse|error - Success response
get api/v2/group_slas/policies
function get api/v2/group_slas/policies() returns GroupSLAPoliciesResponse|errorList Group SLA Policies
Return Type
- GroupSLAPoliciesResponse|error - Success response
post api/v2/group_slas/policies
function post api/v2/group_slas/policies() returns GroupSLAPolicyResponse|errorCreate Group SLA Policy
Return Type
- GroupSLAPolicyResponse|error - Created response
get api/v2/group_slas/policies/[int group_sla_policy_id]
function get api/v2/group_slas/policies/[int group_sla_policy_id](string accept) returns GroupSLAPolicyResponse|errorShow Group SLA Policy
Parameters
- accept string (default "application/json") -
Return Type
- GroupSLAPolicyResponse|error - Success response
put api/v2/group_slas/policies/[int group_sla_policy_id]
function put api/v2/group_slas/policies/[int group_sla_policy_id](string accept) returns GroupSLAPolicyResponse|errorUpdate Group SLA Policy
Parameters
- accept string (default "application/json") -
Return Type
- GroupSLAPolicyResponse|error - Success response
delete api/v2/group_slas/policies/[int group_sla_policy_id]
Delete Group SLA Policy
Parameters
- accept string (default "application/json") -
Return Type
- error? - No Content response
get api/v2/group_slas/policies/definitions
function get api/v2/group_slas/policies/definitions() returns GroupSLAPolicyFilterDefinitionResponse|errorRetrieve Supported Filter Definition Items
Return Type
- GroupSLAPolicyFilterDefinitionResponse|error - Success response
put api/v2/group_slas/policies/reorder
function put api/v2/group_slas/policies/reorder(string accept, string[]? group_sla_policy_ids) returns string|errorReorder Group SLA Policies
Parameters
- accept string (default "application/json") -
- group_sla_policy_ids string[]? (default ()) - The ids of the Group SLA policies to reorder
get api/v2/groups
function get api/v2/groups(string accept, boolean? exclude_deleted) returns GroupsResponse|errorList Groups
Parameters
- accept string (default "application/json") -
- exclude_deleted boolean? (default ()) - Whether to exclude deleted entities
Return Type
- GroupsResponse|error - Success response
post api/v2/groups
function post api/v2/groups() returns GroupResponse|errorCreate Group
Return Type
- GroupResponse|error - Created response
get api/v2/groups/[int group_id]
function get api/v2/groups/[int group_id](string accept) returns GroupResponse|errorShow Group
Parameters
- accept string (default "application/json") -
Return Type
- GroupResponse|error - Success response
put api/v2/groups/[int group_id]
function put api/v2/groups/[int group_id](string accept) returns GroupResponse|errorUpdate Group
Parameters
- accept string (default "application/json") -
Return Type
- GroupResponse|error - Success response
delete api/v2/groups/[int group_id]
Delete Group
Parameters
- accept string (default "application/json") -
Return Type
- error? - No content response
get api/v2/groups/[int group_id]/memberships
function get api/v2/groups/[int group_id]/memberships(string accept) returns GroupMembershipsResponse|errorList Memberships
Parameters
- accept string (default "application/json") -
Return Type
- GroupMembershipsResponse|error - Success response
get api/v2/groups/assignable
function get api/v2/groups/assignable() returns GroupsResponse|errorList Assignable Groups
Return Type
- GroupsResponse|error - Success response
get api/v2/groups/count
function get api/v2/groups/count(string accept) returns GroupsCountObject|errorCount Groups
Parameters
- accept string (default "application/json") -
Return Type
- GroupsCountObject|error - Success response
post api/v2/imports/tickets
function post api/v2/imports/tickets(TicketImportRequest payload, string accept, boolean? archive_immediately) returns TicketResponse|errorTicket Import
Parameters
- payload TicketImportRequest -
- accept string (default "application/json") -
- archive_immediately boolean? (default ()) - If
true, any ticket created with aclosedstatus bypasses the normal ticket lifecycle and will be created directly in your ticket archive
Return Type
- TicketResponse|error - Successfully created
post api/v2/imports/tickets/create_many
function post api/v2/imports/tickets/create_many(TicketBulkImportRequest payload, string accept, boolean? archive_immediately) returns JobStatusResponse|errorTicket Bulk Import
Parameters
- payload TicketBulkImportRequest -
- accept string (default "application/json") -
- archive_immediately boolean? (default ()) - If
true, any ticket created with aclosedstatus bypasses the normal ticket lifecycle and will be created directly in your ticket archive
Return Type
- JobStatusResponse|error - Successful response
get api/v2/incremental/[string incremental_resource]/sample
function get api/v2/incremental/[string incremental_resource]/sample(int start_time, string accept) returns TimeBasedExportIncrementalTicketsResponse|errorIncremental Sample Export
Parameters
- start_time int - The time to start the incremental export from. Must be at least one minute in the past. Data isn't provided for the most recent minute
- accept string (default "application/json") -
Return Type
- TimeBasedExportIncrementalTicketsResponse|error - Success response
get api/v2/incremental/organizations
function get api/v2/incremental/organizations(int start_time, string accept) returns ExportIncrementalOrganizationsResponse|errorIncremental Organization Export
Parameters
- start_time int - The time to start the incremental export from. Must be at least one minute in the past. Data isn't provided for the most recent minute
- accept string (default "application/json") -
Return Type
- ExportIncrementalOrganizationsResponse|error - Success response
get api/v2/incremental/routing/attribute_values
function get api/v2/incremental/routing/attribute_values() returns IncrementalSkillBasedRouting|errorIncremental Attributes Values Export
Return Type
- IncrementalSkillBasedRouting|error - Success response
get api/v2/incremental/routing/attributes
function get api/v2/incremental/routing/attributes() returns IncrementalSkillBasedRouting|errorIncremental Attributes Export
Return Type
- IncrementalSkillBasedRouting|error - Success response
get api/v2/incremental/routing/instance_values
function get api/v2/incremental/routing/instance_values() returns IncrementalSkillBasedRouting|errorIncremental Instance Values Export
Return Type
- IncrementalSkillBasedRouting|error - Success response
get api/v2/incremental/ticket_events
function get api/v2/incremental/ticket_events(int start_time, string accept) returns ExportIncrementalTicketEventsResponse|errorIncremental Ticket Event Export
Parameters
- start_time int - The time to start the incremental export from. Must be at least one minute in the past. Data isn't provided for the most recent minute
- accept string (default "application/json") -
Return Type
- ExportIncrementalTicketEventsResponse|error - Success response
get api/v2/incremental/ticket_metric_events
function get api/v2/incremental/ticket_metric_events(int start_time, string accept) returns TicketMetricEventsResponse|errorList Ticket Metric Events
Parameters
- start_time int - The Unix UTC epoch time of the oldest event you're interested in. Example: 1332034771.
- accept string (default "application/json") -
Return Type
- TicketMetricEventsResponse|error - Successful response
get api/v2/incremental/tickets
function get api/v2/incremental/tickets(int start_time, string accept) returns TimeBasedExportIncrementalTicketsResponse|errorIncremental Ticket Export, Time Based
Parameters
- start_time int - The time to start the incremental export from. Must be at least one minute in the past. Data isn't provided for the most recent minute
- accept string (default "application/json") -
Return Type
- TimeBasedExportIncrementalTicketsResponse|error - Success response
get api/v2/incremental/tickets/cursor
function get api/v2/incremental/tickets/cursor(int start_time, string accept, string? cursor) returns CursorBasedExportIncrementalTicketsResponse|errorIncremental Ticket Export, Cursor Based
Parameters
- start_time int - The time to start the incremental export from. Must be at least one minute in the past. Data isn't provided for the most recent minute
- accept string (default "application/json") -
- cursor string? (default ()) - The cursor pointer to work with for all subsequent exports after the initial request
Return Type
- CursorBasedExportIncrementalTicketsResponse|error - Success response
get api/v2/incremental/users
function get api/v2/incremental/users(int start_time, string accept, int? per_page) returns TimeBasedExportIncrementalUsersResponse|errorIncremental User Export, Time Based
Parameters
- start_time int - The time to start the incremental export from. Must be at least one minute in the past. Data isn't provided for the most recent minute
- accept string (default "application/json") -
- per_page int? (default ()) - The number of records to return per page
Return Type
- TimeBasedExportIncrementalUsersResponse|error - Success response
get api/v2/incremental/users/cursor
function get api/v2/incremental/users/cursor(int start_time, string accept, string? cursor, int? per_page) returns CursorBasedExportIncrementalUsersResponse|errorIncremental User Export, Cursor Based
Parameters
- start_time int - The time to start the incremental export from. Must be at least one minute in the past. Data isn't provided for the most recent minute
- accept string (default "application/json") -
- cursor string? (default ()) - The cursor pointer to work with for all subsequent exports after the initial request
- per_page int? (default ()) - The number of records to return per page
Return Type
- CursorBasedExportIncrementalUsersResponse|error - Success response
get api/v2/job_statuses
function get api/v2/job_statuses() returns JobStatusesResponse|errorList Job Statuses
Return Type
- JobStatusesResponse|error - Success Response
get api/v2/job_statuses/[string job_status_id]
function get api/v2/job_statuses/[string job_status_id](string accept) returns JobStatusResponse|errorShow Job Status
Parameters
- accept string (default "application/json") -
Return Type
- JobStatusResponse|error - Success Response
get api/v2/job_statuses/show_many
function get api/v2/job_statuses/show_many(string ids, string accept) returns JobStatusesResponse|errorShow Many Job Statuses
Parameters
- ids string - Comma-separated list of job status ids.
- accept string (default "application/json") -
Return Type
- JobStatusesResponse|error - Success Response
get api/v2/locales
function get api/v2/locales() returns LocalesResponse|errorList Locales
Return Type
- LocalesResponse|error - Success response
get api/v2/locales/[string locale_id]
function get api/v2/locales/[string locale_id](string accept) returns LocaleResponse|errorShow Locale
Parameters
- accept string (default "application/json") -
Return Type
- LocaleResponse|error - Success Response
get api/v2/locales/agent
function get api/v2/locales/agent() returns LocalesResponse|errorList Locales for Agent
Return Type
- LocalesResponse|error - Success response
get api/v2/locales/current
function get api/v2/locales/current() returns LocaleResponse|errorShow Current Locale
Return Type
- LocaleResponse|error - Success response
get api/v2/locales/detect_best_locale
function get api/v2/locales/detect_best_locale() returns LocaleResponse|errorDetect Best Language for User
Return Type
- LocaleResponse|error - Success response
get api/v2/locales/'public
function get api/v2/locales/'public() returns LocalesResponse|errorList Available Public Locales
Return Type
- LocalesResponse|error - Success response
get api/v2/macros
function get api/v2/macros(string accept, string? include, string? access, boolean? active, int? category, int? group_id, boolean? only_viewable, string? sort_by, string? sort_order) returns MacrosResponse|errorList Macros
Parameters
- accept string (default "application/json") -
- access string? (default ()) - Filter macros by access. Possible values are "personal", "agents", "shared", or "account". The "agents" value returns all personal macros for the account's agents and is only available to admins.
- active boolean? (default ()) - Filter by active macros if true or inactive macros if false
- category int? (default ()) - Filter macros by category
- group_id int? (default ()) - Filter macros by group
- only_viewable boolean? (default ()) - If true, returns only macros that can be applied to tickets. If false, returns all macros the current user can manage. Default is false
- sort_by string? (default ()) - Possible values are alphabetical, "created_at", "updated_at", "usage_1h", "usage_24h", "usage_7d", or "usage_30d". Defaults to alphabetical
- sort_order string? (default ()) - One of "asc" or "desc". Defaults to "asc" for alphabetical and position sort, "desc" for all others
Return Type
- MacrosResponse|error - Success Response
post api/v2/macros
function post api/v2/macros(V2_macros_body payload) returns Inline_response_200_2|errorCreate Macro
Parameters
- payload V2_macros_body -
Return Type
get api/v2/macros/[int macro_id]
function get api/v2/macros/[int macro_id](string accept) returns MacroResponse|errorShow Macro
Parameters
- accept string (default "application/json") -
Return Type
- MacroResponse|error - Success Response
put api/v2/macros/[int macro_id]
function put api/v2/macros/[int macro_id](Macros_macro_id_body payload, string accept) returns Inline_response_200_2|errorUpdate Macro
Return Type
delete api/v2/macros/[int macro_id]
Delete Macro
Parameters
- accept string (default "application/json") -
Return Type
- error? - No Content
get api/v2/macros/[int macro_id]/apply
function get api/v2/macros/[int macro_id]/apply(string accept) returns MacroApplyTicketResponse|errorShow Changes to Ticket
Parameters
- accept string (default "application/json") -
Return Type
- MacroApplyTicketResponse|error - Success Response
get api/v2/macros/[int macro_id]/attachments
function get api/v2/macros/[int macro_id]/attachments(string accept) returns MacroAttachmentsResponse|errorList Macro Attachments
Parameters
- accept string (default "application/json") -
Return Type
- MacroAttachmentsResponse|error - Success Response
post api/v2/macros/[int macro_id]/attachments
function post api/v2/macros/[int macro_id]/attachments(string accept) returns MacroAttachmentResponse|errorCreate Macro Attachment
Parameters
- accept string (default "application/json") -
Return Type
- MacroAttachmentResponse|error - Success Response
get api/v2/macros/actions
function get api/v2/macros/actions() returns Inline_response_200_3|errorList Supported Actions for Macros
Return Type
- Inline_response_200_3|error - Success Response
get api/v2/macros/active
function get api/v2/macros/active(string accept, string? include, string? access, int? category, int? group_id, string? sort_by, string? sort_order) returns MacrosResponse|errorList Active Macros
Parameters
- accept string (default "application/json") -
- access string? (default ()) - Filter macros by access. Possible values are "personal", "agents", "shared", or "account". The "agents" value returns all personal macros for the account's agents and is only available to admins.
- category int? (default ()) - Filter macros by category
- group_id int? (default ()) - Filter macros by group
- sort_by string? (default ()) - Possible values are alphabetical, "created_at", "updated_at", "usage_1h", "usage_24h", "usage_7d", or "usage_30d". Defaults to alphabetical
- sort_order string? (default ()) - One of "asc" or "desc". Defaults to "asc" for alphabetical and position sort, "desc" for all others
Return Type
- MacrosResponse|error - Success Response
post api/v2/macros/attachments
function post api/v2/macros/attachments() returns MacroAttachmentResponse|errorCreate Unassociated Macro Attachment
Return Type
- MacroAttachmentResponse|error - Created Response
get api/v2/macros/attachments/[int attachment_id]
function get api/v2/macros/attachments/[int attachment_id](string accept) returns MacroAttachmentResponse|errorShow Macro Attachment
Parameters
- accept string (default "application/json") -
Return Type
- MacroAttachmentResponse|error - Success Response
get api/v2/macros/categories
function get api/v2/macros/categories() returns MacroCategoriesResponse|errorList Macro Categories
Return Type
- MacroCategoriesResponse|error - Success Response
get api/v2/macros/definitions
function get api/v2/macros/definitions() returns Inline_response_200_4|errorList Macro Action Definitions
Return Type
- Inline_response_200_4|error - Success Response
delete api/v2/macros/destroy_many
Bulk Delete Macros
Return Type
- error? - No Content
get api/v2/macros/'new
function get api/v2/macros/'new(int macro_id, int ticket_id, string accept) returns MacroResponse|errorShow Macro Replica
Parameters
- macro_id int - The ID of the macro to replicate
- ticket_id int - The ID of the ticket from which to build a macro replica
- accept string (default "application/json") -
Return Type
- MacroResponse|error - Success Response
get api/v2/macros/search
function get api/v2/macros/search(string query, string accept, string? include, string? access, boolean? active, int? category, int? group_id, boolean? only_viewable, string? sort_by, string? sort_order) returns MacrosResponse|errorSearch Macros
Parameters
- query string - Query string used to find macros with matching titles
- accept string (default "application/json") -
- access string? (default ()) - Filter macros by access. Possible values are "personal", "agents", "shared", or "account". The "agents" value returns all personal macros for the account's agents and is only available to admins.
- active boolean? (default ()) - Filter by active macros if true or inactive macros if false
- category int? (default ()) - Filter macros by category
- group_id int? (default ()) - Filter macros by group
- only_viewable boolean? (default ()) - If true, returns only macros that can be applied to tickets. If false, returns all macros the current user can manage. Default is false
- sort_by string? (default ()) - Possible values are alphabetical, "created_at", "updated_at", "usage_1h", "usage_24h", "usage_7d", or "usage_30d". Defaults to alphabetical
- sort_order string? (default ()) - One of "asc" or "desc". Defaults to "asc" for alphabetical and position sort, "desc" for all others
Return Type
- MacrosResponse|error - Success Response
put api/v2/macros/update_many
function put api/v2/macros/update_many(MacroUpdateManyInput payload) returns MacrosResponse|errorUpdate Many Macros
Parameters
- payload MacroUpdateManyInput -
Return Type
- MacrosResponse|error - Success Response
get api/v2/object_layouts/[string object_type]/essentials_card
function get api/v2/object_layouts/[string object_type]/essentials_card(string accept) returns EssentialsCardResponse|errorShow Essentials Card
Parameters
- accept string (default "application/json") -
Return Type
- EssentialsCardResponse|error - Success response
put api/v2/object_layouts/[string object_type]/essentials_card
function put api/v2/object_layouts/[string object_type]/essentials_card(string accept) returns EssentialsCardResponse|errorUpdate Essentials Card
Parameters
- accept string (default "application/json") -
Return Type
- EssentialsCardResponse|error - Success response
delete api/v2/object_layouts/[string object_type]/essentials_card
function delete api/v2/object_layouts/[string object_type]/essentials_card(string accept) returns error?Delete Essentials Card
Parameters
- accept string (default "application/json") -
Return Type
- error? - Success response
get api/v2/object_layouts/essentials_cards
function get api/v2/object_layouts/essentials_cards() returns EssentialsCardsResponse|errorList of Essentials Cards
Return Type
- EssentialsCardsResponse|error - Success response
get api/v2/organization_fields
function get api/v2/organization_fields() returns OrganizationFieldsResponse|errorList Organization Fields
Return Type
- OrganizationFieldsResponse|error - Success response
post api/v2/organization_fields
function post api/v2/organization_fields() returns OrganizationFieldResponse|errorCreate Organization Field
Return Type
- OrganizationFieldResponse|error - Created response
get api/v2/organization_fields/[Organization_field_id organization_field_id]
function get api/v2/organization_fields/[Organization_field_id organization_field_id](string accept) returns OrganizationFieldResponse|errorShow Organization Field
Parameters
- accept string (default "application/json") -
Return Type
- OrganizationFieldResponse|error - Success response
put api/v2/organization_fields/[Organization_field_id organization_field_id]
function put api/v2/organization_fields/[Organization_field_id organization_field_id](string accept) returns OrganizationFieldResponse|errorUpdate Organization Field
Parameters
- accept string (default "application/json") -
Return Type
- OrganizationFieldResponse|error - Success response
delete api/v2/organization_fields/[Organization_field_id organization_field_id]
function delete api/v2/organization_fields/[Organization_field_id organization_field_id](string accept) returns error?Delete Organization Field
Parameters
- accept string (default "application/json") -
Return Type
- error? - No Content response
put api/v2/organization_fields/reorder
Reorder Organization Field
get api/v2/organization_memberships
function get api/v2/organization_memberships() returns OrganizationMembershipsResponse|errorList Memberships
Return Type
- OrganizationMembershipsResponse|error - Success response
post api/v2/organization_memberships
function post api/v2/organization_memberships() returns OrganizationMembershipResponse|errorCreate Membership
Return Type
- OrganizationMembershipResponse|error - Created response
get api/v2/organization_memberships/[int organization_membership_id]
function get api/v2/organization_memberships/[int organization_membership_id](string accept) returns OrganizationMembershipResponse|errorShow Membership
Parameters
- accept string (default "application/json") -
Return Type
- OrganizationMembershipResponse|error - Success response
delete api/v2/organization_memberships/[int organization_membership_id]
function delete api/v2/organization_memberships/[int organization_membership_id](string accept) returns error?Delete Membership
Parameters
- accept string (default "application/json") -
Return Type
- error? - No Content response
post api/v2/organization_memberships/create_many
function post api/v2/organization_memberships/create_many() returns JobStatusResponse|errorCreate Many Memberships
Return Type
- JobStatusResponse|error - Success response
delete api/v2/organization_memberships/destroy_many
function delete api/v2/organization_memberships/destroy_many(string accept, int[]? ids) returns JobStatusResponse|errorBulk Delete Memberships
Parameters
- accept string (default "application/json") -
- ids int[]? (default ()) - The IDs of the organization memberships to delete
Return Type
- JobStatusResponse|error - Success response
get api/v2/organization_subscriptions
function get api/v2/organization_subscriptions() returns OrganizationSubscriptionsResponse|errorList Organization Subscriptions
Return Type
- OrganizationSubscriptionsResponse|error - Successful response
post api/v2/organization_subscriptions
function post api/v2/organization_subscriptions(OrganizationSubscriptionCreateRequest payload) returns OrganizationSubscriptionResponse|errorCreate Organization Subscription
Parameters
- payload OrganizationSubscriptionCreateRequest -
Return Type
- OrganizationSubscriptionResponse|error - Successful response
get api/v2/organization_subscriptions/[int organization_subscription_id]
function get api/v2/organization_subscriptions/[int organization_subscription_id](string accept) returns OrganizationSubscriptionResponse|errorShow Organization Subscription
Parameters
- accept string (default "application/json") -
Return Type
- OrganizationSubscriptionResponse|error - Successful response
delete api/v2/organization_subscriptions/[int organization_subscription_id]
function delete api/v2/organization_subscriptions/[int organization_subscription_id](string accept) returns error?Delete Organization Subscription
Parameters
- accept string (default "application/json") -
Return Type
- error? - No content
get api/v2/organizations
function get api/v2/organizations() returns OrganizationsResponse|errorList Organizations
Return Type
- OrganizationsResponse|error - Success response
post api/v2/organizations
function post api/v2/organizations() returns OrganizationResponse|errorCreate Organization
Return Type
- OrganizationResponse|error - Created
get api/v2/organizations/[int organization_id]
function get api/v2/organizations/[int organization_id](string accept) returns OrganizationResponse|errorShow Organization
Parameters
- accept string (default "application/json") -
Return Type
- OrganizationResponse|error - Success response
put api/v2/organizations/[int organization_id]
function put api/v2/organizations/[int organization_id](string accept) returns OrganizationResponse|errorUpdate Organization
Parameters
- accept string (default "application/json") -
Return Type
- OrganizationResponse|error - Success response
delete api/v2/organizations/[int organization_id]
Delete Organization
Parameters
- accept string (default "application/json") -
Return Type
- error? - No Content Response
get api/v2/organizations/[int organization_id]/related
function get api/v2/organizations/[int organization_id]/related(string accept) returns OrganizationsRelatedResponse|errorShow Organization's Related Information
Parameters
- accept string (default "application/json") -
Return Type
- OrganizationsRelatedResponse|error - Success response
get api/v2/organizations/autocomplete
function get api/v2/organizations/autocomplete(string name, string accept, string? field_id, string? 'source) returns OrganizationsResponse|errorAutocomplete Organizations
Parameters
- name string - A substring of an organization to search for
- accept string (default "application/json") -
- field_id string? (default ()) - The id of a lookup relationship field. The type of field is determined
by the
sourceparam
- 'source string? (default ()) - If a
field_idis provided, this specifies the type of the field. For example, if the field is on a "zen:user", it references a field on a user
Return Type
- OrganizationsResponse|error - Success response
get api/v2/organizations/count
function get api/v2/organizations/count() returns CountOrganizationResponse|errorCount Organizations
Return Type
- CountOrganizationResponse|error - Success response
post api/v2/organizations/create_many
function post api/v2/organizations/create_many() returns JobStatusResponse|errorCreate Many Organizations
Return Type
- JobStatusResponse|error - Success response
post api/v2/organizations/create_or_update
function post api/v2/organizations/create_or_update() returns OrganizationResponse|errorCreate Or Update Organization
Return Type
- OrganizationResponse|error - Success response
delete api/v2/organizations/destroy_many
function delete api/v2/organizations/destroy_many(string accept, string? ids, string? external_ids) returns JobStatusResponse|errorBulk Delete Organizations
Parameters
- accept string (default "application/json") -
- ids string? (default ()) - A list of organization ids
- external_ids string? (default ()) - A list of external ids
Return Type
- JobStatusResponse|error - Success response
get api/v2/organizations/search
function get api/v2/organizations/search(string accept, int? external_id, string? name) returns OrganizationsResponse|errorSearch Organizations
Parameters
- accept string (default "application/json") -
- external_id int? (default ()) - The external id of an organization
- name string? (default ()) - The name of an organization
Return Type
- OrganizationsResponse|error - Success response
get api/v2/organizations/show_many
function get api/v2/organizations/show_many(string accept, string? ids, string? external_ids) returns OrganizationsResponse|errorShow Many Organizations
Parameters
- accept string (default "application/json") -
- ids string? (default ()) - A list of organization ids
- external_ids string? (default ()) - A list of external ids
Return Type
- OrganizationsResponse|error - Success response
put api/v2/organizations/update_many
function put api/v2/organizations/update_many(string accept, string? ids, string? external_ids) returns JobStatusResponse|errorUpdate Many Organizations
Parameters
- accept string (default "application/json") -
- ids string? (default ()) - A list of organization ids
- external_ids string? (default ()) - A list of external ids
Return Type
- JobStatusResponse|error - Success response
get api/v2/problems
function get api/v2/problems() returns ListTicketProblemsResponse|errorList Ticket Problems
Return Type
- ListTicketProblemsResponse|error - Successful response
post api/v2/problems/autocomplete
function post api/v2/problems/autocomplete(Problems_autocomplete_body payload, string accept, string? text) returns ListTicketProblemsResponse|errorAutocomplete Problems
Parameters
- payload Problems_autocomplete_body -
- accept string (default "application/json") -
- text string? (default ()) - The text to search for
Return Type
- ListTicketProblemsResponse|error - Successful response
post api/v2/push_notification_devices/destroy_many
function post api/v2/push_notification_devices/destroy_many(PushNotificationDevicesRequest payload) returns string|errorBulk Unregister Push Notification Devices
Parameters
- payload PushNotificationDevicesRequest -
get api/v2/queues
function get api/v2/queues() returns QueuesResponse|errorList queues
Return Type
- QueuesResponse|error - Success response
post api/v2/queues
function post api/v2/queues() returns QueueResponse|errorCreate queue
Return Type
- QueueResponse|error - Created response
get api/v2/queues/[string queue_id]
function get api/v2/queues/[string queue_id](string accept) returns QueueResponse|errorShow Queue
Parameters
- accept string (default "application/json") -
Return Type
- QueueResponse|error - Success response
put api/v2/queues/[string queue_id]
function put api/v2/queues/[string queue_id](string accept) returns QueueResponse|errorUpdate queue
Parameters
- accept string (default "application/json") -
Return Type
- QueueResponse|error - Success response
delete api/v2/queues/[string queue_id]
Delete queue
Parameters
- accept string (default "application/json") -
Return Type
- error? - No content response
get api/v2/queues/definitions
function get api/v2/queues/definitions() returns DefinitionsResponse|errorList queue definitions
Return Type
- DefinitionsResponse|error - Success response
get api/v2/recipient_addresses
function get api/v2/recipient_addresses() returns SupportAddressesResponse|errorList Support Addresses
Return Type
- SupportAddressesResponse|error - Success response
post api/v2/recipient_addresses
function post api/v2/recipient_addresses() returns SupportAddressResponse|errorCreate Support Address
Return Type
- SupportAddressResponse|error - Created response
get api/v2/recipient_addresses/[int support_address_id]
function get api/v2/recipient_addresses/[int support_address_id](string accept) returns SupportAddressResponse|errorShow Support Address
Parameters
- accept string (default "application/json") -
Return Type
- SupportAddressResponse|error - Success response
put api/v2/recipient_addresses/[int support_address_id]
function put api/v2/recipient_addresses/[int support_address_id](string accept) returns SupportAddressResponse|errorUpdate Support Address
Parameters
- accept string (default "application/json") -
Return Type
- SupportAddressResponse|error - Success response
delete api/v2/recipient_addresses/[int support_address_id]
Delete Support Address
Parameters
- accept string (default "application/json") -
Return Type
- error? - No Content response
put api/v2/recipient_addresses/[int support_address_id]/verify
function put api/v2/recipient_addresses/[int support_address_id]/verify(string accept) returns string|errorVerify Support Address Forwarding
Parameters
- accept string (default "application/json") -
get api/v2/relationships/definitions/[string target_type]
function get api/v2/relationships/definitions/[string target_type](string accept, string? source_type) returns RelationshipFilterDefinitionResponse|errorFilter Definitions
Parameters
- accept string (default "application/json") -
- source_type string? (default ()) - The source type for which you would like to see filter definitions. The options are "zen:user", "zen:ticket", and "zen:organization"
Return Type
- RelationshipFilterDefinitionResponse|error - Success response
get api/v2/requests
function get api/v2/requests(string accept, string? sort_by, string? sort_order) returns RequestsResponse|errorList Requests
Parameters
- accept string (default "application/json") -
- sort_by string? (default ()) - Possible values are "updated_at", "created_at"
- sort_order string? (default ()) - One of "asc", "desc". Defaults to "asc"
Return Type
- RequestsResponse|error - Success response
post api/v2/requests
function post api/v2/requests() returns RequestResponse|errorCreate Request
Return Type
- RequestResponse|error - Created response
get api/v2/requests/[int request_id]
function get api/v2/requests/[int request_id](string accept) returns RequestResponse|errorShow Request
Parameters
- accept string (default "application/json") -
Return Type
- RequestResponse|error - Success response
put api/v2/requests/[int request_id]
function put api/v2/requests/[int request_id](string accept) returns RequestResponse|errorUpdate Request
Parameters
- accept string (default "application/json") -
Return Type
- RequestResponse|error - Success response
get api/v2/requests/[int request_id]/comments
function get api/v2/requests/[int request_id]/comments(string accept, string? since, string? role) returns TicketCommentsResponse|errorListing Comments
Parameters
- accept string (default "application/json") -
- since string? (default ()) - Filters the comments from the given datetime
- role string? (default ()) - One of "agent", "end_user". If not specified it does not filter
Return Type
- TicketCommentsResponse|error - Success response
get api/v2/requests/[int request_id]/comments/[int ticket_comment_id]
function get api/v2/requests/[int request_id]/comments/[int ticket_comment_id](string accept) returns TicketCommentResponse|errorGetting Comments
Parameters
- accept string (default "application/json") -
Return Type
- TicketCommentResponse|error - Success response
get api/v2/requests/search
function get api/v2/requests/search(string accept, string? query) returns RequestsResponse|errorSearch Requests
Parameters
- accept string (default "application/json") -
- query string? (default ()) - The syntax and matching logic for the string is detailed in the Zendesk Support search reference. See also Query basics in the Tickets API doc.
Return Type
- RequestsResponse|error - Success response
get api/v2/resource_collections
function get api/v2/resource_collections() returns ResourceCollectionsResponse|errorList Resource Collections
Return Type
- ResourceCollectionsResponse|error - Success response
post api/v2/resource_collections
function post api/v2/resource_collections() returns JobStatusResponse|errorCreate Resource Collection
Return Type
- JobStatusResponse|error - Success response
get api/v2/resource_collections/[int resource_collection_id]
function get api/v2/resource_collections/[int resource_collection_id](string accept) returns ResourceCollectionResponse|errorShow Resource Collection
Parameters
- accept string (default "application/json") -
Return Type
- ResourceCollectionResponse|error - Success response
put api/v2/resource_collections/[int resource_collection_id]
function put api/v2/resource_collections/[int resource_collection_id](string accept) returns JobStatusResponse|errorUpdate Resource Collection
Parameters
- accept string (default "application/json") -
Return Type
- JobStatusResponse|error - Success response
delete api/v2/resource_collections/[int resource_collection_id]
function delete api/v2/resource_collections/[int resource_collection_id](string accept) returns JobStatusResponse|errorDelete Resource Collection
Parameters
- accept string (default "application/json") -
Return Type
- JobStatusResponse|error - Success response
get api/v2/routing/agents/[int user_id]/instance_values
function get api/v2/routing/agents/[int user_id]/instance_values(string accept) returns SkillBasedRoutingAttributeValuesResponse|errorList Agent Attribute Values
Parameters
- accept string (default "application/json") -
Return Type
- SkillBasedRoutingAttributeValuesResponse|error - Success response
post api/v2/routing/agents/[int user_id]/instance_values
function post api/v2/routing/agents/[int user_id]/instance_values(string accept) returns SkillBasedRoutingAttributeValuesResponse|errorSet Agent Attribute Values
Parameters
- accept string (default "application/json") -
Return Type
- SkillBasedRoutingAttributeValuesResponse|error - Success response
get api/v2/routing/attributes
function get api/v2/routing/attributes() returns SkillBasedRoutingAttributesResponse|errorList Account Attributes
Return Type
- SkillBasedRoutingAttributesResponse|error - Success response
post api/v2/routing/attributes
function post api/v2/routing/attributes() returns SkillBasedRoutingAttributeResponse|errorCreate Attribute
Return Type
- SkillBasedRoutingAttributeResponse|error - Created response
get api/v2/routing/attributes/[string attribute_id]
function get api/v2/routing/attributes/[string attribute_id](string accept) returns SkillBasedRoutingAttributeResponse|errorShow Attribute
Parameters
- accept string (default "application/json") -
Return Type
- SkillBasedRoutingAttributeResponse|error - Success response
put api/v2/routing/attributes/[string attribute_id]
function put api/v2/routing/attributes/[string attribute_id](string accept) returns SkillBasedRoutingAttributeResponse|errorUpdate Attribute
Parameters
- accept string (default "application/json") -
Return Type
- SkillBasedRoutingAttributeResponse|error - Success response
delete api/v2/routing/attributes/[string attribute_id]
Delete Attribute
Parameters
- accept string (default "application/json") -
Return Type
- error? - No Content response
get api/v2/routing/attributes/[string attribute_id]/values
function get api/v2/routing/attributes/[string attribute_id]/values(string accept) returns SkillBasedRoutingAttributeValuesResponse|errorList Attribute Values for an Attribute
Parameters
- accept string (default "application/json") -
Return Type
- SkillBasedRoutingAttributeValuesResponse|error - Success response
post api/v2/routing/attributes/[string attribute_id]/values
function post api/v2/routing/attributes/[string attribute_id]/values(string accept) returns SkillBasedRoutingAttributeValueResponse|errorCreate Attribute Value
Parameters
- accept string (default "application/json") -
Return Type
- SkillBasedRoutingAttributeValueResponse|error - Created response
get api/v2/routing/attributes/[string attribute_id]/values/[string attribute_value_id]
function get api/v2/routing/attributes/[string attribute_id]/values/[string attribute_value_id](string accept) returns SkillBasedRoutingAttributeValueResponse|errorShow Attribute Value
Parameters
- accept string (default "application/json") -
Return Type
- SkillBasedRoutingAttributeValueResponse|error - Success response
delete api/v2/routing/attributes/[string attribute_id]/values/[string attribute_value_id]
function delete api/v2/routing/attributes/[string attribute_id]/values/[string attribute_value_id](string accept) returns error?Delete Attribute Value
Parameters
- accept string (default "application/json") -
Return Type
- error? - No Content response
patch api/v2/routing/attributes/[string attribute_id]/values/[string attribute_value_id]
function patch api/v2/routing/attributes/[string attribute_id]/values/[string attribute_value_id](string accept) returns SkillBasedRoutingAttributeValueResponse|errorUpdate Attribute Value
Parameters
- accept string (default "application/json") -
Return Type
- SkillBasedRoutingAttributeValueResponse|error - Success response
get api/v2/routing/attributes/definitions
function get api/v2/routing/attributes/definitions() returns SkillBasedRoutingAttributeDefinitions|errorList Routing Attribute Definitions
Return Type
- SkillBasedRoutingAttributeDefinitions|error - Success response
get api/v2/routing/requirements/fulfilled
function get api/v2/routing/requirements/fulfilled(int ticket_ids, string accept) returns SkillBasedRoutingTicketFulfilledResponse|errorList Tickets Fulfilled by a User
Parameters
- ticket_ids int - The IDs of the relevant tickets to check for matching attributes
- accept string (default "application/json") -
Return Type
- SkillBasedRoutingTicketFulfilledResponse|error - Success response
get api/v2/routing/tickets/[int ticket_id]/instance_values
function get api/v2/routing/tickets/[int ticket_id]/instance_values(string accept) returns SkillBasedRoutingAttributeValuesResponse|errorList Ticket Attribute Values
Parameters
- accept string (default "application/json") -
Return Type
- SkillBasedRoutingAttributeValuesResponse|error - Success response
post api/v2/routing/tickets/[int ticket_id]/instance_values
function post api/v2/routing/tickets/[int ticket_id]/instance_values(string accept) returns SkillBasedRoutingAttributeValuesResponse|errorSet Ticket Attribute Values
Parameters
- accept string (default "application/json") -
Return Type
- SkillBasedRoutingAttributeValuesResponse|error - Success response
get api/v2/satisfaction_ratings
function get api/v2/satisfaction_ratings(string accept) returns SatisfactionRatingsResponse|errorList Satisfaction Ratings
Parameters
- accept string (default "application/json") -
Return Type
- SatisfactionRatingsResponse|error - Success response
get api/v2/satisfaction_ratings/[int satisfaction_rating_id]
function get api/v2/satisfaction_ratings/[int satisfaction_rating_id](string accept) returns SatisfactionRatingResponse|errorShow Satisfaction Rating
Parameters
- accept string (default "application/json") -
Return Type
- SatisfactionRatingResponse|error - Success response
get api/v2/satisfaction_ratings/count
function get api/v2/satisfaction_ratings/count() returns SatisfactionRatingsCountResponse|errorCount Satisfaction Ratings
Return Type
- SatisfactionRatingsCountResponse|error - Count of satisfaction ratings
get api/v2/satisfaction_reasons
function get api/v2/satisfaction_reasons() returns SatisfactionReasonsResponse|errorList Reasons for Satisfaction Rating
Return Type
- SatisfactionReasonsResponse|error - Success response
get api/v2/satisfaction_reasons/[int satisfaction_reason_id]
function get api/v2/satisfaction_reasons/[int satisfaction_reason_id](string accept) returns SatisfactionReasonResponse|errorShow Reason for Satisfaction Rating
Parameters
- accept string (default "application/json") -
Return Type
- SatisfactionReasonResponse|error - Success response
get api/v2/search
function get api/v2/search(string query, string accept, string? sort_by, string? sort_order) returns SearchResponse|errorList Search Results
Parameters
- query string - The search query. See Query basics above. For details on the query syntax, see the Zendesk Support search reference
- accept string (default "application/json") -
- sort_by string? (default ()) - One of
updated_at,created_at,priority,status, orticket_type. Defaults to sorting by relevance
- sort_order string? (default ()) - One of
ascordesc. Defaults todesc
Return Type
- SearchResponse|error - Success response
get api/v2/search/count
function get api/v2/search/count(string query, string accept) returns SearchCountResponse|errorShow Results Count
Return Type
- SearchCountResponse|error - Success response
get api/v2/search/export
function get api/v2/search/export(string query, string accept, int? pageSize, string? filterType) returns SearchExportResponse|errorExport Search Results
Parameters
- query string - The search query. See Query basics above. For details on the query syntax, see the Zendesk Support search reference
- accept string (default "application/json") -
- pageSize int? (default ()) - The number of results shown in a page.
- filterType string? (default ()) - The object type returned by the export query. Can be
ticket,organization,user, orgroup.
Return Type
- SearchExportResponse|error - Success response
get api/v2/sessions
function get api/v2/sessions(string accept) returns SessionsResponse|errorList Sessions
Parameters
- accept string (default "application/json") -
Return Type
- SessionsResponse|error - Success response
get api/v2/sharing_agreements
function get api/v2/sharing_agreements() returns SharingAgreementsResponse|errorList Sharing Agreements
Return Type
- SharingAgreementsResponse|error - Success response
post api/v2/sharing_agreements
function post api/v2/sharing_agreements() returns SharingAgreementResponse|errorCreate Sharing Agreement
Return Type
- SharingAgreementResponse|error - Created response
get api/v2/sharing_agreements/[int sharing_agreement_id]
function get api/v2/sharing_agreements/[int sharing_agreement_id](string accept) returns SharingAgreementResponse|errorShow a Sharing Agreement
Parameters
- accept string (default "application/json") -
Return Type
- SharingAgreementResponse|error - Success response
put api/v2/sharing_agreements/[int sharing_agreement_id]
function put api/v2/sharing_agreements/[int sharing_agreement_id](string accept) returns SharingAgreementResponse|errorUpdate a Sharing Agreement
Parameters
- accept string (default "application/json") -
Return Type
- SharingAgreementResponse|error - Success response
delete api/v2/sharing_agreements/[int sharing_agreement_id]
Delete a Sharing Agreement
Parameters
- accept string (default "application/json") -
Return Type
- error? - No Content response
post api/v2/skips
function post api/v2/skips() returns TicketSkipCreation|errorRecord a New Skip for the Current User
Return Type
- TicketSkipCreation|error - Success response
get api/v2/slas/policies
function get api/v2/slas/policies() returns SLAPoliciesResponse|errorList SLA Policies
Return Type
- SLAPoliciesResponse|error - Success response
post api/v2/slas/policies
function post api/v2/slas/policies() returns SLAPolicyResponse|errorCreate SLA Policy
Return Type
- SLAPolicyResponse|error - Created response
get api/v2/slas/policies/[int sla_policy_id]
function get api/v2/slas/policies/[int sla_policy_id](string accept) returns SLAPolicyResponse|errorShow SLA Policy
Parameters
- accept string (default "application/json") -
Return Type
- SLAPolicyResponse|error - Success response
put api/v2/slas/policies/[int sla_policy_id]
function put api/v2/slas/policies/[int sla_policy_id](string accept) returns SLAPolicyResponse|errorUpdate SLA Policy
Parameters
- accept string (default "application/json") -
Return Type
- SLAPolicyResponse|error - Success response
delete api/v2/slas/policies/[int sla_policy_id]
Delete SLA Policy
Parameters
- accept string (default "application/json") -
Return Type
- error? - No Content response
get api/v2/slas/policies/definitions
function get api/v2/slas/policies/definitions() returns SLAPolicyFilterDefinitionResponse|errorRetrieve Supported Filter Definition Items
Return Type
- SLAPolicyFilterDefinitionResponse|error - Success response
put api/v2/slas/policies/reorder
function put api/v2/slas/policies/reorder(string accept, int[]? sla_policy_ids) returns string|errorReorder SLA Policies
Parameters
- accept string (default "application/json") -
- sla_policy_ids int[]? (default ()) - The IDs of the SLA Policies to reorder
get api/v2/suspended_tickets
function get api/v2/suspended_tickets(string accept, string? sort_by, string? sort_order) returns SuspendedTicketsResponse|errorList Suspended Tickets
Parameters
- accept string (default "application/json") -
- sort_by string? (default ()) - The field to sort the ticket by, being one of
author_email,cause,created_at, orsubject.
- sort_order string? (default ()) - The order in which to sort the suspended tickets. This can take value
ascordesc.
Return Type
- SuspendedTicketsResponse|error - Success response
get api/v2/suspended_tickets/[decimal id]
function get api/v2/suspended_tickets/[decimal id](string accept) returns SuspendedTicketsResponse|errorShow Suspended Ticket
Parameters
- accept string (default "application/json") -
Return Type
- SuspendedTicketsResponse|error - Success response
delete api/v2/suspended_tickets/[decimal id]
Delete Suspended Ticket
Parameters
- accept string (default "application/json") -
Return Type
- error? - No Content response
put api/v2/suspended_tickets/[decimal id]/recover
function put api/v2/suspended_tickets/[decimal id]/recover(string accept) returns RecoverSuspendedTicketResponse|errorRecover Suspended Ticket
Parameters
- accept string (default "application/json") -
Return Type
- RecoverSuspendedTicketResponse|error - Success response
post api/v2/suspended_tickets/attachments
function post api/v2/suspended_tickets/attachments(string accept) returns SuspendedTicketsAttachmentsResponse|errorSuspended Ticket Attachments
Parameters
- accept string (default "application/json") -
Return Type
- SuspendedTicketsAttachmentsResponse|error - Success response
delete api/v2/suspended_tickets/destroy_many
Delete Multiple Suspended Tickets
Parameters
- ids string - A comma separated list of ids of suspended tickets to delete.
- accept string (default "application/json") -
Return Type
- error? - No Content response
post api/v2/suspended_tickets/export
function post api/v2/suspended_tickets/export() returns SuspendedTicketsExportResponse|errorExport Suspended Tickets
Return Type
put api/v2/suspended_tickets/recover_many
function put api/v2/suspended_tickets/recover_many(string ids, string accept) returns RecoverSuspendedTicketsResponse|errorRecover Multiple Suspended Tickets
Parameters
- ids string - A comma separated list of ids of suspended tickets to recover.
- accept string (default "application/json") -
Return Type
- RecoverSuspendedTicketsResponse|error - Success response
get api/v2/tags
function get api/v2/tags() returns TagsResponse|errorList Tags
Return Type
- TagsResponse|error - Success response
get api/v2/tags/count
function get api/v2/tags/count() returns TagCountResponse|errorCount Tags
Return Type
- TagCountResponse|error - Success response
get api/v2/target_failures
function get api/v2/target_failures() returns TargetFailuresResponse|errorList Target Failures
Return Type
- TargetFailuresResponse|error - Success response
get api/v2/target_failures/[int target_failure_id]
function get api/v2/target_failures/[int target_failure_id](string accept) returns TargetFailureResponse|errorShow Target Failure
Parameters
- accept string (default "application/json") -
Return Type
- TargetFailureResponse|error - Success response
get api/v2/targets
function get api/v2/targets() returns TargetsResponse|errorList Targets
Return Type
- TargetsResponse|error - Success response
post api/v2/targets
function post api/v2/targets() returns TargetResponse|errorCreate Target
Return Type
- TargetResponse|error - Created response
get api/v2/targets/[int target_id]
function get api/v2/targets/[int target_id](string accept) returns TargetResponse|errorShow Target
Parameters
- accept string (default "application/json") -
Return Type
- TargetResponse|error - Success response
put api/v2/targets/[int target_id]
function put api/v2/targets/[int target_id](string accept) returns TargetResponse|errorUpdate Target
Parameters
- accept string (default "application/json") -
Return Type
- TargetResponse|error - Success response
delete api/v2/targets/[int target_id]
Delete Target
Parameters
- accept string (default "application/json") -
Return Type
- error? - No Content response
get api/v2/ticket_audits
function get api/v2/ticket_audits(string accept, int? 'limit) returns TicketAuditsResponse|errorList All Ticket Audits
Parameters
- accept string (default "application/json") -
- 'limit int? (default ()) - Maximum number of results returned
Return Type
- TicketAuditsResponse|error - Success response
get api/v2/ticket_fields
function get api/v2/ticket_fields(string accept, string? locale, boolean? creator) returns TicketFieldsResponse|errorList Ticket Fields
Parameters
- accept string (default "application/json") -
- locale string? (default ()) - Forces the
title_in_portalproperty to return a dynamic content variant for the specified locale. Only accepts active locale ids. Example:locale="de".
- creator boolean? (default ()) - Displays the
creator_user_idandcreator_app_nameproperties. If the ticket field is created by an app,creator_app_nameis the name of the app andcreator_user_idis-1. If the ticket field is not created by an app,creator_app_nameis null
Return Type
- TicketFieldsResponse|error - Success response
post api/v2/ticket_fields
function post api/v2/ticket_fields() returns TicketFieldResponse|errorCreate Ticket Field
Return Type
- TicketFieldResponse|error - Created response
get api/v2/ticket_fields/[int ticket_field_id]
function get api/v2/ticket_fields/[int ticket_field_id](string accept, boolean? creator) returns TicketFieldResponse|errorShow Ticket Field
Parameters
- accept string (default "application/json") -
- creator boolean? (default ()) - If true, displays the
creator_user_idandcreator_app_nameproperties. If the ticket field is created by an app,creator_app_nameis the name of the app andcreator_user_idis-1. If the ticket field is not created by an app, thencreator_app_nameis null
Return Type
- TicketFieldResponse|error - Success response
put api/v2/ticket_fields/[int ticket_field_id]
function put api/v2/ticket_fields/[int ticket_field_id](string accept, boolean? creator) returns TicketFieldResponse|errorUpdate Ticket Field
Parameters
- accept string (default "application/json") -
- creator boolean? (default ()) - If true, displays the
creator_user_idandcreator_app_nameproperties. If the ticket field is created by an app,creator_app_nameis the name of the app andcreator_user_idis-1. If the ticket field is not created by an app, thencreator_app_nameis null
Return Type
- TicketFieldResponse|error - Success response
delete api/v2/ticket_fields/[int ticket_field_id]
function delete api/v2/ticket_fields/[int ticket_field_id](string accept, boolean? creator) returns error?Delete Ticket Field
Parameters
- accept string (default "application/json") -
- creator boolean? (default ()) - If true, displays the
creator_user_idandcreator_app_nameproperties. If the ticket field is created by an app,creator_app_nameis the name of the app andcreator_user_idis-1. If the ticket field is not created by an app, thencreator_app_nameis null
Return Type
- error? - No Content response
get api/v2/ticket_fields/[int ticket_field_id]/options
function get api/v2/ticket_fields/[int ticket_field_id]/options(string accept) returns CustomFieldOptionsResponse|errorList Ticket Field Options
Parameters
- accept string (default "application/json") -
Return Type
- CustomFieldOptionsResponse|error - Success response
post api/v2/ticket_fields/[int ticket_field_id]/options
function post api/v2/ticket_fields/[int ticket_field_id]/options(string accept) returns CustomFieldOptionResponse|errorCreate or Update Ticket Field Option
Parameters
- accept string (default "application/json") -
Return Type
- CustomFieldOptionResponse|error - Success response
get api/v2/ticket_fields/[int ticket_field_id]/options/[int ticket_field_option_id]
function get api/v2/ticket_fields/[int ticket_field_id]/options/[int ticket_field_option_id](string accept) returns CustomFieldOptionResponse|errorShow Ticket Field Option
Parameters
- accept string (default "application/json") -
Return Type
- CustomFieldOptionResponse|error - Success response
delete api/v2/ticket_fields/[int ticket_field_id]/options/[int ticket_field_option_id]
function delete api/v2/ticket_fields/[int ticket_field_id]/options/[int ticket_field_option_id](string accept) returns error?Delete Ticket Field Option
Parameters
- accept string (default "application/json") -
Return Type
- error? - No Content response
get api/v2/ticket_fields/count
function get api/v2/ticket_fields/count() returns TicketFieldCountResponse|errorCount Ticket Fields
Return Type
- TicketFieldCountResponse|error - Count of ticket fields
get api/v2/ticket_forms
function get api/v2/ticket_forms(string accept, boolean? active, boolean? end_user_visible, boolean? fallback_to_default, boolean? associated_to_brand) returns TicketFormsResponse|errorList Ticket Forms
Parameters
- accept string (default "application/json") -
- active boolean? (default ()) - true returns active ticket forms; false returns inactive ticket forms. If not present, returns both
- end_user_visible boolean? (default ()) - true returns ticket forms where
end_user_visible; false returns ticket forms that are not end-user visible. If not present, returns both
- fallback_to_default boolean? (default ()) - true returns the default ticket form when the criteria defined by the parameters results in a set without active and end-user visible ticket forms
- associated_to_brand boolean? (default ()) - true returns the ticket forms of the brand specified by the url's subdomain
Return Type
- TicketFormsResponse|error - Success response
post api/v2/ticket_forms
function post api/v2/ticket_forms() returns TicketFormResponse|errorCreate Ticket Form
Return Type
- TicketFormResponse|error - Created response
get api/v2/ticket_forms/[int ticket_form_id]
function get api/v2/ticket_forms/[int ticket_form_id](string accept) returns TicketFormResponse|errorShow Ticket Form
Parameters
- accept string (default "application/json") -
Return Type
- TicketFormResponse|error - Success response
put api/v2/ticket_forms/[int ticket_form_id]
function put api/v2/ticket_forms/[int ticket_form_id](string accept) returns TicketFormResponse|errorUpdate Ticket Form
Parameters
- accept string (default "application/json") -
Return Type
- TicketFormResponse|error - Success response
delete api/v2/ticket_forms/[int ticket_form_id]
Delete Ticket Form
Parameters
- accept string (default "application/json") -
Return Type
- error? - No Content response
post api/v2/ticket_forms/[int ticket_form_id]/clone
function post api/v2/ticket_forms/[int ticket_form_id]/clone(string accept) returns TicketFormResponse|errorClone an Already Existing Ticket Form
Parameters
- accept string (default "application/json") -
Return Type
- TicketFormResponse|error - Success response
put api/v2/ticket_forms/reorder
function put api/v2/ticket_forms/reorder() returns TicketFormsResponse|errorReorder Ticket Forms
Return Type
- TicketFormsResponse|error - Success response
get api/v2/ticket_forms/show_many
function get api/v2/ticket_forms/show_many(string ids, string accept, boolean? active, boolean? end_user_visible, boolean? fallback_to_default, boolean? associated_to_brand) returns TicketFormsResponse|errorShow Many Ticket Forms
Parameters
- ids string - IDs of the ticket forms to be shown
- accept string (default "application/json") -
- active boolean? (default ()) - true returns active ticket forms; false returns inactive ticket forms. If not present, returns both
- end_user_visible boolean? (default ()) - true returns ticket forms where
end_user_visible; false returns ticket forms that are not end-user visible. If not present, returns both
- fallback_to_default boolean? (default ()) - true returns the default ticket form when the criteria defined by the parameters results in a set without active and end-user visible ticket forms
- associated_to_brand boolean? (default ()) - true returns the ticket forms of the brand specified by the url's subdomain
Return Type
- TicketFormsResponse|error - Success response
get api/v2/ticket_metrics
function get api/v2/ticket_metrics() returns TicketMetricsResponse|errorList Ticket Metrics
Return Type
- TicketMetricsResponse|error - Success response
get api/v2/ticket_metrics/[string ticket_metric_id]
function get api/v2/ticket_metrics/[string ticket_metric_id](string accept) returns TicketMetricsByTicketMetricIdResponse|errorShow Ticket Metrics
Parameters
- accept string (default "application/json") -
Return Type
- TicketMetricsByTicketMetricIdResponse|error - Success response
get api/v2/tickets
function get api/v2/tickets(string accept, string? external_id) returns TicketsResponse|errorList Tickets
Parameters
- accept string (default "application/json") -
- external_id string? (default ()) - Lists tickets by external id. External ids don't have to be unique for each ticket. As a result, the request may return multiple tickets with the same external id.
Return Type
- TicketsResponse|error - List tickets
post api/v2/tickets
function post api/v2/tickets(TicketCreateRequest payload) returns TicketResponse|errorCreate Ticket
Parameters
- payload TicketCreateRequest -
Return Type
- TicketResponse|error - Create ticket
get api/v2/tickets/[int ticket_id]
function get api/v2/tickets/[int ticket_id](string accept) returns TicketResponse|errorShow Ticket
Parameters
- accept string (default "application/json") -
Return Type
- TicketResponse|error - Ticket
put api/v2/tickets/[int ticket_id]
function put api/v2/tickets/[int ticket_id](TicketUpdateRequest payload, string accept) returns TicketUpdateResponse|errorUpdate Ticket
Return Type
- TicketUpdateResponse|error - Successful request
delete api/v2/tickets/[int ticket_id]
Delete Ticket
Parameters
- accept string (default "application/json") -
Return Type
- error? - No content
get api/v2/tickets/[int ticket_id]/audits
function get api/v2/tickets/[int ticket_id]/audits(string accept) returns TicketAuditsResponseNoneCursor|errorList Audits for a Ticket
Parameters
- accept string (default "application/json") -
Return Type
- TicketAuditsResponseNoneCursor|error - OK response
get api/v2/tickets/[int ticket_id]/audits/[int ticket_audit_id]
function get api/v2/tickets/[int ticket_id]/audits/[int ticket_audit_id](string accept) returns TicketAuditResponse|errorShow Audit
Parameters
- accept string (default "application/json") -
Return Type
- TicketAuditResponse|error - OK response
put api/v2/tickets/[int ticket_id]/audits/[int ticket_audit_id]/make_private
function put api/v2/tickets/[int ticket_id]/audits/[int ticket_audit_id]/make_private(string accept) returns string|errorChange a Comment From Public To Private
Parameters
- accept string (default "application/json") -
get api/v2/tickets/[int ticket_id]/audits/count
function get api/v2/tickets/[int ticket_id]/audits/count(string accept) returns TicketAuditsCountResponse|errorCount Audits for a Ticket
Parameters
- accept string (default "application/json") -
Return Type
- TicketAuditsCountResponse|error - Count of audits on a ticket
get api/v2/tickets/[int ticket_id]/collaborators
function get api/v2/tickets/[int ticket_id]/collaborators(string accept) returns ListTicketCollaboratorsResponse|errorList Collaborators for a Ticket
Parameters
- accept string (default "application/json") -
Return Type
- ListTicketCollaboratorsResponse|error - Successful response
get api/v2/tickets/[int ticket_id]/comments
function get api/v2/tickets/[int ticket_id]/comments(string accept, boolean? include_inline_images, string? include) returns TicketCommentsResponse|errorList Comments
Parameters
- accept string (default "application/json") -
- include_inline_images boolean? (default ()) - Default is false. When true, inline images are also listed as attachments in the response
- include string? (default ()) - Accepts "users". Use this parameter to list email CCs by side-loading users. Example:
?include=users. Note: If the comment source is email, a deleted user will be represented as the CCd email address. If the comment source is anything else, a deleted user will be represented as the user name.
Return Type
- TicketCommentsResponse|error - Success response
put api/v2/tickets/[int ticket_id]/comments/[int comment_id]/attachments/[int attachment_id]/redact
function put api/v2/tickets/[int ticket_id]/comments/[int comment_id]/attachments/[int attachment_id]/redact(string accept) returns AttachmentResponse|errorRedact Comment Attachment
Parameters
- accept string (default "application/json") -
Return Type
- AttachmentResponse|error - OK response
put api/v2/tickets/[int ticket_id]/comments/[int ticket_comment_id]/make_private
function put api/v2/tickets/[int ticket_id]/comments/[int ticket_comment_id]/make_private(string accept) returns string|errorMake Comment Private
Parameters
- accept string (default "application/json") -
put api/v2/tickets/[int ticket_id]/comments/[int ticket_comment_id]/redact
function put api/v2/tickets/[int ticket_id]/comments/[int ticket_comment_id]/redact(string accept) returns TicketCommentResponse|errorRedact String in Comment
Parameters
- accept string (default "application/json") -
Return Type
- TicketCommentResponse|error - Success response
get api/v2/tickets/[int ticket_id]/comments/count
function get api/v2/tickets/[int ticket_id]/comments/count(string accept) returns TicketCommentsCountResponse|errorCount Ticket Comments
Parameters
- accept string (default "application/json") -
Return Type
- TicketCommentsCountResponse|error - Count of ticket comments
get api/v2/tickets/[int ticket_id]/email_ccs
function get api/v2/tickets/[int ticket_id]/email_ccs(string accept) returns ListTicketEmailCCsResponse|errorList Email CCs for a Ticket
Parameters
- accept string (default "application/json") -
Return Type
- ListTicketEmailCCsResponse|error - Successful response
get api/v2/tickets/[int ticket_id]/followers
function get api/v2/tickets/[int ticket_id]/followers(string accept) returns ListTicketFollowersResponse|errorList Followers for a Ticket
Parameters
- accept string (default "application/json") -
Return Type
- ListTicketFollowersResponse|error - Successful response
get api/v2/tickets/[int ticket_id]/incidents
function get api/v2/tickets/[int ticket_id]/incidents(string accept) returns ListTicketIncidentsResponse|errorList Ticket Incidents
Parameters
- accept string (default "application/json") -
Return Type
- ListTicketIncidentsResponse|error - Successful response
get api/v2/tickets/[int ticket_id]/macros/[int macro_id]/apply
function get api/v2/tickets/[int ticket_id]/macros/[int macro_id]/apply(string accept) returns MacroApplyTicketResponse|errorShow Ticket After Changes
Parameters
- accept string (default "application/json") -
Return Type
- MacroApplyTicketResponse|error - Success Response
put api/v2/tickets/[int ticket_id]/mark_as_spam
Mark Ticket as Spam and Suspend Requester
Parameters
- accept string (default "application/json") -
post api/v2/tickets/[int ticket_id]/merge
function post api/v2/tickets/[int ticket_id]/merge(TicketMergeInput payload, string accept) returns JobStatusResponse|errorMerge Tickets into Target Ticket
Return Type
- JobStatusResponse|error - Successful response
get api/v2/tickets/[int ticket_id]/related
function get api/v2/tickets/[int ticket_id]/related(string accept) returns TicketRelatedInformation|errorTicket Related Information
Parameters
- accept string (default "application/json") -
Return Type
- TicketRelatedInformation|error - Successful response
post api/v2/tickets/[int ticket_id]/satisfaction_rating
function post api/v2/tickets/[int ticket_id]/satisfaction_rating(string accept) returns SatisfactionRatingResponse|errorCreate a Satisfaction Rating
Parameters
- accept string (default "application/json") -
Return Type
- SatisfactionRatingResponse|error - Success response
get api/v2/tickets/[int ticket_id]/tags
function get api/v2/tickets/[int ticket_id]/tags(string accept) returns TagsByObjectIdResponse|errorList Resource Tags
Parameters
- accept string (default "application/json") -
Return Type
- TagsByObjectIdResponse|error - Success response
put api/v2/tickets/[int ticket_id]/tags
function put api/v2/tickets/[int ticket_id]/tags(string accept) returns TagsByObjectIdResponse|errorAdd Tags
Parameters
- accept string (default "application/json") -
Return Type
- TagsByObjectIdResponse|error - Success response
post api/v2/tickets/[int ticket_id]/tags
function post api/v2/tickets/[int ticket_id]/tags(string accept) returns TagsByObjectIdResponse|errorSet Tags
Parameters
- accept string (default "application/json") -
Return Type
- TagsByObjectIdResponse|error - Created response
delete api/v2/tickets/[int ticket_id]/tags
Remove Tags
Parameters
- accept string (default "application/json") -
Return Type
- error? - No Content response
get api/v2/tickets/count
function get api/v2/tickets/count() returns Inline_response_200_5|errorCount Tickets
Return Type
- Inline_response_200_5|error - Count of tickets
post api/v2/tickets/create_many
function post api/v2/tickets/create_many(TicketsCreateRequest payload) returns JobStatusResponse|errorCreate Many Tickets
Parameters
- payload TicketsCreateRequest -
Return Type
- JobStatusResponse|error - Create many tickets
delete api/v2/tickets/destroy_many
function delete api/v2/tickets/destroy_many(string ids, string accept) returns JobStatusResponse|errorBulk Delete Tickets
Parameters
- ids string - Comma-separated list of ticket ids
- accept string (default "application/json") -
Return Type
- JobStatusResponse|error - Successful response
put api/v2/tickets/mark_many_as_spam
function put api/v2/tickets/mark_many_as_spam(string ids, string accept) returns JobStatusResponse|errorBulk Mark Tickets as Spam
Parameters
- ids string - Comma-separated list of ticket ids
- accept string (default "application/json") -
Return Type
- JobStatusResponse|error - Successful response
get api/v2/tickets/show_many
function get api/v2/tickets/show_many(string ids, string accept) returns TicketsResponse|errorShow Multiple Tickets
Parameters
- ids string - Comma-separated list of ticket ids
- accept string (default "application/json") -
Return Type
- TicketsResponse|error - List tickets
put api/v2/tickets/update_many
function put api/v2/tickets/update_many(string accept, string? ids) returns JobStatusResponse|errorUpdate Many Tickets
Parameters
- accept string (default "application/json") -
- ids string? (default ()) - Comma-separated list of ticket ids
Return Type
- JobStatusResponse|error - Successful response
get api/v2/trigger_categories
function get api/v2/trigger_categories(string accept, Page? page, "position"|"-position"|"name"|"-name"|"created_at"|"-created_at"|"updated_at"|"-updated_at"? sort, "rule_counts"? include) returns Inline_response_200_6|errorList Trigger Categories
Parameters
- accept string (default "application/json") -
- page Page? (default ()) - Pagination parameters
- sort "position"|"-position"|"name"|"-name"|"created_at"|"-created_at"|"updated_at"|"-updated_at"? (default ()) - Sort parameters
- include "rule_counts"? (default ()) - Allowed sideloads
Return Type
- Inline_response_200_6|error - A paged array of trigger categories
post api/v2/trigger_categories
function post api/v2/trigger_categories(V2_trigger_categories_body payload) returns TriggerCategoryResponse|errorCreate Trigger Category
Parameters
- payload V2_trigger_categories_body -
Return Type
- TriggerCategoryResponse|error - The created trigger category
get api/v2/trigger_categories/[string trigger_category_id]
function get api/v2/trigger_categories/[string trigger_category_id](string accept) returns TriggerCategoryResponse|errorShow Trigger Category
Parameters
- accept string (default "application/json") -
Return Type
- TriggerCategoryResponse|error - The requested trigger category
delete api/v2/trigger_categories/[string trigger_category_id]
function delete api/v2/trigger_categories/[string trigger_category_id](string accept) returns Response|errorDelete Trigger Category
Parameters
- accept string (default "application/json") -
patch api/v2/trigger_categories/[string trigger_category_id]
function patch api/v2/trigger_categories/[string trigger_category_id](Trigger_categories_trigger_category_id_body payload, string accept) returns TriggerCategoryResponse|errorUpdate Trigger Category
Parameters
- accept string (default "application/json") -
Return Type
- TriggerCategoryResponse|error - The updated trigger category
post api/v2/trigger_categories/jobs
function post api/v2/trigger_categories/jobs(BatchJobRequest payload) returns BatchJobResponse|errorCreate Batch Job for Trigger Categories
Parameters
- payload BatchJobRequest -
Return Type
- BatchJobResponse|error - The response to the batch job
get api/v2/triggers
function get api/v2/triggers(string accept, boolean? active, string? sort, string? sort_by, string? sort_order, string? category_id) returns TriggersResponse|errorList Triggers
Parameters
- accept string (default "application/json") -
- active boolean? (default ()) - Filter by active triggers if true or inactive triggers if false
- sort string? (default ()) - Cursor-based pagination only. Possible values are "alphabetical", "created_at", "updated_at", or "position".
- sort_by string? (default ()) - Offset pagination only. Possible values are "alphabetical", "created_at", "updated_at", "usage_1h", "usage_24h", or "usage_7d". Defaults to "position"
- sort_order string? (default ()) - One of "asc" or "desc". Defaults to "asc" for alphabetical and position sort, "desc" for all others
- category_id string? (default ()) - Filter triggers by category ID
Return Type
- TriggersResponse|error - Success response
post api/v2/triggers
function post api/v2/triggers(TriggerWithCategoryRequest payload) returns TriggerResponse|errorCreate Trigger
Parameters
- payload TriggerWithCategoryRequest -
Return Type
- TriggerResponse|error - Created response
get api/v2/triggers/[int trigger_id]
function get api/v2/triggers/[int trigger_id](string accept) returns TriggerResponse|errorShow Trigger
Parameters
- accept string (default "application/json") -
Return Type
- TriggerResponse|error - Success response
put api/v2/triggers/[int trigger_id]
function put api/v2/triggers/[int trigger_id](TriggerWithCategoryRequest payload, string accept) returns TriggerResponse|errorUpdate Trigger
Return Type
- TriggerResponse|error - Success response
delete api/v2/triggers/[int trigger_id]
Delete Trigger
Parameters
- accept string (default "application/json") -
Return Type
- error? - No Content response
get api/v2/triggers/[int trigger_id]/revisions
function get api/v2/triggers/[int trigger_id]/revisions(string accept) returns TriggerRevisionsResponse|errorList Trigger Revisions
Parameters
- accept string (default "application/json") -
Return Type
- TriggerRevisionsResponse|error - Success response
get api/v2/triggers/[int trigger_id]/revisions/[int trigger_revision_id]
function get api/v2/triggers/[int trigger_id]/revisions/[int trigger_revision_id](string accept) returns TriggerRevisionResponse|errorShow Trigger Revision
Parameters
- accept string (default "application/json") -
Return Type
- TriggerRevisionResponse|error - Success response
get api/v2/triggers/active
function get api/v2/triggers/active(string accept, string? sort, string? sort_by, string? sort_order, string? category_id) returns TriggersResponse|errorList Active Triggers
Parameters
- accept string (default "application/json") -
- sort string? (default ()) - Cursor-based pagination only. Possible values are "alphabetical", "created_at", "updated_at", or "position".
- sort_by string? (default ()) - Offset pagination only. Possible values are "alphabetical", "created_at", "updated_at", "usage_1h", "usage_24h", or "usage_7d". Defaults to "position"
- sort_order string? (default ()) - One of "asc" or "desc". Defaults to "asc" for alphabetical and position sort, "desc" for all others
- category_id string? (default ()) - Filter triggers by category ID
Return Type
- TriggersResponse|error - Success response
get api/v2/triggers/definitions
function get api/v2/triggers/definitions() returns TriggerDefinitionResponse|errorList Trigger Action and Condition Definitions
Return Type
- TriggerDefinitionResponse|error - Success response
delete api/v2/triggers/destroy_many
Bulk Delete Triggers
Parameters
- ids string - A comma separated list of trigger IDs
- accept string (default "application/json") -
Return Type
- error? - No content response
put api/v2/triggers/reorder
function put api/v2/triggers/reorder() returns TriggerResponse|errorReorder Triggers
Return Type
- TriggerResponse|error - Success response
get api/v2/triggers/search
function get api/v2/triggers/search(string query, string accept, Filter? filter, boolean? active, string? sort, string? sort_by, string? sort_order, string? include) returns TriggersResponse|errorSearch Triggers
Parameters
- query string - Query string used to find all triggers with matching title
- accept string (default "application/json") -
- active boolean? (default ()) - Filter by active triggers if true or inactive triggers if false
- sort string? (default ()) - Cursor-based pagination only. Possible values are "alphabetical", "created_at", "updated_at", or "position".
- sort_by string? (default ()) - Offset pagination only. Possible values are "alphabetical", "created_at", "updated_at", "usage_1h", "usage_24h", or "usage_7d". Defaults to "position"
- sort_order string? (default ()) - One of "asc" or "desc". Defaults to "asc" for alphabetical and position sort, "desc" for all others
Return Type
- TriggersResponse|error - Success response
put api/v2/triggers/update_many
function put api/v2/triggers/update_many(TriggerBulkUpdateRequest payload) returns TriggersResponse|errorUpdate Many Triggers
Parameters
- payload TriggerBulkUpdateRequest -
Return Type
- TriggersResponse|error - Success response
post api/v2/uploads
function post api/v2/uploads() returns AttachmentUploadResponse|errorUpload Files
Return Type
- AttachmentUploadResponse|error - Created response
delete api/v2/uploads/[string token]
Delete Upload
Parameters
- accept string (default "application/json") -
Return Type
- error? - No Content response
get api/v2/user_fields
function get api/v2/user_fields() returns UserFieldsResponse|errorList User Fields
Return Type
- UserFieldsResponse|error - Success response
post api/v2/user_fields
function post api/v2/user_fields() returns UserFieldResponse|errorCreate User Field
Return Type
- UserFieldResponse|error - Created response
get api/v2/user_fields/[User_field_id user_field_id]
function get api/v2/user_fields/[User_field_id user_field_id](string accept) returns UserFieldResponse|errorShow User Field
Parameters
- accept string (default "application/json") -
Return Type
- UserFieldResponse|error - Success response
put api/v2/user_fields/[User_field_id user_field_id]
function put api/v2/user_fields/[User_field_id user_field_id](string accept) returns UserFieldResponse|errorUpdate User Field
Parameters
- accept string (default "application/json") -
Return Type
- UserFieldResponse|error - Success response
delete api/v2/user_fields/[User_field_id user_field_id]
Delete User Field
Parameters
- accept string (default "application/json") -
Return Type
- error? - No Content response
get api/v2/user_fields/[User_field_id user_field_id]/options
function get api/v2/user_fields/[User_field_id user_field_id]/options(string accept) returns CustomFieldOptionsResponse|errorList User Field Options
Parameters
- accept string (default "application/json") -
Return Type
- CustomFieldOptionsResponse|error - Success response
post api/v2/user_fields/[User_field_id user_field_id]/options
function post api/v2/user_fields/[User_field_id user_field_id]/options(string accept) returns CustomFieldOptionResponse|errorCreate or Update a User Field Option
Parameters
- accept string (default "application/json") -
Return Type
- CustomFieldOptionResponse|error - Success response
get api/v2/user_fields/[User_field_id user_field_id]/options/[int user_field_option_id]
function get api/v2/user_fields/[User_field_id user_field_id]/options/[int user_field_option_id](string accept) returns CustomFieldOptionResponse|errorShow a User Field Option
Parameters
- accept string (default "application/json") -
Return Type
- CustomFieldOptionResponse|error - Success response
delete api/v2/user_fields/[User_field_id user_field_id]/options/[int user_field_option_id]
function delete api/v2/user_fields/[User_field_id user_field_id]/options/[int user_field_option_id](string accept) returns error?Delete User Field Option
Parameters
- accept string (default "application/json") -
Return Type
- error? - No Content response
put api/v2/user_fields/reorder
Reorder User Field
get api/v2/users
function get api/v2/users(string accept, "end-user"|"agent"|"admin"? role, string? roles, int? permission_set, string? external_id) returns UsersResponse|errorList Users
Parameters
- accept string (default "application/json") -
- role "end-user"|"agent"|"admin"? (default ()) - Filters the results by role. Possible values are "end-user", "agent", or "admin"
- roles string? (default ()) - Filters the results by more than one role using the format
role[]={role}&role[]={role}
- permission_set int? (default ()) - For custom roles which is available on the Enterprise plan and above. You can only filter by one role ID per request
- external_id string? (default ()) - List users by external id. External id has to be unique for each user under the same account.
Return Type
- UsersResponse|error - Success response
post api/v2/users
function post api/v2/users(UserRequest payload) returns UserResponse|errorCreate User
Parameters
- payload UserRequest -
Return Type
- UserResponse|error - Created response
get api/v2/users/[int user_id]
function get api/v2/users/[int user_id](string accept) returns UserResponse|errorShow User
Parameters
- accept string (default "application/json") -
Return Type
- UserResponse|error - Success response
put api/v2/users/[int user_id]
function put api/v2/users/[int user_id](UserRequest payload, string accept) returns UserResponse|errorUpdate User
Return Type
- UserResponse|error - Success response
delete api/v2/users/[int user_id]
function delete api/v2/users/[int user_id](string accept) returns UserResponse|errorDelete User
Parameters
- accept string (default "application/json") -
Return Type
- UserResponse|error - Success response
get api/v2/users/[int user_id]/compliance_deletion_statuses
function get api/v2/users/[int user_id]/compliance_deletion_statuses(string accept, string? application) returns ComplianceDeletionStatusesResponse|errorShow Compliance Deletion Statuses
Parameters
- accept string (default "application/json") -
- application string? (default ()) - Area of compliance
Return Type
- ComplianceDeletionStatusesResponse|error - Success response
get api/v2/users/[int user_id]/group_memberships
function get api/v2/users/[int user_id]/group_memberships(string accept) returns GroupMembershipsResponse|errorList Memberships
Parameters
- accept string (default "application/json") -
Return Type
- GroupMembershipsResponse|error - Success response
put api/v2/users/[int user_id]/group_memberships/[int group_membership_id]/make_default
function put api/v2/users/[int user_id]/group_memberships/[int group_membership_id]/make_default(string accept) returns GroupMembershipsResponse|errorSet Membership as Default
Parameters
- accept string (default "application/json") -
Return Type
- GroupMembershipsResponse|error - Success response
get api/v2/users/[int user_id]/identities
function get api/v2/users/[int user_id]/identities(string accept) returns UserIdentitiesResponse|errorList Identities
Parameters
- accept string (default "application/json") -
Return Type
- UserIdentitiesResponse|error - Success response
post api/v2/users/[int user_id]/identities
function post api/v2/users/[int user_id]/identities(string accept) returns UserIdentityResponse|errorCreate Identity
Parameters
- accept string (default "application/json") -
Return Type
- UserIdentityResponse|error - Created response
get api/v2/users/[int user_id]/identities/[int user_identity_id]
function get api/v2/users/[int user_id]/identities/[int user_identity_id](string accept) returns UserIdentityResponse|errorShow Identity
Parameters
- accept string (default "application/json") -
Return Type
- UserIdentityResponse|error - Success response
put api/v2/users/[int user_id]/identities/[int user_identity_id]
function put api/v2/users/[int user_id]/identities/[int user_identity_id](string accept) returns UserIdentityResponse|errorUpdate Identity
Parameters
- accept string (default "application/json") -
Return Type
- UserIdentityResponse|error - Success response
delete api/v2/users/[int user_id]/identities/[int user_identity_id]
function delete api/v2/users/[int user_id]/identities/[int user_identity_id](string accept) returns error?Delete Identity
Parameters
- accept string (default "application/json") -
Return Type
- error? - No Content response
put api/v2/users/[int user_id]/identities/[int user_identity_id]/make_primary
function put api/v2/users/[int user_id]/identities/[int user_identity_id]/make_primary(string accept) returns UserIdentitiesResponse|errorMake Identity Primary
Parameters
- accept string (default "application/json") -
Return Type
- UserIdentitiesResponse|error - Success response
put api/v2/users/[int user_id]/identities/[int user_identity_id]/request_verification
function put api/v2/users/[int user_id]/identities/[int user_identity_id]/request_verification(string accept) returns string|errorRequest User Verification
Parameters
- accept string (default "application/json") -
put api/v2/users/[int user_id]/identities/[int user_identity_id]/verify
function put api/v2/users/[int user_id]/identities/[int user_identity_id]/verify(string accept) returns UserIdentityResponse|errorVerify Identity
Parameters
- accept string (default "application/json") -
Return Type
- UserIdentityResponse|error - Success response
put api/v2/users/[int user_id]/merge
function put api/v2/users/[int user_id]/merge(UserRequest payload, string accept) returns UserResponse|errorMerge End Users
Return Type
- UserResponse|error - Success response
put api/v2/users/[int user_id]/organization_memberships/[int organization_membership_id]/make_default
function put api/v2/users/[int user_id]/organization_memberships/[int organization_membership_id]/make_default(string accept) returns OrganizationMembershipsResponse|errorSet Membership as Default
Parameters
- accept string (default "application/json") -
Return Type
- OrganizationMembershipsResponse|error - Success response
delete api/v2/users/[int user_id]/organizations/[int organization_id]
function delete api/v2/users/[int user_id]/organizations/[int organization_id](string accept) returns error?Unassign Organization
Parameters
- accept string (default "application/json") -
Return Type
- error? - No Content response
put api/v2/users/[int user_id]/organizations/[int organization_id]/make_default
function put api/v2/users/[int user_id]/organizations/[int organization_id]/make_default(string accept) returns OrganizationMembershipResponse|errorSet Organization as Default
Parameters
- accept string (default "application/json") -
Return Type
- OrganizationMembershipResponse|error - Success response
put api/v2/users/[int user_id]/password
Change Your Password
Parameters
- accept string (default "application/json") -
post api/v2/users/[int user_id]/password
Set a User's Password
Parameters
- accept string (default "application/json") -
get api/v2/users/[int user_id]/password/requirements
function get api/v2/users/[int user_id]/password/requirements(string accept) returns UserPasswordRequirementsResponse|errorList password requirements
Parameters
- accept string (default "application/json") -
Return Type
- UserPasswordRequirementsResponse|error - Success response
get api/v2/users/[int user_id]/related
function get api/v2/users/[int user_id]/related(string accept) returns UserRelatedResponse|errorShow User Related Information
Parameters
- accept string (default "application/json") -
Return Type
- UserRelatedResponse|error - Success response
delete api/v2/users/[int user_id]/sessions
Bulk Delete Sessions
Parameters
- accept string (default "application/json") -
Return Type
- error? - No Content
get api/v2/users/[int user_id]/sessions/[int session_id]
function get api/v2/users/[int user_id]/sessions/[int session_id](string accept) returns SessionResponse|errorShow Session
Parameters
- accept string (default "application/json") -
Return Type
- SessionResponse|error - Success response
delete api/v2/users/[int user_id]/sessions/[int session_id]
Delete Session
Parameters
- accept string (default "application/json") -
Return Type
- error? - No Content
get api/v2/users/[int user_id]/skips
function get api/v2/users/[int user_id]/skips(string accept, "asc"|"desc"? sort_order) returns TicketSkipsResponse|errorList Ticket Skips
Parameters
- accept string (default "application/json") -
- sort_order "asc"|"desc"? (default ()) - Sort order. Defaults to "asc"
Return Type
- TicketSkipsResponse|error - Success response
get api/v2/users/autocomplete
function get api/v2/users/autocomplete(string name, string accept, string? field_id, string? 'source) returns UsersResponse|errorAutocomplete Users
Parameters
- name string - The name to search for the user.
- accept string (default "application/json") -
- field_id string? (default ()) - The id of a lookup relationship field. The type of field is determined
by the
sourceparam
- 'source string? (default ()) - If a
field_idis provided, this specifies the type of the field. For example, if the field is on a "zen:user", it references a field on a user
Return Type
- UsersResponse|error - Success response
get api/v2/users/count
function get api/v2/users/count(string accept, "end-user"|"agent"|"admin"? role, string? roles, int? permission_set) returns CountResponse|errorCount Users
Parameters
- accept string (default "application/json") -
- role "end-user"|"agent"|"admin"? (default ()) - Filters the results by role. Possible values are "end-user", "agent", or "admin"
- roles string? (default ()) - Filters the results by more than one role using the format
role[]={role}&role[]={role}
- permission_set int? (default ()) - For custom roles which is available on the Enterprise plan and above. You can only filter by one role ID per request
Return Type
- CountResponse|error - Success response
post api/v2/users/create_many
function post api/v2/users/create_many(UsersRequest payload) returns JobStatusResponse|errorCreate Many Users
Parameters
- payload UsersRequest -
Return Type
- JobStatusResponse|error - Success response
post api/v2/users/create_or_update
function post api/v2/users/create_or_update(UserRequest payload) returns UserResponse|errorCreate Or Update User
Parameters
- payload UserRequest -
Return Type
- UserResponse|error - Successful response, when user exits
post api/v2/users/create_or_update_many
function post api/v2/users/create_or_update_many(UsersRequest payload) returns JobStatusResponse|errorCreate Or Update Many Users
Parameters
- payload UsersRequest -
Return Type
- JobStatusResponse|error - Success response
delete api/v2/users/destroy_many
function delete api/v2/users/destroy_many(string accept, string? ids, string? external_ids) returns JobStatusResponse|errorBulk Delete Users
Parameters
- accept string (default "application/json") -
- ids string? (default ()) - Id of the users to delete. Comma separated
- external_ids string? (default ()) - External Id of the users to delete. Comma separated
Return Type
- JobStatusResponse|error - Success response
post api/v2/users/logout_many
Logout many users
Parameters
- accept string (default "application/json") -
- ids string? (default ()) - Accepts a comma-separated list of up to 100 user ids.
get api/v2/users/me
function get api/v2/users/me() returns CurrentUserResponse|errorShow Self
Return Type
- CurrentUserResponse|error - Success response
delete api/v2/users/me/logout
function delete api/v2/users/me/logout() returns error?Delete the Authenticated Session
Return Type
- error? - No Content
get api/v2/users/me/session
function get api/v2/users/me/session() returns SessionResponse|errorShow the Currently Authenticated Session
Return Type
- SessionResponse|error - Success response
get api/v2/users/me/session/renew
function get api/v2/users/me/session/renew() returns RenewSessionResponse|errorRenew the current session
Return Type
- RenewSessionResponse|error - Success response
post api/v2/users/request_create
function post api/v2/users/request_create(UserRequest payload) returns string|errorRequest User Create
Parameters
- payload UserRequest -
get api/v2/users/search
function get api/v2/users/search(string accept, string? query, string? external_id) returns UsersResponse|errorSearch Users
Parameters
- accept string (default "application/json") -
- query string? (default ()) - The
queryparameter supports the Zendesk search syntax for more advanced user searches. It can specify a partial or full value of any user property, including name, email address, notes, or phone. Example:query="jdoe". See the Search API.
- external_id string? (default ()) - The
external_idparameter does not support the search syntax. It only accepts ids.
Return Type
- UsersResponse|error - Success response
get api/v2/users/show_many
function get api/v2/users/show_many(string accept, string? ids, string? external_ids) returns UsersResponse|errorShow Many Users
Parameters
- accept string (default "application/json") -
- ids string? (default ()) - Accepts a comma-separated list of up to 100 user ids.
- external_ids string? (default ()) - Accepts a comma-separated list of up to 100 external ids.
Return Type
- UsersResponse|error - Success response
put api/v2/users/update_many
function put api/v2/users/update_many(Users_update_many_body payload, string accept, string? ids, string? external_ids) returns JobStatusResponse|errorUpdate Many Users
Parameters
- payload Users_update_many_body -
- accept string (default "application/json") -
- ids string? (default ()) - Id of the users to update. Comma separated
- external_ids string? (default ()) - External Id of the users to update. Comma separated
Return Type
- JobStatusResponse|error - Successful response
get api/v2/views
function get api/v2/views(string accept, string? access, boolean? active, int? group_id, string? sort_by, string? sort_order) returns ViewsResponse|errorList Views
Parameters
- accept string (default "application/json") -
- access string? (default ()) - Only views with given access. May be "personal", "shared", or "account"
- active boolean? (default ()) - Only active views if true, inactive views if false
- group_id int? (default ()) - Only views belonging to given group
- sort_by string? (default ()) - Possible values are "alphabetical", "created_at", or "updated_at". Defaults to "position"
- sort_order string? (default ()) - One of "asc" or "desc". Defaults to "asc" for alphabetical and position sort, "desc" for all others
Return Type
- ViewsResponse|error - Success response
post api/v2/views
function post api/v2/views() returns ViewResponse|errorCreate View
Return Type
- ViewResponse|error - Success response
get api/v2/views/[int view_id]
function get api/v2/views/[int view_id](string accept) returns ViewResponse|errorShow View
Parameters
- accept string (default "application/json") -
Return Type
- ViewResponse|error - Success response
put api/v2/views/[int view_id]
function put api/v2/views/[int view_id](string accept) returns ViewResponse|errorUpdate View
Parameters
- accept string (default "application/json") -
Return Type
- ViewResponse|error - Success response
delete api/v2/views/[int view_id]
Delete View
Parameters
- accept string (default "application/json") -
Return Type
- error? - No Content response
get api/v2/views/[int view_id]/count
function get api/v2/views/[int view_id]/count(string accept) returns ViewCountResponse|errorCount Tickets in View
Parameters
- accept string (default "application/json") -
Return Type
- ViewCountResponse|error - Success response
get api/v2/views/[int view_id]/execute
function get api/v2/views/[int view_id]/execute(string accept, string? sort_by, string? sort_order) returns ViewResponse|errorExecute View
Parameters
- accept string (default "application/json") -
- sort_by string? (default ()) - The ticket field used for sorting. This will either be a title or a custom field id.
- sort_order string? (default ()) - The direction the tickets are sorted. May be one of 'asc' or 'desc'
Return Type
- ViewResponse|error - Success response
get api/v2/views/[int view_id]/export
function get api/v2/views/[int view_id]/export(string accept) returns ViewExportResponse|errorExport View
Parameters
- accept string (default "application/json") -
Return Type
- ViewExportResponse|error - Success response
get api/v2/views/[int view_id]/tickets
function get api/v2/views/[int view_id]/tickets(string accept, string? sort_by, string? sort_order) returns TicketsResponse|errorList Tickets From a View
Parameters
- accept string (default "application/json") -
- sort_by string? (default ()) - Sort or group the tickets by a column in the View columns table. The
subjectandsubmittercolumns are not supported
- sort_order string? (default ()) - One of "asc" or "desc". Defaults to "asc" for alphabetical and position sort, "desc" for all others
Return Type
- TicketsResponse|error - Success response
get api/v2/views/active
function get api/v2/views/active(string accept, string? access, int? group_id, string? sort_by, string? sort_order) returns ViewsResponse|errorList Active Views
Parameters
- accept string (default "application/json") -
- access string? (default ()) - Only views with given access. May be "personal", "shared", or "account"
- group_id int? (default ()) - Only views belonging to given group
- sort_by string? (default ()) - Possible values are "alphabetical", "created_at", or "updated_at". Defaults to "position"
- sort_order string? (default ()) - One of "asc" or "desc". Defaults to "asc" for alphabetical and position sort, "desc" for all others
Return Type
- ViewsResponse|error - Success response
get api/v2/views/compact
function get api/v2/views/compact() returns ViewsResponse|errorList Views - Compact
Return Type
- ViewsResponse|error - Success response
get api/v2/views/count
function get api/v2/views/count() returns ViewsCountResponse|errorCount Views
Return Type
- ViewsCountResponse|error - Count of views
get api/v2/views/count_many
function get api/v2/views/count_many(string ids, string accept) returns ViewCountsResponse|errorCount Tickets in Views
Parameters
- ids string - List of view's ids separated by commas.
- accept string (default "application/json") -
Return Type
- ViewCountsResponse|error - Success response
delete api/v2/views/destroy_many
Bulk Delete Views
Return Type
- error? - No Content response
post api/v2/views/preview
function post api/v2/views/preview() returns ViewResponse|errorPreview Views
Return Type
- ViewResponse|error - Success response
post api/v2/views/preview/count
function post api/v2/views/preview/count() returns ViewCountResponse|errorPreview Ticket Count
Return Type
- ViewCountResponse|error - Success response
get api/v2/views/search
function get api/v2/views/search(string query, string accept, string? access, boolean? active, int? group_id, string? sort_by, string? sort_order, string? include) returns ViewsResponse|errorSearch Views
Parameters
- query string - Query string used to find all views with matching title
- accept string (default "application/json") -
- access string? (default ()) - Filter views by access. May be "personal", "shared", or "account"
- active boolean? (default ()) - Filter by active views if true or inactive views if false
- group_id int? (default ()) - Filter views by group
- sort_by string? (default ()) - Possible values are "alphabetical", "created_at", "updated_at", and "position". If unspecified, the views are sorted by relevance
- sort_order string? (default ()) - One of "asc" or "desc". Defaults to "asc" for alphabetical and position sort, "desc" for all others
Return Type
- ViewsResponse|error - Success response
get api/v2/views/show_many
function get api/v2/views/show_many(string ids, string accept, boolean? active) returns ViewsResponse|errorList Views By ID
Parameters
- ids string - List of view's ids separated by commas.
- accept string (default "application/json") -
- active boolean? (default ()) - Only active views if true, inactive views if false
Return Type
- ViewsResponse|error - Success response
put api/v2/views/update_many
function put api/v2/views/update_many() returns ViewsResponse|errorUpdate Many Views
Return Type
- ViewsResponse|error - Success response
get api/v2/workspaces
function get api/v2/workspaces() returns WorkspaceResponse|errorList Workspaces
Return Type
- WorkspaceResponse|error - Success Response
post api/v2/workspaces
function post api/v2/workspaces(V2_workspaces_body payload) returns Inline_response_201|errorCreate Workspace
Parameters
- payload V2_workspaces_body -
Return Type
- Inline_response_201|error - Created workspace
get api/v2/workspaces/[int workspace_id]
function get api/v2/workspaces/[int workspace_id](string accept) returns Inline_response_201|errorShow Workspace
Parameters
- accept string (default "application/json") -
Return Type
- Inline_response_201|error - Successful response
put api/v2/workspaces/[int workspace_id]
function put api/v2/workspaces/[int workspace_id](Workspaces_workspace_id_body payload, string accept) returns Inline_response_201|errorUpdate Workspace
Return Type
- Inline_response_201|error - OK
delete api/v2/workspaces/[int workspace_id]
Delete Workspace
Parameters
- accept string (default "application/json") -
Return Type
- error? - No Content
delete api/v2/workspaces/destroy_many
Bulk Delete Workspaces
Parameters
- ids int[] - The ids of the workspaces to delete
- accept string (default "application/json") -
put api/v2/workspaces/reorder
function put api/v2/workspaces/reorder(Workspaces_reorder_body payload) returns string|errorReorder Workspaces
Parameters
- payload Workspaces_reorder_body -
Records
zendesk: AccountSettingsActiveFeaturesObject
The active features for an account. See Active Features
Fields
- advanced_analytics boolean? -
- agent_forwarding boolean? -
- allow_ccs boolean? -
- allow_email_template_customization boolean? -
- automatic_answers boolean? -
- bcc_archiving boolean? -
- benchmark_opt_out boolean? -
- business_hours boolean? -
- chat boolean? -
- chat_about_my_ticket boolean? -
- csat_reason_code boolean? -
- custom_dkim_domain boolean? -
- customer_context_as_default boolean? -
- customer_satisfaction boolean? -
- dynamic_contents boolean? -
- explore boolean? -
- explore_on_support_ent_plan boolean? -
- explore_on_support_pro_plan boolean? -
- facebook boolean? -
- facebook_login boolean? -
- fallback_composer boolean? -
- forum_analytics boolean? -
- good_data_and_explore boolean? -
- google_login boolean? -
- insights boolean? -
- is_abusive boolean? -
- light_agents boolean? -
- markdown boolean? -
- on_hold_status boolean? -
- organization_access_enabled boolean? -
- rich_content_in_emails boolean? -
- sandbox boolean? -
- satisfaction_prediction boolean? -
- suspended_ticket_notification boolean? -
- ticket_forms boolean? -
- ticket_tagging boolean? -
- topic_suggestion boolean? -
- twitter boolean? -
- twitter_login boolean? -
- user_org_fields boolean? -
- user_tagging boolean? -
- voice boolean? -
zendesk: AccountSettingsAgentObject
Configuration for the agent workspace. See Agents
Fields
- agent_home boolean? -
- agent_workspace boolean? -
- aw_self_serve_migration_enabled boolean? -
- focus_mode boolean? -
- idle_timeout_enabled boolean? -
- unified_agent_statuses boolean? -
zendesk: AccountSettingsApiObject
API configuration options. See API
Fields
- accepted_api_agreement boolean? -
- api_password_access string? -
- api_token_access string? -
zendesk: AccountSettingsAppsObject
Apps configuration options. See Apps
Fields
- create_private boolean? -
- create_public boolean? -
- use boolean? -
zendesk: AccountSettingsBillingObject
Billing configuration options. See Billing
Fields
- backend string? -
zendesk: AccountSettingsBrandingObject
Branding settings. See Branding
Fields
- favicon_url string? -
- header_color string? -
- header_logo_url string? -
- page_background_color string? -
- tab_background_color string? -
- text_color string? -
zendesk: AccountSettingsBrandsObject
Brand settings. See Brands
Fields
- default_brand_id int? -
- require_brand_on_new_tickets boolean? -
zendesk: AccountSettingsCdnObject
CDN settings
Fields
- cdn_provider string? -
- fallback_cdn_provider string? -
- hosts AccountSettingsCdnObject_hosts[]? -
zendesk: AccountSettingsCdnObject_hosts
Fields
- name string? -
- url string? -
zendesk: AccountSettingsChatObject
Zendesk Chat settings. See Chat
Fields
- available boolean? -
- enabled boolean? -
- integrated boolean? -
- maximum_request_count int? -
- welcome_message string? -
zendesk: AccountSettingsCrossSellObject
Cross Sell settings
Fields
- show_chat_tooltip boolean? -
- xsell_source string? -
zendesk: AccountSettingsGooddataAdvancedAnalyticsObject
GoodData settings, used for insights. Legacy configuration prior to Zendesk Explore. See GoodData Advanced Analytics
Fields
- enabled boolean? -
zendesk: AccountSettingsGoogleAppsObject
Google Apps configuration. See G Suite
Fields
- has_google_apps boolean? -
- has_google_apps_admin boolean? -
zendesk: AccountSettingsGroupObject
Group configuration
Fields
- check_group_name_uniqueness boolean? -
zendesk: AccountSettingsLimitsObject
Account limits configuration. See Limits
Fields
- attachment_size int? -
zendesk: AccountSettingsLocalizationObject
Internationalization configuration settings. See Localization
Fields
- locale_ids int[]? -
zendesk: AccountSettingsLotusObject
Support UI settings. See Lotus
Fields
- pod_id int? -
- prefer_lotus boolean? -
- reporting boolean? -
zendesk: AccountSettingsMetricsObject
Account metrics settings. See Metrics
Fields
- account_size string? -
zendesk: AccountSettingsObject
Fields
- active_features AccountSettingsActiveFeaturesObject? - The active features for an account. See Active Features
- agents AccountSettingsAgentObject? - Configuration for the agent workspace. See Agents
- api AccountSettingsApiObject? - API configuration options. See API
- apps AccountSettingsAppsObject? - Apps configuration options. See Apps
- billing AccountSettingsBillingObject? - Billing configuration options. See Billing
- branding AccountSettingsBrandingObject? - Branding settings. See Branding
- brands AccountSettingsBrandsObject? - Brand settings. See Brands
- cdn AccountSettingsCdnObject? - CDN settings
- chat AccountSettingsChatObject? - Zendesk Chat settings. See Chat
- cross_sell AccountSettingsCrossSellObject? - Cross Sell settings
- gooddata_advanced_analytics AccountSettingsGooddataAdvancedAnalyticsObject? - GoodData settings, used for insights. Legacy configuration prior to Zendesk Explore. See GoodData Advanced Analytics
- google_apps AccountSettingsGoogleAppsObject? - Google Apps configuration. See G Suite
- groups AccountSettingsGroupObject? - Group configuration
- limits AccountSettingsLimitsObject? - Account limits configuration. See Limits
- localization AccountSettingsLocalizationObject? - Internationalization configuration settings. See Localization
- lotus AccountSettingsLotusObject? - Support UI settings. See Lotus
- metrics AccountSettingsMetricsObject? - Account metrics settings. See Metrics
- onboarding AccountSettingsOnboardingObject? - Onboarding settings
- routing AccountSettingsRoutingObject? - Configuration for routing. See Routing
- rule AccountSettingsRuleObject? - Rules settings for triggers, macros, views, and automations. See Rules
- side_conversations AccountSettingsSideConversationsObject? - Side conversations settings
- statistics AccountSettingsStatisticsObject? - Account statistics settings. See Statistics
- ticket_form AccountSettingsTicketFormObject? - Ticket form settings. See Ticket Form
- ticket_sharing_partners AccountSettingsTicketSharingPartnersObject? - Ticket sharing partners settings. See Ticket Sharing Partners
- tickets AccountSettingsTicketObject? - Ticket settings. See Tickets
- twitter AccountSettingsTwitterObject? - X (formerly Twitter) settings. See X
- user AccountSettingsUserObject? - User settings. See Users
- voice AccountSettingsVoiceObject? - Zendesk Talk settings. See Voice
zendesk: AccountSettingsOnboardingObject
Onboarding settings
Fields
- checklist_onboarding_version int? -
- onboarding_segments string? -
- product_sign_up string? -
zendesk: AccountSettingsResponse
Fields
- settings AccountSettingsObject? -
zendesk: AccountSettingsRoutingObject
Configuration for routing. See Routing
Fields
- autorouting_tag string? -
- enabled boolean? -
- max_email_capacity int? -
- max_messaging_capacity int? -
- reassignment_messaging_enabled boolean? -
- reassignment_messaging_timeout int? -
- reassignment_talk_timeout int? -
zendesk: AccountSettingsRuleObject
Rules settings for triggers, macros, views, and automations. See Rules
Fields
- macro_most_used boolean? -
- macro_order string? -
- skill_based_filtered_views record {}[]? -
- using_skill_based_routing boolean? -
zendesk: AccountSettingsSideConversationsObject
Side conversations settings
Fields
- email_channel boolean? -
- msteams_channel boolean? -
- show_in_context_panel boolean? -
- slack_channel boolean? -
- tickets_channel boolean? -
zendesk: AccountSettingsStatisticsObject
Account statistics settings. See Statistics
Fields
- forum boolean? -
- rule_usage boolean? -
- search boolean? -
zendesk: AccountSettingsTicketFormObject
Ticket form settings. See Ticket Form
Fields
- raw_ticket_forms_instructions string? -
- ticket_forms_instructions string? -
zendesk: AccountSettingsTicketObject
Ticket settings. See Tickets
Fields
- accepted_new_collaboration_tos boolean? -
- agent_collision boolean? -
- agent_invitation_enabled boolean? -
- agent_ticket_deletion boolean? -
- allow_group_reset boolean? -
- assign_default_organization boolean? -
- assign_tickets_upon_solve boolean? -
- auto_translation_enabled boolean? -
- auto_updated_ccs_followers_rules boolean? -
- chat_sla_enablement boolean? -
- collaboration boolean? -
- comments_public_by_default boolean? -
- email_attachments boolean? -
- emoji_autocompletion boolean? -
- follower_and_email_cc_collaborations boolean? -
- has_color_text boolean? -
- is_first_comment_private_enabled boolean? -
- light_agent_email_ccs_allowed boolean? -
- list_empty_views boolean? -
- list_newest_comments_first boolean? -
- markdown_ticket_comments boolean? -
- maximum_personal_views_to_list int? -
- private_attachments boolean? -
- rich_text_comments boolean? -
- status_hold boolean? -
- tagging boolean? -
- using_skill_based_routing boolean? -
zendesk: AccountSettingsTicketSharingPartnersObject
Ticket sharing partners settings. See Ticket Sharing Partners
Fields
- support_addresses string[]? -
zendesk: AccountSettingsTwitterObject
X (formerly Twitter) settings. See X
Fields
- shorten_url string? -
zendesk: AccountSettingsUserObject
User settings. See Users
Fields
- agent_created_welcome_emails boolean? -
- end_user_phone_number_validation boolean? -
- have_gravatars_enabled boolean? -
- language_selection boolean? -
- multiple_organizations boolean? -
- tagging boolean? -
- time_zone_selection boolean? -
zendesk: AccountSettingsVoiceObject
Zendesk Talk settings. See Voice
Fields
- agent_confirmation_when_forwarding boolean? -
- agent_wrap_up_after_calls boolean? -
- enabled boolean? -
- logging boolean? -
- maximum_queue_size int? -
- maximum_queue_wait_time int? -
- only_during_business_hours boolean? -
- outbound_enabled boolean? -
- recordings_public boolean? -
- uk_mobile_forwarding boolean? -
zendesk: ActionObject
Fields
- 'field string? - The name of a ticket field to modify
- value string? - The new value of the field
zendesk: ActionsObject
Fields
- actions ActionObject[]? -
zendesk: ActivitiesCountResponse
Fields
- count ActivitiesCountResponse_count? -
zendesk: ActivitiesCountResponse_count
Fields
- refreshed_at string? -
- value int? -
zendesk: ActivitiesResponse
Fields
- activities ActivityObject[]? -
- actors record {}[]? -
- count int? -
- next_page string? -
- previous_page string? -
- users record {}[]? -
zendesk: ActivityObject
Fields
- actor UserObject? - The full user record of the user responsible for the ticket activity. See Users
- actor_id int? - The id of the user responsible for the ticket activity. An
actor_idof "-1" is a Zendesk system user, such as an automations action.
- created_at string? - When the record was created
- id int? - Automatically assigned on creation
- 'object record {}? - The content of the activity. Can be a ticket, comment, or change.
- target record {}? - The target of the activity, a ticket.
- title string? - Description of the activity
- updated_at string? - When the record was last updated
- url string? - The API url of the activity
- user UserObject? - The full user record of the agent making the request. See Users
- user_id int? - The id of the agent making the request
- verb string? - The type of activity. Can be "tickets.assignment", "tickets.comment", or "tickets.priority_increase"
zendesk: ActivityResponse
Fields
- activity ActivityObject? -
zendesk: AssigneeFieldAssignableAgentObject
Fields
- avatar_url string? - URL of Agent's avatar
- id int? - Agent Support ID
- name string? - Name of the agent
zendesk: AssigneeFieldAssignableGroupAgentsResponse
Fields
- agents AssigneeFieldAssignableAgentObject[]? -
- count int? - Number of agents listed in
agentsproperty.
- next_page string? -
- previous_page string? -
zendesk: AssigneeFieldAssignableGroupObject
Fields
- description string? - Description of the group
- id int? - Group ID
- name string? - Name of the group
zendesk: AssigneeFieldAssignableGroupsAndAgentsSearchResponse
Fields
- agents AssigneeFieldAssignableSearchAgentObject[]? -
- count int? - Number of agents + groups listed from search result.
- groups AssigneeFieldAssignableSearchGroupObject[]? -
zendesk: AssigneeFieldAssignableGroupsResponse
Fields
- count int? - Number of groups listed in
groupsproperty.
- groups AssigneeFieldAssignableGroupObject[]? -
- next_page string? -
- previous_page string? -
zendesk: AssigneeFieldAssignableSearchAgentObject
Fields
- group string? - Name of the agent's group
- group_id int? - Agent's Group ID
- id int? - Agent ID
- name string? - Name of the agent
- photo_url string? - URL of Avatar
zendesk: AssigneeFieldAssignableSearchGroupObject
Fields
- id int? - Group ID
- name string? - Name of the group
zendesk: AttachmentBaseObject
Fields
- content_type string? - The content type of the image. Example value: "image/png"
- content_url string? - A full URL where the attachment image file can be downloaded. The file may be hosted externally so take care not to inadvertently send Zendesk authentication credentials. See Working with url properties
- deleted boolean? - If true, the attachment has been deleted
- file_name string? - The name of the image file
- height string? - The height of the image file in pixels. If height is unknown, returns null
- id int? - Automatically assigned when created
- inline boolean? - If true, the attachment is excluded from the attachment list and the attachment's URL can be referenced within the comment of a ticket. Default is false
- malware_access_override boolean? - If true, you can download an attachment flagged as malware. If false, you can't download such an attachment.
- malware_scan_result string? - The result of the malware scan. There is a delay between the time the attachment is uploaded and when the malware scan is completed. Usually the scan is done within a few seconds, but high load conditions can delay the scan results. Possible values: "malware_found", "malware_not_found", "failed_to_scan", "not_scanned"
- mapped_content_url string? - The URL the attachment image file has been mapped to
- size int? - The size of the image file in bytes
- url string? - A URL to access the attachment details
- width string? - The width of the image file in pixels. If width is unknown, returns null
zendesk: AttachmentObject
A file represented as an Attachment object
Fields
- Fields Included from * AttachmentBaseObject
- Fields Included from * AttachmentThumbnails
- thumbnails AttachmentBaseObject[]|()
- anydata...
zendesk: AttachmentResponse
Fields
- attachment AttachmentObject? - A file represented as an Attachment object
zendesk: AttachmentThumbnails
Fields
- thumbnails AttachmentBaseObject[]? - An array of attachment objects. Note that photo thumbnails do not have thumbnails
zendesk: AttachmentUpdateInput
Fields
- malware_access_override boolean? - If true, allows access to attachments with detected malware.
zendesk: AttachmentUpdateRequest
Fields
- attachment AttachmentUpdateInput? -
zendesk: AttachmentUploadResponse
Fields
- upload AttachmentUploadResponse_upload? -
zendesk: AttachmentUploadResponse_upload
Fields
- attachment AttachmentObject? - A file represented as an Attachment object
- attachments AttachmentObject[]? -
- token string? - Token for subsequent request
zendesk: AuditLogObject
Fields
- action string? - Type of change made. Possible values are "create", "destroy", "exported", "login", and "update"
- action_label string? - Localized string of action field
- actor_id int? - id of the user or system that initiated the change
- actor_name string? - Name of the user or system that initiated the change
- change_description string? - The description of the change that occurred
- created_at string? - The time the audit got created
- id int? - The id automatically assigned upon creation
- ip_address string? - The IP address of the user doing the audit
- source_id int? - The id of the item being audited
- source_label string? - The name of the item being audited
- source_type string? - Item type being audited. Typically describes the system where the change was initiated. Possible values vary based on your account's Zendesk products and activity. Common values include "apitoken", "rule", "ticket", "user", and "zendesk/app_market/app". The "rule" value is used for automations, macros, triggers, views, and other automated business rules
- url string? - The URL to access the audit log
zendesk: AuditLogResponse
Fields
- audit_log AuditLogObject? -
zendesk: AuditLogsResponse
Fields
- audit_logs AuditLogObject[]? -
zendesk: AuditObject
Fields
- created_at string? -
- events AuditObject_events[]? -
- id int? -
- metadata record {}? -
- ticket_id int? -
- via ViaObject? - An object explaining how the ticket was created. See the Via object reference
zendesk: AuditObject_events
Fields
- body string? -
- field_name string? -
- id int? -
- 'type string? -
zendesk: AuthorObject
Fields
- email string? - The author email
- id int? - The author id
- name string? - The author name
zendesk: AutomationObject
Fields
- actions ActionObject[]? - An object describing what the automation will do. See Actions reference
- active boolean? - Whether the automation is active
- conditions ConditionsObject? - An object that describes the conditions under which the automation will execute. See Conditions reference
- created_at string? - The time the automation was created
- default boolean? - If true, the automation is a default automation
- id int? - Automatically assigned when created
- position int? - The position of the automation which specifies the order it will be executed
- raw_title string? - The raw title of the automation
- title string? - The title of the automation
- updated_at string? - The time of the last update of the automation
zendesk: AutomationResponse
Fields
- automation AutomationObject? -
zendesk: AutomationsResponse
Fields
- automations AutomationObject[]? -
- count int? -
- next_page string? -
- previous_page string? -
zendesk: BatchErrorItem
Fields
- Fields Included from * Error
- trigger_id string? -
zendesk: BatchJobRequest
Fields
- job BatchJobRequest_job? -
zendesk: BatchJobRequest_job
Fields
- action "patch" ? -
- items BatchJobRequest_job_items? -
zendesk: BatchJobRequest_job_items
Fields
- trigger_categories TriggerCategoryBatchRequest[]? -
- triggers TriggerBatchRequest[]? -
zendesk: BatchJobResponse
Fields
- errors BatchErrorItem[]? -
- results BatchJobResponse_results? -
- status "complete"|"failed" ? -
zendesk: BatchJobResponse_results
Fields
- trigger_categories TriggerCategory[]? -
- triggers TriggerObject[]? -
zendesk: BookmarkCreateRequest
Fields
- bookmark BookmarkInput? -
zendesk: BookmarkInput
Fields
- ticket_id int? - The id of the ticket the bookmark is for.
zendesk: BookmarkObject
Fields
- created_at string? - The time the bookmark was created
- id int? - Automatically assigned when the bookmark is created
- ticket TicketObject? -
- url string? - The API url of this bookmark
zendesk: BookmarkResponse
Fields
- bookmark BookmarkObject? -
zendesk: BookmarksResponse
Fields
- Fields Included from * OffsetPaginationObject
- bookmarks BookmarkObject[]? -
zendesk: BrandCreateRequest
Fields
- brand BrandObject? -
zendesk: BrandObject
Fields
- active boolean? - If the brand is set as active
- brand_url string? - The url of the brand
- created_at string? - The time the brand was created
- default boolean? - Is the brand the default brand for this account
- has_help_center boolean? - If the brand has a Help Center
- help_center_state "enabled"|"disabled"|"restricted" ? - The state of the Help Center
- host_mapping string? - The hostmapping to this brand, if any. Only admins view this property.
- id int? - The ID automatically assigned when the brand is created
- is_deleted boolean? - If the brand object is deleted or not
- logo AttachmentObject? - A file represented as an Attachment object
- name string - The name of the brand
- signature_template string? - The signature template for a brand
- subdomain string - The subdomain of the brand
- ticket_form_ids int[]? - The ids of ticket forms that are available for use by a brand
- updated_at string? - The time of the last update of the brand
- url string? - The API url of this brand
zendesk: BrandResponse
Fields
- brand BrandObject? -
zendesk: BrandsResponse
Fields
- Fields Included from * OffsetPaginationObject
- brands BrandObject[]? - Array of brands
zendesk: BrandUpdateRequest
Fields
- brand BrandObject? -
zendesk: BulkUpdateDefaultCustomStatusRequest
Fields
- ids string? - The comma-separated list of custom ticket status ids to be set as default for their status categories
zendesk: BulkUpdateDefaultCustomStatusResponse
zendesk: ChannelFrameworkPushResultsResponse
Fields
- results ChannelFrameworkResultObject[]? - An array of result objects
zendesk: ChannelFrameworkResultObject
Fields
- external_resource_id string? - The external ID of the resource, as passed in
- status ChannelFrameworkResultStatusObject? - The status of the import for the indicated resource
zendesk: ChannelFrameworkResultStatusObject
The status of the import for the indicated resource
Fields
- code string? - A code indicating the status of the import of the resource, as described in status codes
- description string? - In the case of an exception, a description of the exception. Otherwise, not present.
zendesk: ClientHttp1Settings
Provides settings related to HTTP/1.x protocol.
Fields
- keepAlive KeepAlive(default http:KEEPALIVE_AUTO) - Specifies whether to reuse a connection for multiple requests
- chunking Chunking(default http:CHUNKING_AUTO) - The chunking behaviour of the request
- proxy ProxyConfig? - Proxy server related options
zendesk: CollaboratorObject
Fields
- email string? -
- name string? -
zendesk: ComplianceDeletionStatusesResponse
Fields
- compliance_deletion_statuses ComplianceDeletionStatusObject[]? -
zendesk: ComplianceDeletionStatusObject
Fields
- account_subdomain string -
- action string -
- application string -
- created_at string -
- executer_id int -
- user_id int -
zendesk: ConditionObject
Fields
- 'field string? - The name of a ticket field
- operator string? - A comparison operator
- value string? - The value of a ticket field
zendesk: ConditionsObject
An object that describes the conditions under which the automation will execute. See Conditions reference
Fields
- all ConditionObject[]? - Logical AND. Tickets must fulfill all of the conditions to be considered matching
- 'any ConditionObject[]? - Logical OR. Tickets may satisfy any of the conditions to be considered matching
zendesk: ConnectionConfig
Provides a set of configurations for controlling the behaviours when communicating with a remote HTTP endpoint.
Fields
- auth CredentialsConfig - Configurations related to client authentication
- httpVersion HttpVersion(default http:HTTP_2_0) - The HTTP version understood by the client
- http1Settings ClientHttp1Settings? - Configurations related to HTTP/1.x protocol
- http2Settings ClientHttp2Settings? - Configurations related to HTTP/2 protocol
- timeout decimal(default 60) - The maximum time to wait (in seconds) for a response before closing the connection
- forwarded string(default "disable") - The choice of setting
forwarded/x-forwardedheader
- poolConfig PoolConfiguration? - Configurations associated with request pooling
- cache CacheConfig? - HTTP caching related configurations
- compression Compression(default http:COMPRESSION_AUTO) - Specifies the way of handling compression (
accept-encoding) header
- circuitBreaker CircuitBreakerConfig? - Configurations associated with the behaviour of the Circuit Breaker
- retryConfig RetryConfig? - Configurations associated with retrying
- responseLimits ResponseLimitConfigs? - Configurations associated with inbound response size limits
- secureSocket ClientSecureSocket? - SSL/TLS-related options
- proxy ProxyConfig? - Proxy server related options
- validation boolean(default true) - Enables the inbound payload validation functionality which provided by the constraint package. Enabled by default
zendesk: CountOrganizationObject
Fields
- refreshed_at string? -
- value int? -
zendesk: CountOrganizationResponse
Fields
- count CountOrganizationObject? -
zendesk: CountResponse
Fields
- count CountResponse_count? -
zendesk: CountResponse_count
Fields
- refreshed_at string? -
- value int? -
zendesk: CreateResourceResult
Fields
- id int - the id of the new resource
- index int - the index number of the resul
zendesk: CurrentUserResponse
Fields
- user UserObject? -
zendesk: CursorBasedExportIncrementalTicketsResponse
See Tickets for a detailed example.
Fields
- after_cursor string? -
- after_url string? -
- before_cursor string? -
- before_url string? -
- end_of_stream boolean? -
- tickets TicketObject[]? -
zendesk: CursorBasedExportIncrementalUsersResponse
Fields
- after_cursor string? -
- after_url string? -
- before_cursor string? -
- before_url string? -
- end_of_stream boolean? -
- users UserObject[]? -
zendesk: CustomFieldObject
Fields
- active boolean? - If true, this field is available for use
- created_at string? - The time of the last update of the ticket field
- custom_field_options CustomFieldOptionObject[]? - Required and presented for a custom field of type "dropdown". Each option is represented by an object with a
nameandvalueproperty
- description string? - User-defined description of this field's purpose
- id int? - Automatically assigned upon creation
- 'key string - A unique key that identifies this custom field. This is used for updating the field and referencing in placeholders. The key must consist of only letters, numbers, and underscores. It can't be only numbers and can't be reused if deleted.
- position int? - Ordering of the field relative to other fields
- raw_description string? - The dynamic content placeholder, if present, or the
descriptionvalue, if not. See Dynamic Content Items
- raw_title string? - The dynamic content placeholder, if present, or the
titlevalue, if not. See Dynamic Content Items
- regexp_for_validation string? - Regular expression field only. The validation pattern for a field value to be deemed valid
- relationship_filter record {}? - A filter definition that allows your autocomplete to filter down results
- relationship_target_type string? - A representation of what type of object the field references. Options are "zen:user", "zen:organization", "zen:ticket", and "zen:custom_object:{key}" where key is a custom object key. For example "zen:custom_object:apartment".
- system boolean? - If true, only active and position values of this field can be changed
- tag string? - Optional for custom field of type "checkbox"; not presented otherwise.
- title string - The title of the custom field
- updated_at string? - The time of the last update of the ticket field
- url string? - The URL for this resource
zendesk: CustomFieldOptionObject
Fields
- id int? - Automatically assigned upon creation
- name string - Name of the dropdown option
- position int? - Position of the dropdown option
- raw_name string? - Raw name of the dropdown option
- url string? - URL of the dropdown option
- value string - Value of the dropdown option
zendesk: CustomFieldOptionResponse
Fields
- custom_field_option CustomFieldOptionObject? -
zendesk: CustomFieldOptionsResponse
Fields
- count int? - Total count of records retrieved
- custom_field_options CustomFieldOptionObject[]? -
- next_page string? - URL of the next page
- previous_page string? - URL of the previous page
zendesk: CustomObject
Fields
- created_at string? - The time the object type was created
- created_by_user_id string? - Id of a user who created the object
- description string? - User-defined description of the object
- 'key string - A user-defined unique identifier. Writable on create only. Cannot be reused if deleted.
- raw_description string? - The dynamic content placeholder, if present, or the "raw_description" value, if not. See Dynamic Content Items
- raw_title string? - The dynamic content placeholder, if present, or the "title" value, if not. See Dynamic Content Items
- raw_title_pluralized string? - The dynamic content placeholder, if present, or the "raw_title_pluralized" value, if not. See Dynamic Content Items
- title string - User-defined display name for the object
- title_pluralized string - User-defined pluralized version of the object's title
- updated_at string? - The time of the last update of the object
- updated_by_user_id string? - Id of the last user who updated the object
- url string? - Direct link to the specific custom object
zendesk: CustomObjectCreateInput
Fields
- 'key string? - Unique identifier. Writable on create only
- title string? - Display name for the object
- title_pluralized string? - Pluralized version of the object's title
zendesk: CustomObjectFieldResponse
Fields
- custom_object_field CustomObjectField? -
zendesk: CustomObjectFieldsCreateRequest
Fields
- custom_object_field CustomObjectField? -
zendesk: CustomObjectFieldsResponse
Fields
- custom_object_fields CustomObjectField[]? -
zendesk: CustomObjectLimitsResponse
Fields
- count int? - The current numnber of the requested resource
- 'limit int? - The maximum allowed number for the requested resource
zendesk: CustomObjectRecord
Fields
- created_at string? - The time the object was created
- created_by_user_id string? - Id of a user who created the object
- custom_object_fields record {}? -
- custom_object_key string? - A user-defined unique identifier
- external_id string? - An id you can use to link custom object records to external data
- id string? - Automatically assigned upon creation
- name string - User-defined display name for the object
- updated_at string? - The time of the last update of the object
- updated_by_user_id string? - Id of the last user who updated the object
- url string? - Direct link to the specific custom object
zendesk: CustomObjectRecordResponse
Fields
- custom_object_record CustomObjectRecord? -
zendesk: CustomObjectRecordsBulkCreateRequest
Fields
zendesk: CustomObjectRecordsBulkCreateRequest_job
Fields
- action string? -
- items CustomObjectRecord[]? - An array of record objects for job actions that create, update, or set. An array of strings for job actions that delete.
zendesk: CustomObjectRecordsCreateRequest
Fields
- custom_object_record CustomObjectRecord? -
zendesk: CustomObjectRecordsJobsResponse
Fields
- job_status CustomObjectRecordsJobsResponse_job_status? -
zendesk: CustomObjectRecordsJobsResponse_job_status
Fields
- id string? -
- message string? -
- progress int? -
- results CustomObjectRecord[]? -
- status string? -
- total int? -
- url string? -
zendesk: CustomObjectRecordsResponse
Fields
- count int? - The number of results returned for the current request
- custom_object_records CustomObjectRecord[]? -
- links CustomObjectRecordsResponse_links? -
- meta CustomObjectRecordsResponse_meta? -
zendesk: CustomObjectRecordsResponse_links
Fields
- next string -
- prev string -
zendesk: CustomObjectRecordsResponse_meta
Fields
- after_cursor string -
- before_cursor string -
- has_more boolean -
zendesk: CustomObjectRecordsUpsertRequest
Fields
- custom_object_record CustomObjectRecord? -
zendesk: CustomObjectResponse
Fields
- custom_object CustomObject? -
zendesk: CustomObjectsCreateRequest
Fields
- custom_object CustomObjectCreateInput? -
zendesk: CustomObjectsResponse
Fields
- custom_objects CustomObject[]? -
zendesk: CustomRoleConfigurationObject
Configuration settings for the role. See Configuration
Fields
- assign_tickets_to_any_group boolean? - Whether or not the agent can assign tickets to any group
- chat_access boolean? - Whether or not the agent has access to Chat
- end_user_list_access string? - Whether or not the agent can view lists of user profiles. Allowed values: "full", "none"
- end_user_profile_access string? - What the agent can do with end-user profiles. Allowed values: "edit", "edit-within-org", "full", "readonly"
- explore_access string? - Allowed values: "edit", "full", "none", "readonly"
- forum_access string? - The kind of access the agent has to Guide. Allowed values: "edit-topics", "full", "readonly"
- forum_access_restricted_content boolean? -
- group_access boolean? - Whether or not the agent can add or modify groups
- light_agent boolean? -
- macro_access string? - What the agent can do with macros. Allowed values: "full", "manage-group", "manage-personal", "readonly"
- manage_business_rules boolean? - Whether or not the agent can manage business rules
- manage_contextual_workspaces boolean? - Whether or not the agent can view, add, and edit contextual workspaces
- manage_dynamic_content boolean? - Whether or not the agent can access dynamic content
- manage_extensions_and_channels boolean? - Whether or not the agent can manage channels and extensions
- manage_facebook boolean? - Whether or not the agent can manage Facebook pages
- manage_organization_fields boolean? - Whether or not the agent can create and manage organization fields
- manage_ticket_fields boolean? - Whether or not the agent can create and manage ticket fields
- manage_ticket_forms boolean? - Whether or not the agent can create and manage ticket forms
- manage_user_fields boolean? - Whether or not the agent can create and manage user fields
- moderate_forums boolean? -
- organization_editing boolean? - Whether or not the agent can add or modify organizations
- organization_notes_editing boolean? - Whether or not the agent can add or modify organization notes
- report_access string? - What the agent can do with reports. Allowed values: "full", "none", "readonly"
- side_conversation_create boolean? - Whether or not the agent can contribute to side conversations
- ticket_access string? - What kind of tickets the agent can access. Allowed values: "all", "assigned-only", "within-groups", "within-groups-and-public-groups", "within-organization"
- ticket_comment_access string? - What type of comments the agent can make. Allowed values: "public", "none"
- ticket_deletion boolean? - Whether or not the agent can delete tickets
- ticket_editing boolean? - Whether or not the agent can edit ticket properties
- ticket_merge boolean? - Whether or not the agent can merge tickets
- ticket_tag_editing boolean? - Whether or not the agent can edit ticket tags
- twitter_search_access boolean? -
- user_view_access string? - What the agent can do with customer lists. Allowed values: "full", "manage-group", "manage-personal", "none", "readonly"
- view_access string? - What the agent can do with views. Allowed values: "full", "manage-group", "manage-personal", "playonly", "readonly"
- view_deleted_tickets boolean? - Whether or not the agent can view deleted tickets
- voice_access boolean? - Whether or not the agent can answer and place calls to end users
- voice_dashboard_access boolean? - Whether or not the agent can view details about calls on the Talk dashboard
zendesk: CustomRoleObject
Fields
- configuration CustomRoleConfigurationObject? - Configuration settings for the role. See Configuration
- created_at string? - The time the record was created
- description string? - A description of the role
- id int? - Automatically assigned on creation
- name string - Name of the custom role
- role_type int - The user's role. 0 stands for a custom agent, 1 for a light agent, 2 for a chat agent, 3 for a contributor, 4 for an admin and 5 for a billing admin. See Understanding standard agent roles in Zendesk Support in Zendesk help
- team_member_count int? - The number of team members assigned to this role
- updated_at string? - The time the record was last updated
zendesk: CustomRoleResponse
Fields
- custom_role CustomRoleObject? -
zendesk: CustomRolesResponse
Fields
- custom_roles CustomRoleObject[]? -
zendesk: CustomStatusCreateInput
Fields
- Fields Included from * CustomStatusUpdateInput
- status_category "new"|"open"|"pending"|"hold"|"solved" ? - The status category the custom ticket status belongs to
zendesk: CustomStatusCreateRequest
Fields
- custom_status CustomStatusCreateInput? -
zendesk: CustomStatusesResponse
Fields
- custom_statuses CustomStatusObject[]? -
zendesk: CustomStatusObject
Fields
- active boolean? - If true, the custom status is set to active, If false, the custom status is set to inactive
- agent_label string - The label displayed to agents. Maximum length is 48 characters
- created_at string? - The date and time the custom ticket status was created
- default boolean? - If true, the custom status is set to default. If false, the custom status is set to non-default
- description string? - The description of when the user should select this custom ticket status
- end_user_description string? - The description displayed to end users
- end_user_label string? - The label displayed to end users. Maximum length is 48 characters
- id int? - Automatically assigned when the custom ticket status is created
- raw_agent_label string? - The dynamic content placeholder. If the dynamic content placeholder is not available, this is the "agent_label" value. See Dynamic Content Items
- raw_description string? - The dynamic content placeholder. If the dynamic content placeholder is not available, this is the "description" value. Dynamic Content Items
- raw_end_user_description string? - The dynamic content placeholder. If the dynamic content placeholder is not available, this is the "end_user_description" value. See Dynamic Content Items
- raw_end_user_label string? - The dynamic content placeholder. If the dynamic content placeholder is not available, this is the "end_user_label" value. See Dynamic Content Items
- status_category "new"|"open"|"pending"|"hold"|"solved" - The status category the custom ticket status belongs to
- updated_at string? - The date and time the custom ticket status was last updated
zendesk: CustomStatusResponse
Fields
- custom_status CustomStatusObject? -
zendesk: CustomStatusUpdateInput
Fields
- active boolean? - True if the custom status is set as active; inactive if false
- agent_label string? - The dynamic content placeholder, if present, or the "agent_label" value, if not. See Dynamic Content Items
- description string? - The dynamic content placeholder, if present, or the "description" value, if not. See Dynamic Content Items
- end_user_description string? - The dynamic content placeholder, if present, or the "end_user_description" value, if not. See Dynamic Content Items
- end_user_label string? - The dynamic content placeholder, if present, or the "end_user_label" value, if not. See Dynamic Content Items
zendesk: CustomStatusUpdateRequest
Fields
- custom_status CustomStatusUpdateInput? -
zendesk: DefinitionsResponse
Fields
- definitions DefinitionsResponse_definitions? -
zendesk: DefinitionsResponse_definitions
Fields
- conditions_all DefinitionsResponse_definitions_conditions_all[]? -
- conditions_any DefinitionsResponse_definitions_conditions_all[]? -
zendesk: DefinitionsResponse_definitions_conditions_all
Fields
- group string? -
- nullable boolean? -
- operators DefinitionsResponse_definitions_operators[]? -
- repeatable boolean? -
- subject string? -
- title string? -
- 'type string? -
- values DefinitionsResponse_definitions_values[]? -
zendesk: DefinitionsResponse_definitions_operators
Fields
- terminal boolean? -
- title string? -
- value string? -
zendesk: DefinitionsResponse_definitions_values
Fields
- enabled boolean? -
- title string? -
- value string? -
zendesk: DeletedUserObject
Fields
- active boolean -
- created_at string -
- email string -
- id int -
- locale string -
- locale_id int -
- name string -
- organization_id int -
- phone string -
- photo record {} -
- role string -
- time_zone string -
- updated_at string -
- url string -
zendesk: DeletedUserResponse
Fields
- deleted_user DeletedUserObject? -
zendesk: DeletedUsersResponse
Fields
- deleted_users DeletedUserObject[]? -
zendesk: DynamicContentObject
Fields
- created_at string? - When this record was created
- default_locale_id int - The default locale for the item. Must be one of the locales the account has active.
- id int? - Automatically assigned when creating items
- name string - The unique name of the item
- outdated boolean? - Indicates the item has outdated variants within it
- placeholder string? - Automatically generated placeholder for the item, derived from name
- updated_at string? - When this record was last updated
- url string? - The API url of this item
- variants DynamicContentVariantObject[] - All variants within this item. See Dynamic Content Item Variants
zendesk: DynamicContentResponse
Fields
- item DynamicContentObject? -
zendesk: DynamicContentsResponse
Fields
- items DynamicContentObject[]? -
zendesk: DynamicContentVariantObject
Fields
- active boolean? - If the variant is active and useable
- content string - The content of the variant
- created_at string? - When the variant was created
- default boolean? - If the variant is the default for the item it belongs to
- id int? - Automatically assigned when the variant is created
- locale_id int - An active locale
- outdated boolean? - If the variant is outdated
- updated_at string? - When the variant was last updated
- url string? - The API url of the variant
zendesk: DynamicContentVariantResponse
Fields
- variant DynamicContentVariantObject? -
zendesk: DynamicContentVariantsResponse
Fields
- variants DynamicContentVariantObject[]? -
zendesk: EmailCCObject
Fields
- Fields Included from * FollowerObject
- action "put"|"delete" ? -
- user_email string? -
- user_id string? -
- user_name string? -
zendesk: Error
Fields
- code string -
- detail string? -
- id string? -
- links record {}? -
- 'source record {}? -
- status string? -
- title string -
zendesk: Errors
Fields
- errors Error[]? -
zendesk: EssentialsCardObject
Fields
- created_at string? - Date and time the essentials card were created
- default boolean? - If true, the system has used the first twenty fields for the custom object type as the essentials card.
- fields record {}[] - Fields that are displayed in the essentials card details. The order is defined by the order of the fields in the array
- id string? - id of the essentials card
- 'key string? - Object type. Example:
zen:userrefers toUsertype
- layout string? - layout type
- max_count int? - Maximum number of fields allowed in the essentials card
- updated_at string? - Date and time the essentials card were last updated
zendesk: EssentialsCardResponse
Fields
- object_layout EssentialsCardObject? -
zendesk: EssentialsCardsResponse
Fields
- object_layouts EssentialsCardObject[]? -
zendesk: ExportIncrementalOrganizationsResponse
Fields
- count int? -
- end_of_stream boolean? -
- end_time int? -
- next_page string? -
- organizations OrganizationObject[]? -
zendesk: ExportIncrementalTicketEventsResponse
Fields
- count int? -
- end_of_stream boolean? -
- end_time int? -
- next_page string? -
- ticket_events TicketMetricEventBaseObject[]? -
zendesk: Filter
Fields
- 'json TriggerObject? -
zendesk: FollowerObject
Fields
- action "put"|"delete" ? -
- user_email string? -
- user_id string? -
zendesk: GroupMembershipObject
Fields
- created_at string? - The time the group was created
- default boolean? - If true, tickets assigned directly to the agent will assume this membership's group
- group_id int - The id of a group
- id int? - Automatically assigned upon creation
- updated_at string? - The time of the last update of the group
- url string? - The API url of this record
- user_id int - The id of an agent
zendesk: GroupMembershipResponse
Fields
- group_membership GroupMembershipObject? -
zendesk: GroupMembershipsResponse
Fields
- group_memberships GroupMembershipObject[]? -
zendesk: GroupObject
Fields
- created_at string? - The time the group was created
- default boolean? - If the group is the default one for the account
- deleted boolean? - Deleted groups get marked as such
- description string? - The description of the group
- id int? - Automatically assigned when creating groups
- is_public boolean? - If true, the group is public. If false, the group is private. You can't change a private group to a public group
- name string - The name of the group
- updated_at string? - The time of the last update of the group
- url string? - The API url of the group
zendesk: GroupResponse
Fields
- group GroupObject? -
zendesk: GroupsCountObject
Fields
- count GroupsCountObject_count? -
zendesk: GroupsCountObject_count
Fields
- refreshed_at string? - Timestamp that indicates when the count was last updated
- value int? - Approximate count of groups
zendesk: GroupSLAPoliciesResponse
Fields
- count int? -
- group_sla_policies GroupSLAPolicyObject[]? -
- next_page string? -
- previous_page string? -
zendesk: GroupSLAPolicyFilterConditionObject
Fields
- 'field string? - The name of a ticket field
- operator string? - A comparison operator
zendesk: GroupSLAPolicyFilterDefinitionResponse
Fields
- definitions GroupSLAPolicyFilterDefinitionResponse_definitions? -
zendesk: GroupSLAPolicyFilterDefinitionResponse_definitions
Fields
zendesk: GroupSLAPolicyFilterDefinitionResponse_definitions_all
Fields
- group string? -
- operators GroupSLAPolicyFilterDefinitionResponse_definitions_operators[]? -
- title string? -
- value string? -
zendesk: GroupSLAPolicyFilterDefinitionResponse_definitions_operators
Fields
- title string? -
- value string? -
zendesk: GroupSLAPolicyFilterDefinitionResponse_definitions_values
Fields
- 'type string? -
zendesk: GroupSLAPolicyFilterDefinitionResponse_definitions_values_list
Fields
- title string? -
- value int? -
zendesk: GroupSLAPolicyFilterObject
An object that describes the conditions a ticket must match for a Group SLA policy to be applied to the ticket. See Filter.
Fields
- all GroupSLAPolicyFilterConditionObject[]? -
zendesk: GroupSLAPolicyMetricObject
Fields
- business_hours boolean? - Whether the metric targets are being measured in business hours or calendar hours
- metric string? - The definition of the time that is being measured
- priority string? - Priority that a ticket must match
- target int? - The time within which the end-state for a metric should be met
zendesk: GroupSLAPolicyObject
Fields
- created_at string? - The time the Group SLA policy was created
- description string? - The description of the Group SLA policy
- filter GroupSLAPolicyFilterObject - An object that describes the conditions a ticket must match for a Group SLA policy to be applied to the ticket. See Filter.
- id string? - Automatically assigned when created
- policy_metrics GroupSLAPolicyMetricObject[]? - Array of policy metric objects
- position int? - Position of the Group SLA policy. This position determines the order in which policies are matched to tickets. If not specified, the Group SLA policy is added at the last position
- title string - The title of the Group SLA policy
- updated_at string? - The time of the last update of the Group SLA policy
- url string? - URL of the Group SLA policy record
zendesk: GroupSLAPolicyResponse
Fields
- group_sla_policy GroupSLAPolicyObject? -
zendesk: GroupsResponse
Fields
- groups GroupObject[]? -
zendesk: HostMappingObject
Fields
- cname string? - The canonical name record for a host mapping
- expected_cnames string[]? - Array of expected CNAME records for host mapping(s) of a given brand
- is_valid boolean? - Whether a host mapping is valid or not for a given brand
- reason string? - Reason why a host mapping is valid or not
zendesk: IncrementalSkillBasedRouting
Fields
- attribute_values IncrementalSkillBasedRoutingAttributeValue[]? - Routing attribute values
- attributes IncrementalSkillBasedRoutingAttribute[]? - Routing attributes
- count int? - The number of results returned for the current request
- end_time int? - The most recent resource creation time present in this result set in Unix epoch time
- instance_values IncrementalSkillBasedRoutingInstanceValue[]? - Routing instance values
- next_page string? - The URL that should be called to get the next set of results
zendesk: IncrementalSkillBasedRoutingAttribute
Fields
- id string? - Automatically assigned when an attribute is created
- name string? - The name of the attribute
- time string? - The time the attribute was created, updated, or deleted
- 'type string? - One of "create", "update", or "delete"
zendesk: IncrementalSkillBasedRoutingAttributeValue
Fields
- attribute_id string? - Id of the associated attribute
- id string? - Automatically assigned when an attribute value is created
- name string? - The name of the attribute value
- time string? - The time the attribute value was created, updated, or deleted
- 'type string? - One of "create", "update", or "delete"
zendesk: IncrementalSkillBasedRoutingInstanceValue
Fields
- attribute_value_id string? - Id of the associated attribute value
- id string? - Automatically assigned when an instance value is created
- instance_id string? - Id of the associated agent or ticket
- time string? - The time the instance value was created or deleted
- 'type string? - One of "associate_agent", "unassociate_agent", "associate_ticket", or "unassociate_ticket"
zendesk: Inline_response_200
Fields
- success boolean? -
zendesk: Inline_response_200_1
Fields
- count record { Inline_response_200_1_count?... }? -
zendesk: Inline_response_200_1_count
Fields
- refreshed_at string? - The time the last count was performed
- value int? - Number of records at the time of the latest count operation
zendesk: Inline_response_200_2
Fields
- macro MacroObject? -
zendesk: Inline_response_200_3
Fields
- actions record {}[]? -
zendesk: Inline_response_200_4
Fields
- definitions Inline_response_200_3? -
zendesk: Inline_response_200_5
Fields
- count ActivitiesCountResponse_count? -
zendesk: Inline_response_200_6
Fields
- Fields Included from * TriggerCategoriesResponse
- trigger_categories TriggerCategory[]|()
- anydata...
- Fields Included from * Pagination
- links Pagination_links|()
- meta Pagination_meta|()
- anydata...
zendesk: Inline_response_201
Fields
- workspace WorkspaceObject? -
zendesk: JobStatusesResponse
Fields
- job_statuses JobStatusObject[] -
zendesk: JobStatusObject
Fields
- id string? - Automatically assigned when the job is queued
- job_type string? - The type of the job
- message string? - Message from the job worker, if any
- progress int? - Number of tasks that have already been completed
- results JobStatusResultObject[]|record { success boolean? }?? - Result data from processed tasks. See Results below
- status string? - The current status. One of the following: "queued", "working", "failed", "completed"
- total int? - The total number of tasks this job is batching through
- url string? - The URL to poll for status updates
zendesk: JobStatusResponse
Fields
- job_status JobStatusObject? -
zendesk: ListDeletedTicketsResponse
Fields
- deleted_tickets ListDeletedTicketsResponse_deleted_tickets[]? -
- Fields Included from * OffsetPaginationObject
zendesk: ListDeletedTicketsResponse_actor
Fields
- id int? -
- name string? -
zendesk: ListDeletedTicketsResponse_deleted_tickets
Fields
- actor ListDeletedTicketsResponse_actor? -
- deleted_at string? -
- id int? -
- previous_state string? -
- subject string? -
zendesk: ListTicketCollaboratorsResponse
zendesk: ListTicketEmailCCsResponse
zendesk: ListTicketFollowersResponse
zendesk: ListTicketIncidentsResponse
zendesk: ListTicketProblemsResponse
zendesk: LocaleObject
Fields
- created_at string? - The ISO 8601 formatted date-time the locale was created
- id int? - The unique ID of the locale
- locale string? - The name of the locale
- name string? - The name of the language
- updated_at string? - The ISO 8601 formatted date-time when the locale was last updated
- url string? - The URL of the locale record
zendesk: LocaleResponse
Fields
- locale LocaleObject? -
zendesk: LocalesResponse
Fields
- locales LocaleObject[]? -
zendesk: MacroApplyTicketResponse
Fields
- result MacroApplyTicketResponse_result? -
zendesk: MacroApplyTicketResponse_result
Fields
- ticket MacroApplyTicketResponse_result_ticket? -
zendesk: MacroApplyTicketResponse_result_ticket
Fields
- assignee_id int? -
- group_id int? -
- id int? -
- url string? -
zendesk: MacroApplyTicketResponse_result_ticket_comment
Fields
- body string? -
- 'public boolean? -
- scoped_body string[]? -
zendesk: MacroApplyTicketResponse_result_ticket_fields
Fields
- id int? -
- value string? -
zendesk: MacroAttachmentObject
Fields
- content_type string? - The content type of the image. Example value: "image/png"
- content_url string? - A full URL where the attachment image file can be downloaded
- created_at string? - The time when this attachment was created
- filename string? - The name of the image file
- id int? - Automatically assigned when created
- size int? - The size of the image file in bytes
zendesk: MacroAttachmentResponse
Fields
- macro_attachment MacroAttachmentObject? -
zendesk: MacroAttachmentsResponse
Fields
- macro_attachments MacroAttachmentObject[]? -
zendesk: MacroCategoriesResponse
Fields
- categories string[]? -
zendesk: MacroCommonObject
Fields
- actions ActionObject[] - Each action describes what the macro will do. See Actions reference
- active boolean? - Useful for determining if the macro should be displayed
- created_at string? - The time the macro was created
- default boolean? - If true, the macro is a default macro
- description string? - The description of the macro
- id int? - The ID automatically assigned when a macro is created
- position int? - The position of the macro
- restriction record {}? - Access to this macro. A null value allows unrestricted access for all users in the account
- title string - The title of the macro
- updated_at string? - The time of the last update of the macro
- url string? - A URL to access the macro's details
zendesk: MacroInput
Fields
- actions ActionObject[] - Each action describes what the macro will do
- active boolean? - Useful for determining if the macro should be displayed
- description string? - The description of the macro
- restriction MacroInput_restriction? - Who may access this macro. Will be null when everyone in the account can access it
- title string - The title of the macro
zendesk: MacroInput_restriction
Who may access this macro. Will be null when everyone in the account can access it
Fields
- id int? - The numeric ID of the group or user
- ids int[]? - The numeric IDs of the groups
- 'type string? - Allowed values are Group or User
zendesk: MacroObject
Fields
- Fields Included from * MacroCommonObject
- app_installation string? - The app installation that requires each macro, if present
- categories string? - The macro categories
- permissions string? - Permissions for each macro
- usage_1h int? - The number of times each macro has been used in the past hour
- usage_7d int? - The number of times each macro has been used in the past week
- usage_24h int? - The number of times each macro has been used in the past day
- usage_30d int? - The number of times each macro has been used in the past thirty days
zendesk: MacroResponse
Fields
- macro MacroObject? -
zendesk: Macros_macro_id_body
Fields
- macro MacroInput? -
zendesk: MacrosResponse
Fields
- macros MacroObject[]? -
- Fields Included from * OffsetPaginationObject
zendesk: MacroUpdateManyInput
Fields
- macros MacroUpdateManyInput_macros[]? -
zendesk: MacroUpdateManyInput_macros
Fields
- active boolean? - The active status of the macro (true or false)
- id int - The ID of the macro to update
- position int? - The new position of the macro
zendesk: OffsetPaginationObject
Fields
- count int? - the total record count
- next_page string? - the URL of the next page
- previous_page string? - the URL of the previous page
zendesk: OrganizationFieldResponse
Fields
- organization_field OrganizationFieldObject? -
zendesk: OrganizationFieldsResponse
Fields
- count int? - Total count of records retrieved
- next_page string? - URL of the next page
- organization_fields OrganizationFieldObject[]? -
- previous_page string? - URL of the previous page
zendesk: OrganizationMembershipObject
Fields
- created_at string? - When this record was created
- default boolean - Denotes whether this is the default organization membership for the user. If false, returns
null
- id int? - Automatically assigned when the membership is created
- organization_id int - The ID of the organization associated with this user, in this membership
- organization_name string? - The name of the organization associated with this user, in this membership
- updated_at string? - When this record last got updated
- url string? - The API url of this membership
- user_id int - The ID of the user for whom this memberships belongs
- view_tickets boolean? - Denotes whether the user can or cannot have access to all organization's tickets.
zendesk: OrganizationMembershipResponse
Fields
- organization_membership OrganizationMembershipObject? -
zendesk: OrganizationMembershipsResponse
Fields
- organization_memberships OrganizationMembershipObject[]? -
zendesk: OrganizationMetadataObject
Fields
- tickets_count int? - The number of tickets for the organization
- users_count int? - The number of users for the organization
zendesk: OrganizationObject
Fields
- created_at string? - The time the organization was created
- details string? - Any details obout the organization, such as the address
- domain_names string[]? - An array of domain names associated with this organization
- external_id string? - A unique external id to associate organizations to an external record. The id is case-insensitive. For example, "company1" and "Company1" are considered the same
- group_id int? - New tickets from users in this organization are automatically put in this group
- id int? - Automatically assigned when the organization is created
- name string? - A unique name for the organization
- notes string? - Any notes you have about the organization
- organization_fields record {}? - Custom fields for this organization. See Custom organization fields
- updated_at string? - The time of the last update of the organization
- url string? - The API url of this organization
zendesk: OrganizationResponse
Fields
- organization OrganizationObject? -
zendesk: OrganizationsRelatedResponse
Fields
zendesk: OrganizationsResponse
Fields
- count int? -
- next_page string? -
- organizations OrganizationObject[]? -
- previous_page string? -
zendesk: OrganizationSubscriptionCreateRequest
Fields
- organization_subscription OrganizationSubscriptionInput? -
zendesk: OrganizationSubscriptionInput
Fields
- organization_id int? - The ID of the organization
- user_id int? - The ID of the user
zendesk: OrganizationSubscriptionObject
Fields
- created_at string? - The date the organization subscription was created
- id int? - The ID of the organization subscription
- organization_id int? - The ID of the organization
- user_id int? - The ID of the user
zendesk: OrganizationSubscriptionResponse
Fields
- organization_subscription OrganizationSubscriptionObject? -
zendesk: OrganizationSubscriptionsResponse
Fields
- Fields Included from * OffsetPaginationObject
- organization_subscriptions OrganizationSubscriptionObject[]? - An array of organization subscriptions
zendesk: Page
Fields
- after string? -
- before string? -
- size int? -
zendesk: Pagination
Fields
- links Pagination_links? -
- meta Pagination_meta? -
zendesk: Pagination_links
Fields
- next string? -
- prev string? -
zendesk: Pagination_meta
Fields
- after_cursor string? -
- before_cursor string? -
- has_more boolean? -
zendesk: Problems_autocomplete_body
Fields
- text string? - The text to search for
zendesk: ProxyConfig
Proxy server configurations to be used with the HTTP client endpoint.
Fields
- host string(default "") - Host name of the proxy server
- port int(default 0) - Proxy server port
- userName string(default "") - Proxy server username
- password string(default "") - Proxy server password
zendesk: PushNotificationDevicesRequest
Fields
- push_notification_devices PushNotificationDevicesInput? -
zendesk: QueueObject
Fields
- created_at string? - The time the queue was created
- definition QueueObject_definition? - Conditions when queue could be applied
- description string? - The description of the queue
- id string? - Automatically assigned when creating queue
- name string? - The name of the queue
- 'order int? - The queue-applied order
- primary_groups QueueObject_primary_groups? - Primary group ids linked to the queue
- priority int? - The queue-applied priority
- secondary_groups QueueObject_secondary_groups? - Secondary group ids linked to the queue
- updated_at string? - The time of the queue's last update
- url string? - The API URL of the queue
zendesk: QueueObject_definition
Conditions when queue could be applied
Fields
- all QueueObject_definition_all[]? -
- 'any QueueObject_definition_all[]? -
zendesk: QueueObject_definition_all
Fields
- 'field string? -
- operator string? -
- value string? -
zendesk: QueueObject_primary_groups
Primary group ids linked to the queue
Fields
- count int? -
- groups ListDeletedTicketsResponse_actor[]? -
zendesk: QueueObject_secondary_groups
Secondary group ids linked to the queue
Fields
- count int? -
- groups ListDeletedTicketsResponse_actor[]? -
zendesk: QueueResponse
Fields
- queue QueueObject? -
zendesk: QueuesResponse
Fields
- queues QueueObject[]? -
zendesk: RecoverSuspendedTicketResponse
Fields
- ticket SuspendedTicketObject[]? -
zendesk: RecoverSuspendedTicketsResponse
Fields
- tickets SuspendedTicketObject[]? -
zendesk: RecoverSuspendedTicketUnprocessableContentResponse
Fields
- ticket SuspendedTicketObject[]? -
zendesk: RelationshipFilterDefinition
Fields
- conditions_all TriggerConditionDefinitionObjectAll[]? -
- conditions_any TriggerConditionDefinitionObjectAny[]? -
zendesk: RelationshipFilterDefinitionResponse
Fields
- definitions RelationshipFilterDefinition? -
zendesk: RenewSessionResponse
Fields
- authenticity_token string? - A token of authenticity for the request
zendesk: RequestObject
Fields
- assignee_id int? - The id of the assignee if the field is visible to end users
- can_be_solved_by_me boolean? - If true, an end user can mark the request as solved. See Update Request
- collaborator_ids int[]? - The ids of users currently CC'ed on the ticket
- created_at string? - When this record was created
- custom_fields MacroApplyTicketResponse_result_ticket_fields[]? - Custom fields for the request. See Setting custom field values in the Tickets doc
- custom_status_id int? - The custom ticket status id of the ticket
- description string? - Read-only first comment on the request. When creating a request, use
commentto set the description
- due_at string? - When the task is due (only applies if the request is of type "task")
- email_cc_ids int[]? - The ids of users who are currently email CCs on the ticket. See CCs and followers resources in the Support Help Center
- followup_source_id int? - The id of the original ticket if this request is a follow-up ticket. See Create Request
- group_id int? - The id of the assigned group if the field is visible to end users
- id int? - Automatically assigned when creating requests
- is_public boolean? - Is true if any comments are public, false otherwise
- organization_id int? - The organization of the requester
- priority string? - The priority of the request, "low", "normal", "high", "urgent"
- recipient string? - The original recipient e-mail address of the request
- requester_id int? - The id of the requester
- solved boolean? - Whether or not request is solved (an end user can set this if "can_be_solved_by_me", above, is true for that user)
- status string? - The state of the request, "new", "open", "pending", "hold", "solved", "closed"
- subject string - The value of the subject field for this request if the subject field is visible to end users; a truncated version of the description otherwise
- ticket_form_id int? - The numeric id of the ticket form associated with this request if the form is visible to end users - only applicable for enterprise accounts
- 'type string? - The type of the request, "question", "incident", "problem", "task"
- updated_at string? - When this record last got updated
- url string? - The API url of this request
- via TicketAuditViaObject? - Describes how the object was created. See the Via object reference
zendesk: RequestResponse
Fields
- request RequestObject? -
zendesk: RequestsResponse
Fields
- requests RequestObject[]? -
zendesk: ResourceCollectionObject
Fields
- created_at string? - When the resource collection was created
- id int? - id for the resource collection. Automatically assigned upon creation
- resources ResourceCollectionObject_resources[]? - Array of resource metadata objects. See Resource objects
- updated_at string? - Last time the resource collection was updated
zendesk: ResourceCollectionObject_resources
Fields
- deleted boolean? -
- identifier string? -
- resource_id int? -
- 'type string? -
zendesk: ResourceCollectionResponse
Fields
- resource_collection ResourceCollectionObject? -
zendesk: ResourceCollectionsResponse
Fields
- count int? -
- next_page string? -
- previous_page string? -
- resource_collections ResourceCollectionObject[]? -
zendesk: SatisfactionRatingObject
Fields
- assignee_id int - The id of agent assigned to at the time of rating
- comment string? - The comment received with this rating, if available
- created_at string? - The time the satisfaction rating got created
- group_id int - The id of group assigned to at the time of rating
- id int? - Automatically assigned upon creation
- reason_code int? - The default reasons the user can select from a list menu for giving a negative rating. See Reason codes in the Satisfaction Reasons API. Can only be set on ratings with a
scoreof "bad". Responses don't include this property
- reason_id int? - id for the reason the user gave a negative rating. Can only be set on ratings with a
scoreof "bad". To get a descriptive value for the id, use the Show Reason for Satisfaction Rating endpoint
- requester_id int - The id of ticket requester submitting the rating
- score string - The rating "offered", "unoffered", "good" or "bad"
- ticket_id int - The id of ticket being rated
- updated_at string? - The time the satisfaction rating got updated
- url string? - The API url of this rating
zendesk: SatisfactionRatingResponse
Fields
- satisfaction_rating SatisfactionRatingObject[]? -
zendesk: SatisfactionRatingsCountResponse
Fields
- count ActivitiesCountResponse_count? -
zendesk: SatisfactionRatingsResponse
Fields
- satisfaction_ratings SatisfactionRatingObject[]? -
zendesk: SatisfactionReasonObject
Fields
- created_at string? - The time the reason was created
- deleted_at string? - The time the reason was deleted
- id int? - Automatically assigned upon creation
- raw_value string? - The dynamic content placeholder, if present, or the current "value", if not. See Dynamic Content Items
- reason_code int? - An account-level code for referencing the reason. Custom reasons are assigned an auto-incrementing integer (non-system reason codes begin at 1000). See Reason codes
- updated_at string? - The time the reason was updated
- url string? - API URL for the resource
- value string - Translated value of the reason in the account locale
zendesk: SatisfactionReasonResponse
Fields
- reason SatisfactionReasonObject[]? -
zendesk: SatisfactionReasonsResponse
Fields
- reasons SatisfactionReasonObject[]? -
zendesk: SearchCountResponse
Fields
- count int? -
zendesk: SearchExportResponse
Fields
- facets string? - The facets corresponding to the search query
- links SearchExportResponse_links? - The links to the previous and next entries via the cursor ids in the metadata.
- meta SearchExportResponse_meta? - Metadata for the export query response.
- results SearchResultObject[]? - May consist of tickets, users, groups, or organizations, as specified by the
result_typeproperty in each result object
zendesk: SearchExportResponse_links
The links to the previous and next entries via the cursor ids in the metadata.
Fields
- next string? - The url to the next entry via the cursor.
- prev string? - The url to the previous entry via the cursor.
zendesk: SearchExportResponse_meta
Metadata for the export query response.
Fields
- after_cursor string? - The cursor id for the next object.
- before_cursor string? - The cursor id for the previous object.
- has_more boolean? - Whether there are more items yet to be returned by the cursor.
zendesk: SearchResponse
Fields
- count int? - The number of resources returned by the query corresponding to this page of results in the paginated response
- facets string? - The facets corresponding to the search query
- next_page string? - URL to the next page of results
- previous_page string? - URL to the previous page of results
- results SearchResultObject[]? - May consist of tickets, users, groups, or organizations, as specified by the
result_typeproperty in each result object
zendesk: SearchResultObject
Fields
- created_at string? - When the resource was created
- default boolean? - Flag to indicate whether this is the default resource
- deleted boolean? - Flag to indicate whether or not resource has been deleted
- description string? - The description of the resource
- id int? - The ID of the resource
- name string? - The name of the resource
- result_type string? - The type of the resource
- updated_at string? - When the resource was last updated
- url string? - The url of the resource
zendesk: SessionObject
Fields
- authenticated_at string? - When the session was created
- id int - Automatically assigned when the session is created
- last_seen_at string? - The last approximate time this session was seen. This does not update on every request.
- url string? - The API URL of this session
- user_id int? - The id of the user
zendesk: SessionResponse
Fields
- session SessionObject[]? -
zendesk: SessionsResponse
Fields
- sessions SessionObject[]? -
zendesk: SharingAgreementObject
Fields
- created_at string? - The time the record was created
- id int? - Automatically assigned upon creation
- name string? - Name of this sharing agreement
- partner_name string? - Can be one of the following: "jira", null
- remote_subdomain string? - Subdomain of the remote account or null if not associated with an account
- status string? - Can be one of the following: "accepted", "declined", "pending", "inactive", "failed", "ssl_error", "configuration_error"
- 'type string? - Can be one of the following: "inbound", "outbound"
- url string? - URL of the sharing agreement record
zendesk: SharingAgreementResponse
Fields
zendesk: SharingAgreementsResponse
Fields
zendesk: SkillBasedRoutingAttributeDefinitions
Fields
- definitions SkillBasedRoutingAttributeDefinitions_definitions? -
zendesk: SkillBasedRoutingAttributeDefinitions_definitions
Fields
- conditions_all SkillBasedRoutingAttributeDefinitions_definitions_conditions_all[]? -
- conditions_any SkillBasedRoutingAttributeDefinitions_definitions_conditions_all[]? -
zendesk: SkillBasedRoutingAttributeDefinitions_definitions_conditions_all
Fields
- subject string? -
- title string? -
zendesk: SkillBasedRoutingAttributeObject
Fields
- created_at string? - When this record was created
- id string? - Automatically assigned when an attribute is created
- name string - The name of the attribute
- updated_at string? - When this record was last updated
- url string? - URL of the attribute
zendesk: SkillBasedRoutingAttributeResponse
Fields
- attribute SkillBasedRoutingAttributeObject? -
zendesk: SkillBasedRoutingAttributesResponse
Fields
- attributes SkillBasedRoutingAttributeObject[]? -
- count int? -
- next_page string? -
- previous_page string? -
zendesk: SkillBasedRoutingAttributeValueObject
Fields
- attribute_id string? - Id of the associated attribute
- created_at string? - When this record was created
- id string? - Automatically assigned when an attribute value is created
- name string? - The name of the attribute value
- updated_at string? - When this record was last updated
- url string? - URL of the attribute value
zendesk: SkillBasedRoutingAttributeValueResponse
Fields
- attribute_value SkillBasedRoutingAttributeValueObject? -
zendesk: SkillBasedRoutingAttributeValuesResponse
Fields
- attribute_values SkillBasedRoutingAttributeValueObject[]? -
zendesk: SkillBasedRoutingTicketFulfilledResponse
Fields
- fulfilled_ticket_ids int[]? -
zendesk: SLAPoliciesResponse
Fields
- count int? -
- next_page string? -
- previous_page string? -
- sla_policies SLAPolicyObject[]? -
zendesk: SLAPolicyFilterConditionObject
Fields
- 'field string? - The name of a ticket field
- operator string? - A comparison operator
zendesk: SLAPolicyFilterDefinitionResponse
Fields
- definitions SLAPolicyFilterDefinitionResponse_definitions? -
zendesk: SLAPolicyFilterDefinitionResponse_definitions
Fields
zendesk: SLAPolicyFilterDefinitionResponse_definitions_all
Fields
- group string? -
- operators GroupSLAPolicyFilterDefinitionResponse_definitions_operators[]? -
- target string? -
- title string? -
- value string? -
zendesk: SLAPolicyFilterDefinitionResponse_definitions_values
Fields
- 'type string? -
zendesk: SLAPolicyFilterDefinitionResponse_definitions_values_list
Fields
- title string? -
- value string? -
zendesk: SLAPolicyFilterObject
An object that describes the conditions that a ticket must match in order for an SLA policy to be applied to that ticket. See Filter.
Fields
- all SLAPolicyFilterConditionObject[]? -
- 'any SLAPolicyFilterConditionObject[]? -
zendesk: SLAPolicyMetricObject
Fields
- business_hours boolean? - Whether the metric targets are being measured in business hours or calendar hours
- metric string? - The definition of the time that is being measured
- priority string? - Priority that a ticket must match
- target int? - The time within which the end-state for a metric should be met
zendesk: SLAPolicyObject
Fields
- created_at string? - The time the SLA policy was created
- description string? - The description of the SLA policy
- filter SLAPolicyFilterObject - An object that describes the conditions that a ticket must match in order for an SLA policy to be applied to that ticket. See Filter.
- id int? - Automatically assigned when created
- policy_metrics SLAPolicyMetricObject[]? - Array of Policy Metric objects
- position int? - Position of the SLA policy that determines the order they will be matched. If not specified, the SLA policy is added as the last position
- title string - The title of the SLA policy
- updated_at string? - The time of the last update of the SLA policy
- url string? - URL of the SLA Policy reacord
zendesk: SLAPolicyResponse
Fields
- sla_policy SLAPolicyObject? -
zendesk: SupportAddressesResponse
Fields
- recipient_addresses SupportAddressObject[]? -
zendesk: SupportAddressObject
Fields
- cname_status "unknown"|"verified"|"failed" ? - Whether all of the required CNAME records are set. Possible values: "unknown", "verified", "failed"
- created_at string? - When the address was created
- default boolean? - Whether the address is the account's default support address
- dns_results "verified"|"failed" ? - Verification statuses for the domain and CNAME records. Possible types: "verified", "failed"
- domain_verification_code string? - Verification string to be added as a TXT record to the domain. Possible types: string or null.
- domain_verification_status "unknown"|"verified"|"failed" ? - Whether the domain verification record is valid. Possible values: "unknown", "verified", "failed"
- email string - The email address. You can't change the email address of an existing support address.
- forwarding_status "unknown"|"waiting"|"verified"|"failed" ? - Status of email forwarding. Possible values: "unknown", "waiting", "verified", or "failed"
- id int? - Automatically assigned when created
- name string? - The name for the address
- spf_status "unknown"|"verified"|"failed" ? - Whether the SPF record is set up correctly. Possible values: "unknown", "verified", "failed"
- updated_at string? - When the address was updated
zendesk: SupportAddressResponse
Fields
- recipient_address SupportAddressObject? -
zendesk: SuspendedTicketObject
Fields
- attachments AttachmentObject[]? - The attachments, if any associated to this suspended ticket. See Attachments
- brand_id int? - The id of the brand this ticket is associated with. Only applicable for Enterprise accounts
- cause string? - Why the ticket was suspended
- cause_id int? - The ID of the cause
- content string? - The content that was flagged
- created_at string? - The ticket ID this suspended email is associated with, if available
- error_messages record {}[]? - The error messages if any associated to this suspended ticket
- id int? - Automatically assigned
- message_id string? - The ID of the email, if available
- recipient string? - The original recipient e-mail address of the ticket
- subject string? - The value of the subject field for this ticket
- ticket_id int? - The ticket ID this suspended email is associated with, if available
- updated_at string? - When the ticket was assigned
- url string? - The API url of this ticket
- via ViaObject? - An object explaining how the ticket was created. See the Via object reference
zendesk: SuspendedTicketResponse
Fields
- suspended_ticket SuspendedTicketObject[]? -
zendesk: SuspendedTicketsAttachmentsResponse
Fields
zendesk: SuspendedTicketsAttachmentsResponse_upload
Fields
- attachments AttachmentObject[]? -
- token string? - Token for subsequent request
zendesk: SuspendedTicketsExportResponse
Fields
- export SuspendedTicketsExportResponse_export? -
zendesk: SuspendedTicketsExportResponse_export
Fields
- status string? -
- view_id string? -
zendesk: SuspendedTicketsResponse
Fields
- suspended_tickets SuspendedTicketObject[]? -
zendesk: SystemFieldOptionObject
Fields
- name string? - Name of the system field option
- value string? - Value of the system field option
zendesk: TagCountObject
Fields
- refreshed_at string? - The time that the count value was last refreshed
- value int? - The count of tags created in the last 24 hours
zendesk: TagCountResponse
Fields
- count TagCountObject? -
zendesk: TagListTagObject
Fields
- count int? - The number of tags
- name string? - A name for the tag
zendesk: TagsByObjectIdResponse
Fields
zendesk: TagsResponse
Fields
- count int? - The number of pages
- next_page string? - The url of the previous page
- previous_page string? - The url of the next page
zendesk: TagUrlObject
Fields
- url string? - The url associated to the api request
zendesk: TargetBasecamp
Fields
- message_id string? - Can be filled if it is a "message" resource
- password string? - The 37Signals password for the Basecamp account (only writable)
- project_id string - The ID of the project in Basecamp where updates should be pushed
- 'resource string - "todo" or "message"
- target_url string - The URL of your Basecamp account, including protocol and path
- todo_list_id string? - Can be filled if it is a "todo" resource
- token string - Get the API token from My info > Show your tokens > Token for feed readers or the Basecamp API in your Basecamp account
- username string? - The 37Signals username of the account you use to log in to Basecamp
zendesk: TargetCampfire
Fields
- preserve_format boolean? -
- room string -
- ssl boolean? -
- subdomain string -
- token string -
zendesk: TargetClickatell
Fields
- api_id string -
- attribute string? - Read-only
- 'from string? -
- method string? - Read-only
- password string - only writable
- target_url string? - Read-only
- to string -
- us_small_business_account string? -
- username string -
zendesk: TargetCommonFields
Fields
- active boolean? - Whether or not the target is activated
- created_at string? - The time the target was created
- id int? - Automatically assigned when created
- title string - A name for the target
- 'type string - A pre-defined target, such as "basecamp_target". See the additional attributes for the type that follow
zendesk: TargetEmail
Fields
- email string -
- subject string -
zendesk: TargetFailureObject
Fields
- consecutive_failure_count int? - Number of times the target failed consecutively
- created_at string? - Time of the failure
- id int? - The ID of the target failure
- raw_request string? - The raw message of the target request
- raw_response string? - The raw response of the failure
- status_code int? - HTTP status code of the target failure
- target_name string? - Name of the target failure
- url string? - The API url of the failure record
zendesk: TargetFailureResponse
Fields
- target_failure TargetFailureObject? -
zendesk: TargetFailuresResponse
Fields
- target_failures TargetFailureObject[]? -
zendesk: TargetFlowdock
Fields
- api_token string -
zendesk: TargetGetSatisfaction
Fields
- account_name string -
- email string -
- password string - only writable
- target_url string? -
zendesk: TargetHTTP
Fields
- content_type string - "application/json", "application/xml", or "application/x-www-form-urlencoded"
- method string - "get", "patch", "put", "post", or "delete"
- password string? - only writable
- target_url string -
- username string? -
zendesk: TargetJira
Fields
- password string - only writable
- target_url string -
- username string -
zendesk: TargetPivotal
Fields
- owner_by string? -
- project_id string -
- requested_by string? -
- story_labels string? -
- story_title string -
- story_type string -
- token string -
zendesk: TargetResponse
Fields
- target TargetObject? -
zendesk: TargetsResponse
Fields
- targets TargetObject[]? -
zendesk: TargetTwitter
Fields
- secret string? - only writable
- token string? -
zendesk: TargetURL
Fields
- attribute string -
- method string? - "get"
- password string? - only writable
- target_url string -
- username string? -
zendesk: TargetYammer
Fields
- group_id string? -
- token string? -
zendesk: TicketAuditObject
Fields
- created_at string? - The time the audit was created
- events record {}[]? - An array of the events that happened in this audit. See the Ticket Audit events reference
- id int? - Automatically assigned when creating audits
- metadata record {}? - Metadata for the audit, custom and system data
- ticket_id int? - The ID of the associated ticket
- via TicketAuditViaObject? - Describes how the object was created. See the Via object reference
zendesk: TicketAuditResponse
Fields
- audit TicketAuditObject? -
zendesk: TicketAuditsCountResponse
Fields
- count ActivitiesCountResponse_count? -
zendesk: TicketAuditsResponse
Fields
- after_cursor string? -
- after_url string? -
- audits TicketAuditObject[]? -
- before_cursor string? -
- before_url string? -
zendesk: TicketAuditsResponseNoneCursor
Fields
- audits TicketAuditObject[]? -
- count int? -
- next_page string? -
- previous_page string? -
zendesk: TicketAuditViaObject
Describes how the object was created. See the Via object reference
Fields
- channel string? - This tells you how the ticket or event was created. Examples: "web", "mobile", "rule", "system"
- 'source record {}? - For some channels a source object gives more information about how or why the ticket or event was created
zendesk: TicketBulkImportRequest
Fields
- tickets TicketImportInput[]? -
zendesk: TicketChatCommentRedactionResponse
Fields
- chat_event TicketChatCommentRedactionResponse_chat_event? - Chat event object
zendesk: TicketChatCommentRedactionResponse_chat_event
Chat event object
Fields
- id int? - Id assigned to the chat event object
- 'type string? - Type of chat event
- value TicketChatCommentRedactionResponse_chat_event_value? - The value of the chat event object
zendesk: TicketChatCommentRedactionResponse_chat_event_value
The value of the chat event object
Fields
- chat_id string? - Id of the chat session
- history record {}[]? - Chat events within the chat session
- visitor_id string? - Id assigned to the visitor
zendesk: TicketCommentObject
Fields
- attachments AttachmentObject[]? - Attachments, if any. See Attachment
- audit_id int? - The id of the ticket audit record. See Show Audit
- created_at string? - The time the comment was created
- id int? - Automatically assigned when the comment is created
- metadata record {}? - System information (web client, IP address, etc.) and comment flags, if any. See Comment flags
- 'public boolean? - true if a public comment; false if an internal note. The initial value set on ticket creation persists for any additional comment unless you change it
- 'type string? -
CommentorVoiceComment. The JSON object for adding voice comments to tickets is different. See Adding voice comments to tickets
- uploads string[]? - List of tokens received from uploading files for comment attachments. The files are attached by creating or updating tickets with the tokens. See Attaching files in Tickets
- via TicketAuditViaObject? - Describes how the object was created. See the Via object reference
zendesk: TicketCommentResponse
Fields
- comment TicketCommentObject? -
zendesk: TicketCommentsCountResponse
Fields
- count ActivitiesCountResponse_count? -
zendesk: TicketCommentsResponse
Fields
- comments TicketCommentObject[]? -
zendesk: TicketCreateInput
Fields
- Fields Included from * TicketUpdateInput
- additional_collaborators CollaboratorObject[]|()
- assignee_email string|()
- assignee_id int|()
- attribute_value_ids int[]|()
- collaborator_ids int[]|()
- comment TicketCommentObject|()
- custom_fields CustomFieldObject[]|()
- custom_status_id int|()
- due_at string|()
- email_ccs EmailCCObject[]|()
- external_id string|()
- followers FollowerObject[]|()
- group_id int|()
- organization_id int|()
- priority "urgent"|"high"|"normal"|"low"
- problem_id int|()
- requester_id int|()
- safe_update boolean|()
- sharing_agreement_ids int[]|()
- status "new"|"open"|"pending"|"hold"|"solved"|"closed"
- subject string|()
- tags string[]|()
- type "problem"|"incident"|"question"|"task"
- updated_stamp string|()
- anydata...
- brand_id int? - Enterprise only. The id of the brand this ticket is associated with
- collaborators CollaboratorObject[]? - POST requests only. Users to add as cc's when creating a ticket. See Setting Collaborators
- email_cc_ids int[]? - The ids of agents or end users currently CC'ed on the ticket. See CCs and followers resources in the Support Help Center
- follower_ids int[]? - The ids of agents currently following the ticket. See CCs and followers resources
- macro_ids int[]? - POST requests only. List of macro IDs to be recorded in the ticket audit
- raw_subject string? - The dynamic content placeholder, if present, or the "subject" value, if not. See Dynamic Content Items
- recipient string? - The original recipient e-mail address of the ticket
- submitter_id int? - The user who submitted the ticket. The submitter always becomes the author of the first comment on the ticket
- ticket_form_id int? - Enterprise only. The id of the ticket form to render for the ticket
- via ViaObject? - An object explaining how the ticket was created. See the Via object reference
- via_followup_source_id int? - POST requests only. The id of a closed ticket when creating a follow-up ticket. See Creating a follow-up ticket
zendesk: TicketCreateRequest
Fields
- ticket TicketCreateInput? -
zendesk: TicketCreateVoicemailTicketInput
Fields
- comment TicketCommentObject? -
- priority "urgent"|"high"|"normal"|"low" ? - The urgency with which the ticket should be addressed.
- via_id 44|45|46 ? - Required for Create Ticket operation
- voice_comment TicketCreateVoicemailTicketVoiceCommentInput? - Required if creating voicemail ticket
zendesk: TicketCreateVoicemailTicketRequest
Fields
- display_to_agent int? - Optional value such as the ID of the agent that will see the newly created ticket.
- ticket TicketCreateVoicemailTicketInput? - Ticket object that lists the values to set when the ticket is created
zendesk: TicketCreateVoicemailTicketVoiceCommentInput
Fields
- answered_by_id int? - The agent who answered the call
- call_duration int? - Duration in seconds of the call
- 'from string? - Incoming phone number
- location string? - Location of the caller (optional)
- recording_url string? - Incoming phone number
- to string? - Dialed phone number
- transcription_text string? - Transcription of the call (optional)
zendesk: TicketFieldCountResponse
Fields
- count ActivitiesCountResponse_count? -
zendesk: TicketFieldCustomStatusObject
Fields
- active boolean? - If true, if the custom status is set to active. If false, the custom status is set to inactive
- agent_label string? - The label displayed to agents
- created_at string? - The date and time at which the custom ticket status was created
- default boolean? - If true, the custom status is set to default. If false, the custom status is set to non-default
- description string? - The description of when the user should select this custom ticket status
- end_user_description string? - The description displayed to end users
- end_user_label string? - The label displayed to end users
- id int? - Automatically assigned when the custom ticket status is created
- status_category "new"|"open"|"pending"|"hold"|"solved" ? - The status category the custom ticket status belongs to
- updated_at string? - The date and time at which the custom ticket status was last updated
zendesk: TicketFieldObject
Fields
- active boolean? - Whether this field is available
- agent_description string? - A description of the ticket field that only agents can see
- collapsed_for_agents boolean? - If true, the field is shown to agents by default. If false, the field is hidden alongside infrequently used fields. Classic interface only
- created_at string? - The time the custom ticket field was created
- creator_app_name string? - Name of the app that created the ticket field, or a null value if no app created the ticket field
- creator_user_id int? - The id of the user that created the ticket field, or a value of "-1" if an app created the ticket field
- custom_field_options CustomFieldOptionObject[]? - Required and presented for a custom ticket field of type "multiselect" or "tagger"
- custom_statuses TicketFieldCustomStatusObject[]? - List of customized ticket statuses. Only presented for a system ticket field of type "custom_status"
- description string? - Describes the purpose of the ticket field to users
- editable_in_portal boolean? - Whether this field is editable by end users in Help Center
- id int? - Automatically assigned when created
- position int? - The relative position of the ticket field on a ticket. Note that for accounts with ticket forms, positions are controlled by the different forms
- raw_description string? - The dynamic content placeholder if present, or the
descriptionvalue if not. See Dynamic Content
- raw_title string? - The dynamic content placeholder if present, or the
titlevalue if not. See Dynamic Content
- raw_title_in_portal string? - The dynamic content placeholder if present, or the "title_in_portal" value if not. See Dynamic Content
- regexp_for_validation string? - For "regexp" fields only. The validation pattern for a field value to be deemed valid
- relationship_filter record {}? - A filter definition that allows your autocomplete to filter down results
- relationship_target_type string? - A representation of what type of object the field references. Options are "zen:user", "zen:organization", "zen:ticket", or "zen:custom_object:{key}" where key is a custom object key. For example "zen:custom_object:apartment".
- removable boolean? - If false, this field is a system field that must be present on all tickets
- required boolean? - If true, agents must enter a value in the field to change the ticket status to solved
- required_in_portal boolean? - If true, end users must enter a value in the field to create the request
- sub_type_id int? - For system ticket fields of type "priority" and "status". Defaults to 0. A "priority" sub type of 1 removes the "Low" and "Urgent" options. A "status" sub type of 1 adds the "On-Hold" option
- system_field_options SystemFieldOptionObject[]? - Presented for a system ticket field of type "tickettype", "priority" or "status"
- tag string? - For "checkbox" fields only. A tag added to tickets when the checkbox field is selected
- title string - The title of the ticket field
- title_in_portal string? - The title of the ticket field for end users in Help Center
- 'type string - System or custom field type. Editable for custom field types and only on creation. See Create Ticket Field
- updated_at string? - The time the custom ticket field was last updated
- url string? - The URL for this resource
- visible_in_portal boolean? - Whether this field is visible to end users in Help Center
zendesk: TicketFieldResponse
Fields
- ticket_field TicketFieldObject? -
zendesk: TicketFieldsResponse
Fields
- ticket_fields TicketFieldObject[]? -
zendesk: TicketFormObject
Fields
- active boolean? - If the form is set as active
- agent_conditions record {}[]? - Array of condition sets for agent workspaces
- created_at string? - The time the ticket form was created
- default boolean? - Is the form the default form for this account
- display_name string? - The name of the form that is displayed to an end user
- end_user_conditions record {}[]? - Array of condition sets for end user products
- end_user_visible boolean? - Is the form visible to the end user
- id int? - Automatically assigned when creating ticket form
- in_all_brands boolean? - Is the form available for use in all brands on this account
- name string - The name of the form
- position int? - The position of this form among other forms in the account, i.e. dropdown
- raw_display_name string? - The dynamic content placeholder, if present, or the "display_name" value, if not. See Dynamic Content Items
- raw_name string? - The dynamic content placeholder, if present, or the "name" value, if not. See Dynamic Content Items
- restricted_brand_ids int[]? - ids of all brands that this ticket form is restricted to
- ticket_field_ids int[]? - ids of all ticket fields which are in this ticket form. The products use the order of the ids to show the field values in the tickets
- updated_at string? - The time of the last update of the ticket form
- url string? - URL of the ticket form
zendesk: TicketFormResponse
Fields
- ticket_form TicketFormObject? -
zendesk: TicketFormsResponse
Fields
- ticket_forms TicketFormObject[]? -
zendesk: TicketImportInput
Fields
- assignee_id int? - The agent currently assigned to the ticket
- comments record {}? - The conversation between requesters, collaborators, and agents
- description string? - Read-only first comment on the ticket. When creating a ticket, use
commentto set the description. See Description and first comment
- requester_id int? - The user who requested this ticket
- subject string? - The value of the subject field for this ticket
zendesk: TicketImportRequest
Fields
- ticket TicketImportInput? -
zendesk: TicketMergeInput
Fields
- ids int[] - Ids of tickets to merge into the target ticket
- source_comment string? - Private comment to add to the source ticket
- source_comment_is_public boolean? - Whether comment in source tickets are public or private
- target_comment string? - Private comment to add to the target ticket
- target_comment_is_public boolean? - Whether comment in target ticket is public or private
zendesk: TicketMetricEventBaseObject
Fields
- id int? - Automatically assigned when the record is created
- instance_id int? - The instance of the metric associated with the event. See instance_id
- metric "agent_work_time"|"pausable_update_time"|"periodic_update_time"|"reply_time"|"requester_wait_time"|"resolution_time" ? - The metric being tracked
- ticket_id int? - Id of the associated ticket
- time string? - The time the event occurred
- 'type "activate"|"pause"|"fulfill"|"apply_sla"|"breach"|"update_status"|"measure" ? - The type of the metric event. See Ticket metric event types reference
zendesk: TicketMetricEventBreachObject
Fields
- Fields Included from * TicketMetricEventBaseObject
zendesk: TicketMetricEventGroupSLAObject
Fields
- Fields Included from * TicketMetricEventBaseObject
- group_sla record {}? - Available if
typeis "apply_group_sla". The Group SLA policy and target being enforced on the ticket and metric in question, if any. See group_sla
zendesk: TicketMetricEventSLAObject
Fields
- Fields Included from * TicketMetricEventBaseObject
- sla record {}? - Available if
typeisapply_sla. The SLA policy and target being enforced on the ticket and metric in question, if any. See sla
zendesk: TicketMetricEventsResponse
Fields
- ticket_metric_events TicketMetricEventBaseObject[]? -
- count int? -
- end_time int? -
- next_page string? -
zendesk: TicketMetricEventUpdateStatusObject
Fields
- Fields Included from * TicketMetricEventBaseObject
- status record {}? - Available if
typeisupdate_status. Minutes since the metric has been open. See status
zendesk: TicketMetricObject
Fields
- agent_wait_time_in_minutes TicketMetricTimeObject? - Number of minutes the agent spent waiting during calendar and business hours
- assigned_at string? - When the ticket was assigned
- assignee_stations int? - Number of assignees the ticket had
- assignee_updated_at string? - When the assignee last updated the ticket
- created_at string? - When the record was created
- custom_status_updated_at string? - The date and time the ticket's custom status was last updated
- first_resolution_time_in_minutes TicketMetricTimeObject? - Number of minutes to the first resolution time during calendar and business hours
- full_resolution_time_in_minutes TicketMetricTimeObject? - Number of minutes to the full resolution during calendar and business hours
- group_stations int? - Number of groups the ticket passed through
- id int? - Automatically assigned when the client is created
- initially_assigned_at string? - When the ticket was initially assigned
- latest_comment_added_at string? - When the latest comment was added
- on_hold_time_in_minutes TicketMetricTimeObject? - Number of minutes on hold
- reopens int? - Total number of times the ticket was reopened
- replies int? - The number of public replies added to a ticket by an agent
- reply_time_in_minutes TicketMetricTimeObject? - Number of minutes to the first reply during calendar and business hours
- reply_time_in_seconds TicketMetricTimeObject? - Number of seconds to the first reply during calendar hours, only available for Messaging tickets
- requester_updated_at string? - When the requester last updated the ticket
- requester_wait_time_in_minutes TicketMetricTimeObject? - Number of minutes the requester spent waiting during calendar and business hours
- solved_at string? - When the ticket was solved
- status_updated_at string? - When the status of the ticket was last updated
- ticket_id int? - Id of the associated ticket
- updated_at string? - When the record was last updated
- url string? - The API url of the ticket metric
zendesk: TicketMetricsByTicketMetricIdResponse
Fields
- ticket_metric TicketMetricObject[]? -
zendesk: TicketMetricsResponse
Fields
- ticket_metrics TicketMetricObject[]? -
zendesk: TicketMetricTimeObject
Fields
- business int? - Time in business hours
- calendar int? - Time in calendar hours
zendesk: TicketObject
Fields
- allow_attachments boolean? - Permission for agents to add add attachments to a comment. Defaults to true
- allow_channelback boolean? - Is false if channelback is disabled, true otherwise. Only applicable for channels framework ticket
- assignee_email string? - Write only. The email address of the agent to assign the ticket to
- assignee_id int? - The agent currently assigned to the ticket
- attribute_value_ids int[]? - Write only. An array of the IDs of attribute values to be associated with the ticket
- brand_id int? - The id of the brand this ticket is associated with. See Setting up multiple brands
- collaborator_ids int[]? - The ids of users currently CC'ed on the ticket
- collaborators CollaboratorObject[]? - POST requests only. Users to add as cc's when creating a ticket. See Setting Collaborators
- comment record {}? - Write only. An object that adds a comment to the ticket. See Ticket comments. To include an attachment with the comment, see Attaching files
- created_at string? - When this record was created
- custom_fields TicketObject_custom_fields[]? - Custom fields for the ticket. See Setting custom field values
- custom_status_id int? - The custom ticket status id of the ticket. See custom ticket statuses
- description string? - Read-only first comment on the ticket. When creating a ticket, use
commentto set the description. See Description and first comment
- email_cc_ids int[]? - The ids of agents or end users currently CC'ed on the ticket. See CCs and followers resources in the Support Help Center
- email_ccs record {}? - Write only. An array of objects that represent agent or end users email CCs to add or delete from the ticket. See Setting email CCs
- external_id string? - An id you can use to link Zendesk Support tickets to local records
- follower_ids int[]? - The ids of agents currently following the ticket. See CCs and followers resources
- followers record {}? - Write only. An array of objects that represent agent followers to add or delete from the ticket. See Setting followers
- followup_ids int[]? - The ids of the followups created from this ticket. Ids are only visible once the ticket is closed
- forum_topic_id int? - The topic in the Zendesk Web portal this ticket originated from, if any. The Web portal is deprecated
- group_id int? - The group this ticket is assigned to
- has_incidents boolean? - Is true if a ticket is a problem type and has one or more incidents linked to it. Otherwise, the value is false.
- id int? - Automatically assigned when the ticket is created
- is_public boolean? - Is true if any comments are public, false otherwise
- macro_id int? - Write only. A macro ID to be recorded in the ticket audit
- macro_ids int[]? - POST requests only. List of macro IDs to be recorded in the ticket audit
- metadata record {}? - Write only. Metadata for the audit. In the
auditobject, the data is specified in thecustomproperty of themetadataobject. See Setting Metadata
- organization_id int? - The organization of the requester. You can only specify the ID of an organization associated with the requester. See Organization Memberships
- priority "urgent"|"high"|"normal"|"low" ? - The urgency with which the ticket should be addressed
- problem_id int? - For tickets of type "incident", the ID of the problem the incident is linked to
- raw_subject string? - The dynamic content placeholder, if present, or the "subject" value, if not. See Dynamic Content Items
- recipient string? - The original recipient e-mail address of the ticket. Notification emails for the ticket are sent from this address
- requester record {}? - Write only. See Creating a ticket with a new requester
- requester_id int - The user who requested this ticket
- safe_update boolean? - Write only. Optional boolean. When true and an
update_stampdate is included, protects against ticket update collisions and returns a message to let you know if one occurs. See Protecting against ticket update collisions. A value of false has the same effect as true. Omit the property to force the updates to not be safe
- satisfaction_rating record {}? - The satisfaction rating of the ticket, if it exists, or the state of satisfaction, "offered" or "unoffered". The value is null for plan types that don't support CSAT
- status "new"|"open"|"pending"|"hold"|"solved"|"closed" ? - The state of the ticket. If your account has activated custom ticket statuses, this is the ticket's status category. See custom ticket statuses
- submitter_id int? - The user who submitted the ticket. The submitter always becomes the author of the first comment on the ticket
- ticket_form_id int? - Enterprise only. The id of the ticket form to render for the ticket
- 'type "problem"|"incident"|"question"|"task" ? - The type of this ticket
- updated_at string? - When this record last got updated. It is updated only if the update generates a ticket event
- updated_stamp string? - Write only. Datetime of last update received from API. See the
safe_updateproperty
- url string? - The API url of this ticket
- via TicketObject_via? - For more information, see the Via object reference
- via_followup_source_id int? - POST requests only. The id of a closed ticket when creating a follow-up ticket. See Creating a follow-up ticket
- via_id int? - Write only. For more information, see the Via object reference
- voice_comment record {}? - Write only. See Creating voicemail ticket
zendesk: TicketObject_custom_fields
Fields
- id int? - The id of the custom field
- value string? - The value of the custom field
zendesk: TicketObject_via
For more information, see the Via object reference
Fields
- channel string? - This tells you how the ticket or event was created. Examples: "web", "mobile", "rule", "system"
- 'source record {}? - For some channels a source object gives more information about how or why the ticket or event was created
zendesk: TicketRelatedInformation
Fields
- followup_source_ids string[]? -
- from_archive boolean? - Is true if the current ticket is archived
- incidents int? - A count of related incident occurrences
- topic_id string? - Related topic in the Web portal (deprecated feature)
- twitter record {}? - X (formerly Twitter) information associated with the ticket
zendesk: TicketResponse
Fields
- ticket TicketObject? -
zendesk: TicketsCreateRequest
Fields
- tickets TicketCreateInput[]? -
zendesk: TicketSkipCreation
Fields
- skip TicketSkipObject? -
zendesk: TicketSkipObject
Fields
- created_at string? - Time the skip was created
- id int? - Automatically assigned upon creation
- reason string? - Reason for skipping the ticket
- ticket TicketObject? - The skipped ticket. See the Ticket object reference
- ticket_id int? - ID of the skipped ticket
- updated_at string? - Time the skip was last updated
- user_id int? - ID of the skipping agent
zendesk: TicketSkipsResponse
Fields
- skips TicketSkipObject[]? -
zendesk: TicketsResponse
Fields
- tickets TicketObject[]? -
zendesk: TicketUpdateInput
Fields
- additional_collaborators CollaboratorObject[]? - An array of numeric IDs, emails, or objects containing name and email properties. See Setting Collaborators. An email notification is sent to them when the ticket is updated
- assignee_email string? - The email address of the agent to assign the ticket to
- assignee_id int? - The agent currently assigned to the ticket
- attribute_value_ids int[]? - An array of the IDs of attribute values to be associated with the ticket
- collaborator_ids int[]? - The ids of users currently CC'ed on the ticket
- comment TicketCommentObject? -
- custom_fields CustomFieldObject[]? - Custom fields for the ticket. See Setting custom field values
- custom_status_id int? - The custom ticket status id of the ticket. See custom ticket statuses
- email_ccs EmailCCObject[]? - An array of objects that represent agent or end users email CCs to add or delete from the ticket. See Setting email CCs
- external_id string? - An id you can use to link Zendesk Support tickets to local records
- followers FollowerObject[]? - An array of objects that represent agent followers to add or delete from the ticket. See Setting followers
- group_id int? - The group this ticket is assigned to
- organization_id int? - The organization of the requester. You can only specify the ID of an organization associated with the requester. See Organization Memberships
- priority "urgent"|"high"|"normal"|"low" ? - The urgency with which the ticket should be addressed.
- problem_id int? - For tickets of type "incident", the ID of the problem the incident is linked to
- requester_id int? - The user who requested this ticket
- safe_update boolean? - Optional boolean. Prevents updates with outdated ticket data (
updated_stampproperty required when true)
- status "new"|"open"|"pending"|"hold"|"solved"|"closed" ? - The state of the ticket. If your account has activated custom ticket statuses, this is the ticket's status category. See custom ticket statuses.
- subject string? - The value of the subject field for this ticket
- 'type "problem"|"incident"|"question"|"task" ? - The type of this ticket.
- updated_stamp string? - Datetime of last update received from API. See the safe_update property
zendesk: TicketUpdateRequest
Fields
- ticket TicketUpdateInput? -
zendesk: TicketUpdateResponse
Fields
- audit AuditObject? -
- ticket TicketObject? -
zendesk: TimeBasedExportIncrementalTicketsResponse
See Tickets for a detailed example.
Fields
- count int? -
- end_of_stream boolean? -
- end_time int? -
- next_page string? -
- tickets TicketObject[]? -
zendesk: TimeBasedExportIncrementalUsersResponse
Fields
- count int? -
- end_of_stream boolean? -
- end_time int? -
- next_page string? -
- users UserObject[]? -
zendesk: TrialAccountObject
Fields
- name string? - The name of the account
- subdomain string? - The subdomain of the account
- url string? - The URL of the account
zendesk: TrialAccountResponse
Fields
- account TrialAccountObject? -
zendesk: Trigger_categories_trigger_category_id_body
Fields
- trigger_category TriggerCategoryRequest? -
zendesk: TriggerActionDefinitionObject
Fields
- group string? -
- nullable boolean? -
- repeatable boolean? -
- subject string? -
- title string? -
- 'type string? -
- values DefinitionsResponse_definitions_values[]? -
zendesk: TriggerActionDiffObject
Fields
- 'field TriggerChangeObject[]? - An array of change objects.
- value TriggerChangeObject[]? - An array of change objects.
zendesk: TriggerActionObject
Fields
- 'field string? -
zendesk: TriggerBatchRequest
Fields
- active boolean? -
- category_id string? -
- id string -
- position int? -
zendesk: TriggerBulkUpdateItem
Fields
- active boolean? - The active status of the trigger (true or false)
- category_id string? - The ID of the new category the trigger is to be moved to
- id int - The ID of the trigger to update
- position int? - The new position of the trigger
zendesk: TriggerBulkUpdateRequest
Fields
- triggers TriggerBulkUpdateItem[]? -
zendesk: TriggerCategoriesResponse
Fields
- trigger_categories TriggerCategory[]? -
zendesk: TriggerCategory
Fields
- created_at string? -
- id string? -
- name string? -
- position int? -
- updated_at string? -
zendesk: TriggerCategoryBatchRequest
Fields
- id string -
- position int -
zendesk: TriggerCategoryRequest
Fields
- name string? -
- position int? -
zendesk: TriggerCategoryRequestRequired
zendesk: TriggerCategoryResponse
Fields
- trigger_category TriggerCategory? -
zendesk: TriggerCategoryRuleCounts
Fields
- active_count int? -
- inactive_count int? -
zendesk: TriggerChangeObject
Fields
- change string? - One of
-,+,=representing the type of change
zendesk: TriggerConditionDefinitionObjectAll
Fields
- group string? -
- nullable boolean? -
- operators DefinitionsResponse_definitions_operators[]? -
- repeatable boolean? -
- subject string? -
- title string? -
- 'type string? -
- values DefinitionsResponse_definitions_values[]? -
zendesk: TriggerConditionDefinitionObjectAny
Fields
- group string? -
- nullable boolean? -
- operators DefinitionsResponse_definitions_operators[]? -
- repeatable boolean? -
- subject string? -
- title string? -
- 'type string? -
zendesk: TriggerConditionDiffObject
Fields
- 'field TriggerChangeObject[]? - An array of change objects
- operator TriggerChangeObject[]? - An array of change objects
- value TriggerChangeObject[]? - An array of change objects
zendesk: TriggerConditionObject
Fields
- 'field string? -
- operator string? -
zendesk: TriggerConditionsDiffObject
Fields
- all TriggerConditionDiffObject[]? -
- 'any TriggerConditionDiffObject[]? -
zendesk: TriggerConditionsObject
An object that describes the conditions under which the trigger will execute. See Conditions reference
Fields
- all TriggerConditionObject[]? -
- 'any TriggerConditionObject[]? -
zendesk: TriggerDefinitionObject
Fields
- actions TriggerActionDefinitionObject[]? -
- conditions_all TriggerConditionDefinitionObjectAll[]? -
- conditions_any TriggerConditionDefinitionObjectAny[]? -
zendesk: TriggerDefinitionResponse
Fields
- definitions TriggerDefinitionObject? -
zendesk: TriggerObject
Fields
- actions TriggerActionObject[] - An array of actions describing what the trigger will do. See Actions reference
- active boolean? - Whether the trigger is active
- category_id string? - The ID of the category the trigger belongs to
- conditions TriggerConditionsObject - An object that describes the conditions under which the trigger will execute. See Conditions reference
- created_at string? - The time the trigger was created
- default boolean? - If true, the trigger is a default trigger
- description string? - The description of the trigger
- id int? - Automatically assigned when created
- position int? - Position of the trigger, determines the order they will execute in
- raw_title string? - The raw format of the title of the trigger
- title string - The title of the trigger
- updated_at string? - The time of the last update of the trigger
- url string? - The url of the trigger
zendesk: TriggerResponse
Fields
- trigger TriggerObject? -
zendesk: TriggerRevisionResponse
Fields
- trigger_revision TriggerRevisionResponse_trigger_revision? -
zendesk: TriggerRevisionResponse_trigger_revision
Fields
- created_at string? -
- id int? -
- url string? -
zendesk: TriggerRevisionResponse_trigger_revision_snapshot
Fields
- actions TriggerActionObject[]? -
- active boolean? -
- conditions TriggerConditionsObject? - An object that describes the conditions under which the trigger will execute. See Conditions reference
- description string? -
- title string? -
zendesk: TriggerRevisionsResponse
Fields
- after_cursor string? -
- after_url string? -
- before_cursor string? -
- before_url string? -
- count int? -
- trigger_revisions TriggerRevisionsResponse_trigger_revisions[]? -
zendesk: TriggerRevisionsResponse_diff
Fields
- actions TriggerActionDiffObject[]? - An array that contain [action diff objects](#Action Diffs)
- active TriggerChangeObject[]? - An array of change objects
- conditions TriggerConditionDiffObject? -
- description TriggerChangeObject[]? - An array of change objects
- source_id int? - ID of the source revision
- target_id int? - ID of the target revision
- title TriggerChangeObject[]? - An array of change objects
zendesk: TriggerRevisionsResponse_trigger_revisions
Fields
- created_at string? -
- diff TriggerRevisionsResponse_diff? -
- id int? -
- snapshot TriggerSnapshotObject? -
- url string? -
zendesk: TriggerSnapshotObject
Fields
- actions TriggerActionObject[]? - An array of Actions describing what the trigger will do
- active boolean? - Whether the trigger is active
- conditions TriggerConditionsObject? - An object that describes the conditions under which the trigger will execute. See Conditions reference
- description string? - The description of the trigger
- title string? - The title of the trigger
zendesk: TriggersResponse
Fields
- count int? -
- next_page string? -
- previous_page string? -
- triggers TriggerObject[]? -
zendesk: TriggerWithCategoryRequest
Fields
- trigger TriggerObject? -
zendesk: TwitterChannelObject
Fields
- allow_reply boolean? - If replies are allowed for this handle
- avatar_url string? - The profile image url of the handle
- brand_id int? - What brand the handle is associated with
- can_reply boolean? - If replies are allowed for this handle
- created_at string? - The time the handle was created
- id int - Automatically assigned upon creation
- name string? - The profile name of the handle
- screen_name string - The Twitter handle
- twitter_user_id int - The country's code
- updated_at string? - The time of the last update of the handle
zendesk: TwitterChannelResponse
Fields
- monitored_twitter_handle TwitterChannelObject? -
zendesk: TwitterChannelsResponse
Fields
- monitored_twitter_handles TwitterChannelObject[]? -
zendesk: TwitterChannelTwicketStatusResponse
Fields
- statuses TwitterChannelTwicketStatusResponse_statuses[]? -
zendesk: TwitterChannelTwicketStatusResponse_statuses
Fields
- favorited boolean? -
- id int? -
- retweeted boolean? -
- user_followed boolean? -
zendesk: UpdateResourceResult
Fields
- action string - the action the job attempted (
"action": "update")
- id int - the id of the resource the job attempted to update
- status string - the status (
"status": "Updated")
- success boolean - whether the action was successful or not (
"success": true)
zendesk: UrlObject
Fields
- url string? -
zendesk: UserCreateInput
Fields
- custom_role_id int? -
- email string -
- external_id string? -
- identities UserCreateInput_identities[]? -
- name string -
- organization UserCreateInput_organization? -
- organization_id int? -
- role string? -
zendesk: UserCreateInput_identities
Fields
- 'type string -
- value string -
zendesk: UserCreateInput_organization
Fields
- name string -
zendesk: UserFieldResponse
Fields
- user_field UserFieldObject? -
zendesk: UserFieldsResponse
Fields
- count int? - Total count of records retrieved
- next_page string? - URL of the next page
- previous_page string? - URL of the previous page
- user_fields UserFieldObject[]? -
zendesk: UserForAdmin
Fields
- active boolean? - false if the user has been deleted
- alias string? - An alias displayed to end users
- chat_only boolean? - Whether or not the user is a chat-only agent
- created_at string? - The time the user was created
- custom_role_id int? - A custom role if the user is an agent on the Enterprise plan or above
- default_group_id int? - The id of the user's default group
- details string? - Any details you want to store about the user, such as an address
- email string? - The user's primary email address. *Writeable on create only. On update, a secondary email is added. See Email Address
- external_id string? - A unique identifier from another system. The API treats the id as case insensitive. Example: "ian1" and "IAN1" are the same value.
- iana_time_zone string? - The time zone for the user
- id int? - Automatically assigned when the user is created
- last_login_at string? - Last time the user signed in to Zendesk Support or made an API request using an API token or basic authentication
- locale string? - The user's locale. A BCP-47 compliant tag for the locale. If both "locale" and "locale_id" are present on create or update, "locale_id" is ignored and only "locale" is used.
- locale_id int? - The user's language identifier
- moderator boolean? - Designates whether the user has forum moderation capabilities
- name string - The user's name
- notes string? - Any notes you want to store about the user
- only_private_comments boolean? - true if the user can only create private comments
- organization_id int? - The id of the user's organization. If the user has more than one organization memberships, the id of the user's default organization. If updating, see Organization ID
- phone string? - The user's primary phone number. See Phone Number below
- photo record {}? - The user's profile picture represented as an Attachment object
- remote_photo_url string? - A URL pointing to the user's profile picture.
- report_csv boolean? - This parameter is inert and has no effect. It may be deprecated in the future. Previously, this parameter determined whether a user could access a CSV report in a legacy Guide dashboard. This dashboard has been removed. See Announcing Guide legacy reporting upgrade to Explore
- restricted_agent boolean? - If the agent has any restrictions; false for admins and unrestricted agents, true for other agents
- role string? - The user's role. Possible values are "end-user", "agent", or "admin"
- role_type int? - The user's role id. 0 for a custom agent, 1 for a light agent, 2 for a chat agent, 3 for a chat agent added to the Support account as a contributor (Chat Phase 4), 4 for an admin, and 5 for a billing admin
- signature string? - The user's signature. Only agents and admins can have signatures
- suspended boolean? - If the agent is suspended. Tickets from suspended users are also suspended, and these users cannot sign in to the end user portal
- ticket_restriction string? - Specifies which tickets the user has access to. Possible values are: "organization", "groups", "assigned", "requested", null. "groups" and "assigned" are valid only for agents. If you pass an invalid value to an end user (for example, "groups"), they will be assigned to "requested", regardless of their previous access
- two_factor_auth_enabled boolean? - If two factor authentication is enabled
- updated_at string? - The time the user was last updated
- url string? - The user's API url
- user_fields record {}? - Values of custom fields in the user's profile. See User Fields
- verified boolean? - Any of the user's identities is verified. See User Identities
zendesk: UserForEndUser
Fields
- created_at string? - The time the user was created
- iana_time_zone string? - The time zone for the user
- id int? - Automatically assigned when creating users
- locale string? - The locale for this user
- locale_id int? - The language identifier for this user
- name string - The name of the user
- organization_id int? - The id of the user's organization. If the user has more than one organization memberships, the id of the user's default organization. If updating, see Organization ID
- phone string? - The primary phone number of this user. See Phone Number in the Users API
- photo record {}? - The user's profile picture represented as an Attachment object
- role string? - The role of the user. Possible values:
"end-user","agent","admin"
- time_zone string? - The time-zone of this user
- updated_at string? - The time of the last update of the user
- url string? - The API url of this user
- verified boolean? - Any of the user's identities is verified. See User Identities
zendesk: UserIdentitiesResponse
Fields
- identities UserIdentityObject[]? -
zendesk: UserIdentityObject
Fields
- created_at string? - The time the identity was created
- deliverable_state string? - Email identity type only. Indicates if Zendesk sends notifications to the email address. See Deliverable state
- id int? - Automatically assigned on creation
- primary boolean? - If the identity is the primary identity. *Writable only when creating, not when updating. Use the Make Identity Primary endpoint instead
- 'type "email"|"twitter"|"facebook"|"google"|"phone_number"|"agent_forwarding"|"any_channel"|"foreign"|"sdk" - The type of this identity
- undeliverable_count int? - The number of times a soft-bounce response was received at that address
- updated_at string? - The time the identity was updated
- url string? - The API url of this identity
- user_id int - The id of the user
- value string - The identifier for this identity, such as an email address
- verified boolean? - If the identity has been verified
zendesk: UserIdentityResponse
Fields
- identity UserIdentityObject? -
zendesk: UserMergeByIdInput
Fields
- id int? -
zendesk: UserMergePropertiesInput
Fields
- email string? -
- name string? -
- organization_id int? -
- password string? -
zendesk: UserPasswordRequirementsResponse
Fields
- requirements string[]? -
zendesk: UserRelatedObject
Fields
- assigned_tickets int? - Count of assigned tickets
- ccd_tickets int? - Count of collaborated tickets
- organization_subscriptions int? - Count of organization subscriptions
- requested_tickets int? - Count of requested tickets
zendesk: UserRelatedResponse
Fields
zendesk: UserRequest
Fields
- user UserInput -
zendesk: UserResponse
Fields
- user UserObject? -
zendesk: UsersRequest
Fields
- users UserInput[] -
zendesk: UsersResponse
Fields
- users UserObject[]? -
zendesk: V2_macros_body
Fields
- macro MacroInput? -
zendesk: V2_trigger_categories_body
Fields
- trigger_category record {}? -
zendesk: V2_workspaces_body
Fields
- workspace WorkspaceInput? -
zendesk: ViaObject
An object explaining how the ticket was created. See the Via object reference
Fields
- channel string? - This tells you how the ticket or event was created. Examples: "web", "mobile", "rule", "system"
- 'source ViaObject_source? - For some channels a source object gives more information about how or why the ticket or event was created
zendesk: ViaObject_source
For some channels a source object gives more information about how or why the ticket or event was created
Fields
- 'from ViaObject_source_from? -
- rel string? -
- to ViaObject_source_to? -
zendesk: ViaObject_source_from
Fields
- address string? -
- id int? -
- name string? -
- title string? -
zendesk: ViaObject_source_to
Fields
- address string? -
- name string? -
zendesk: ViewCountObject
Fields
- active boolean? - Only active views if true, inactive views if false, all views if null.
- fresh boolean? - false if the cached data is stale and the system is still loading and caching new data
- pretty string? - A pretty-printed text approximation of the view count
- url string? - The API url of the count
- value int? - The cached number of tickets in the view. Can also be null if the system is loading and caching new data. Not to be confused with 0 tickets
- view_id int? - The id of the view
zendesk: ViewCountResponse
Fields
- view_count ViewCountObject? -
zendesk: ViewCountsResponse
Fields
- view_counts ViewCountObject[]? -
zendesk: ViewExportResponse
Fields
- export ViewExportResponse_export? -
zendesk: ViewExportResponse_export
Fields
- status string? -
- view_id int? -
zendesk: ViewObject
Fields
- active boolean? - Whether the view is active
- conditions record {}? - Describes how the view is constructed. See Conditions reference
- created_at string? - The time the view was created
- default boolean? - If true, the view is a default view
- description string? - The description of the view
- execution record {}? - Describes how the view should be executed. See Execution
- id int? - Automatically assigned when created
- position int? - The position of the view
- restriction record {}? - Who may access this account. Is null when everyone in the account can access it
- title string? - The title of the view
- updated_at string? - The time the view was last updated
zendesk: ViewResponse
Fields
- columns record {}[]? -
- groups record {}[]? -
- rows record {}[]? -
- view ViewObject? -
zendesk: ViewsCountResponse
Fields
- count ActivitiesCountResponse_count? -
zendesk: ViewsResponse
Fields
- count int? -
- next_page string? -
- previous_page string? -
- views ViewObject[]? -
zendesk: WorkspaceInput
Fields
- conditions ConditionsObject? - An object that describes the conditions under which the automation will execute. See Conditions reference
- description string? - User-defined description of this workspace's purpose
- macros decimal[]? -
- ticket_form_id decimal? -
- title string? - The title of the workspace
zendesk: WorkspaceObject
Fields
- activated boolean? - If true, this workspace is available for use
- apps record {}[]? - The apps associated to this workspace
- conditions ConditionsObject? - An object that describes the conditions under which the automation will execute. See Conditions reference
- created_at string? - The time the workspace was created
- description string? - User-defined description of this workspace's purpose
- id int? - Automatically assigned upon creation
- macro_ids int[]? - The ids of the macros associated to this workspace
- macros int[]? - The ids of the macros associated to this workspace
- position int? - Ordering of the workspace relative to other workspaces
- prefer_workspace_app_order boolean? - If true, the order of apps within the workspace will be preserved
- selected_macros MacroObject[]? - An array of the macro objects that will be used in this workspace. See Macros
- ticket_form_id int? - The id of the ticket web form associated to this workspace
- title string? - The title of the workspace
- updated_at string? - The time of the last update of the workspace
- url string? - The URL for this resource
zendesk: WorkspaceResponse
Fields
- workspaces WorkspaceObject[]? -
- Fields Included from * OffsetPaginationObject
zendesk: Workspaces_reorder_body
Fields
- ids decimal[]? -
zendesk: Workspaces_workspace_id_body
Fields
- workspace WorkspaceInput? -
Union types
zendesk: UserInput
UserInput
zendesk: Users_update_many_body
Users_update_many_body
zendesk: UserObject
UserObject
zendesk: JobStatusResultObject
JobStatusResultObject
Import
import ballerinax/zendesk;Other versions
2.0.0