Module docusign.dsclick

ballerinax/docusign.dsclick Ballerina library
Overview
DocuSign is a digital transaction management platform that enables users to securely sign, send, and manage documents electronically.
The Ballerina DocuSign Click connector integrates with the DocuSign platform, provides APIs to capture user consent with one click for simple agreements such as terms & conditions and privacy policies within Ballerina applications. It supports DocuSign Click API V2.
Setup guide
To utilize the DocuSign Click connector, you must have access to the DocuSign REST API through a DocuSign account.
Step 1: Create a DocuSign account
In order to use the DocuSign Click connector, you need to first create the DocuSign credentials for the connector to interact with DocuSign.
-
You can create an account for free at the Developer Center.

Step 2: Create integration key and secret key
-
Create an integration key: Visit the Apps and Keys page on DocuSign. Click on
Add App and Integration Key,provide a name for the app, and clickCreate App. This will generate anIntegration Key.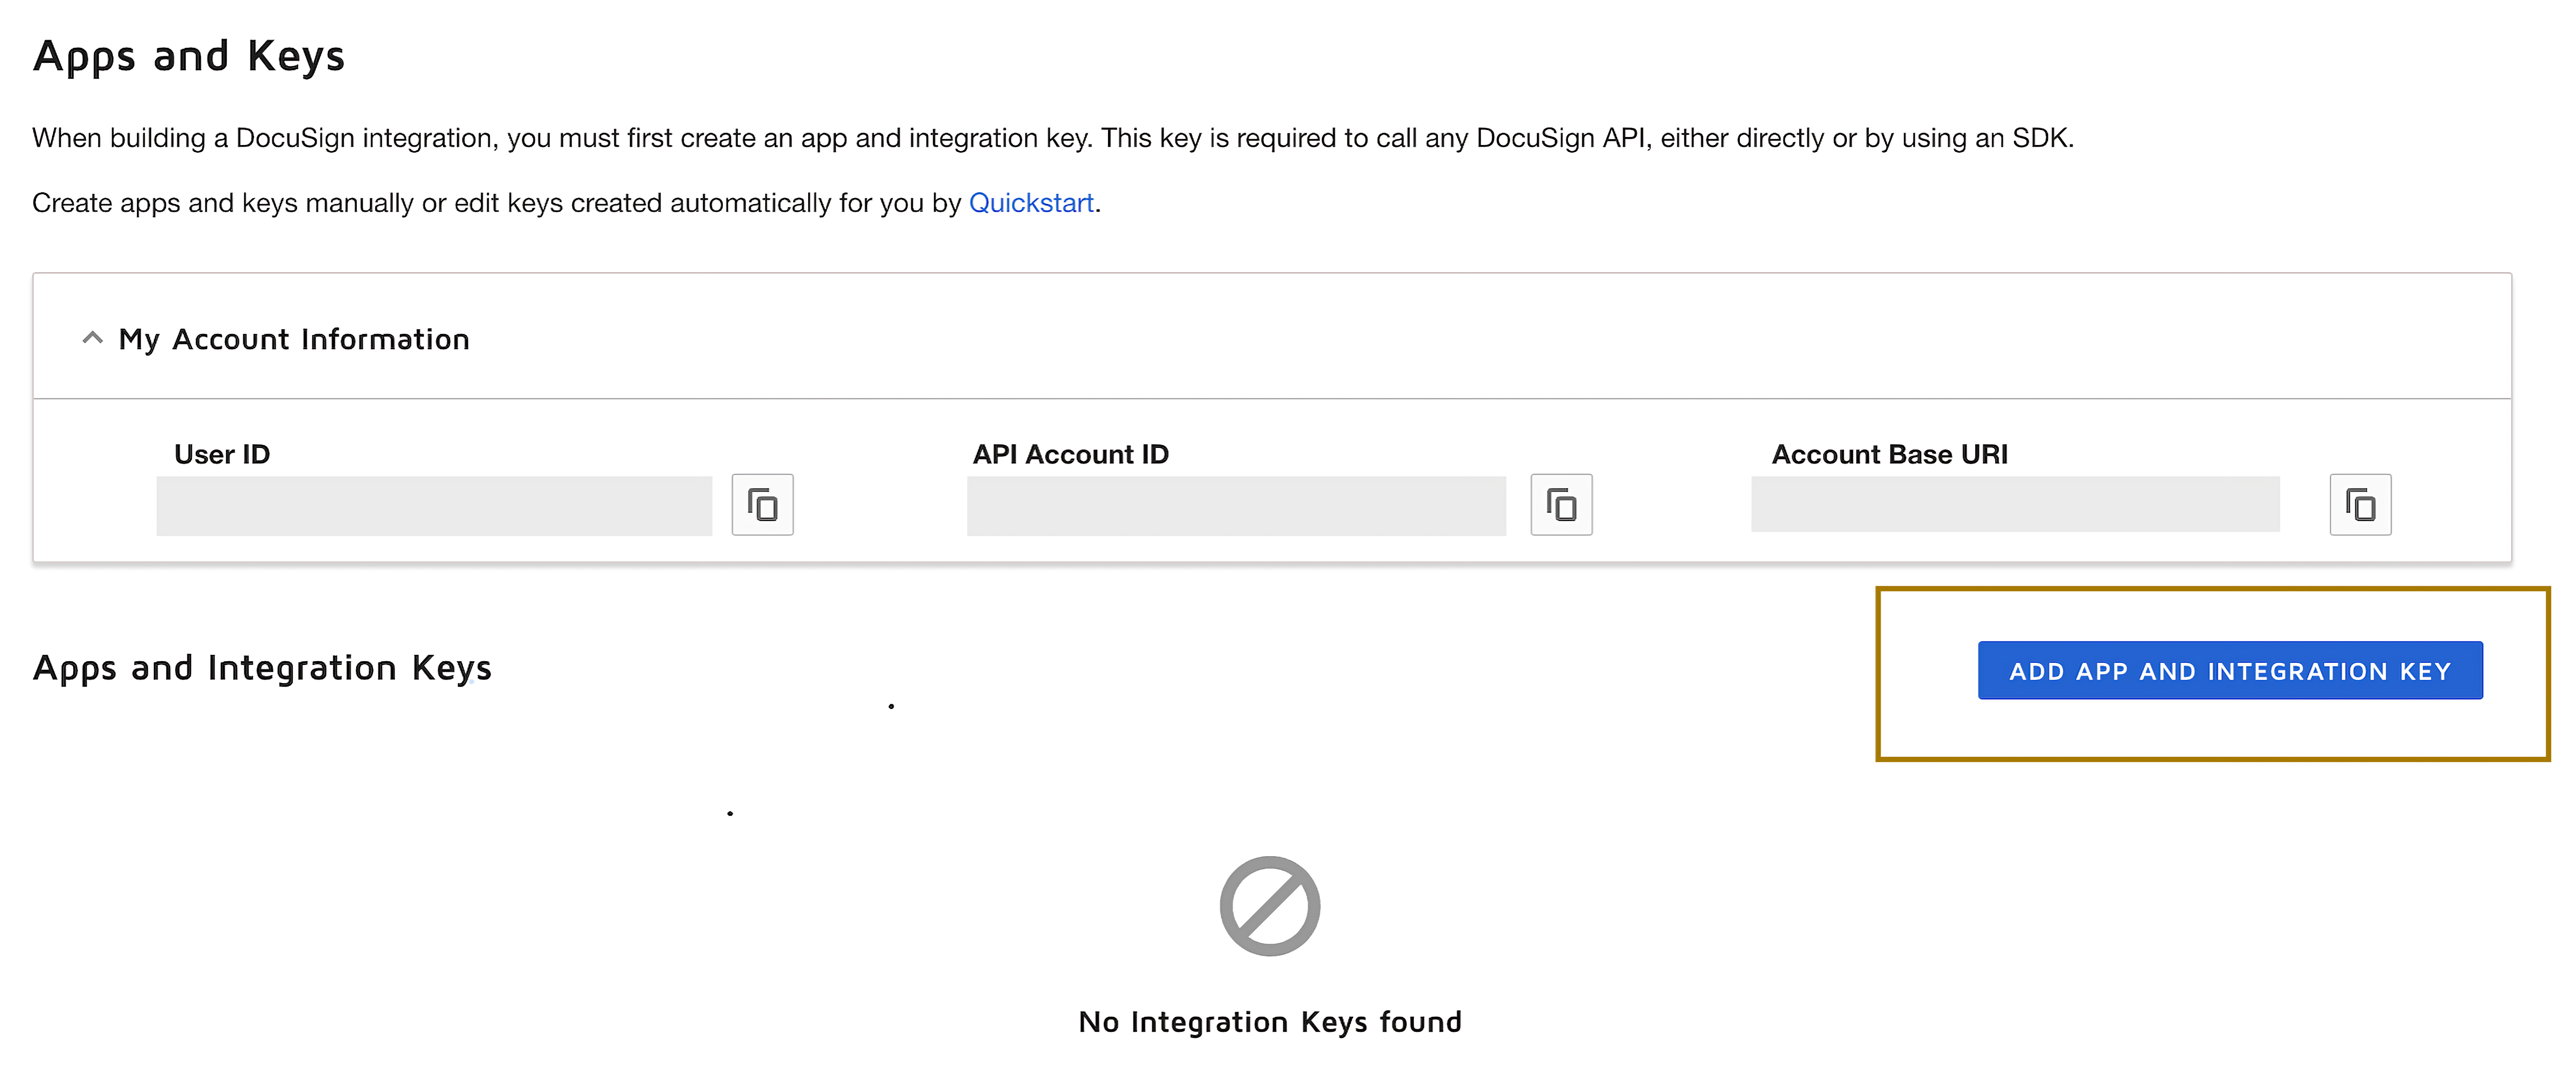
-
Generate a secret key: Under the
Authenticationsection, click onAdd Secret Key. This will generate a secret Key. Make sure to copy and save both theIntegration KeyandSecret Key.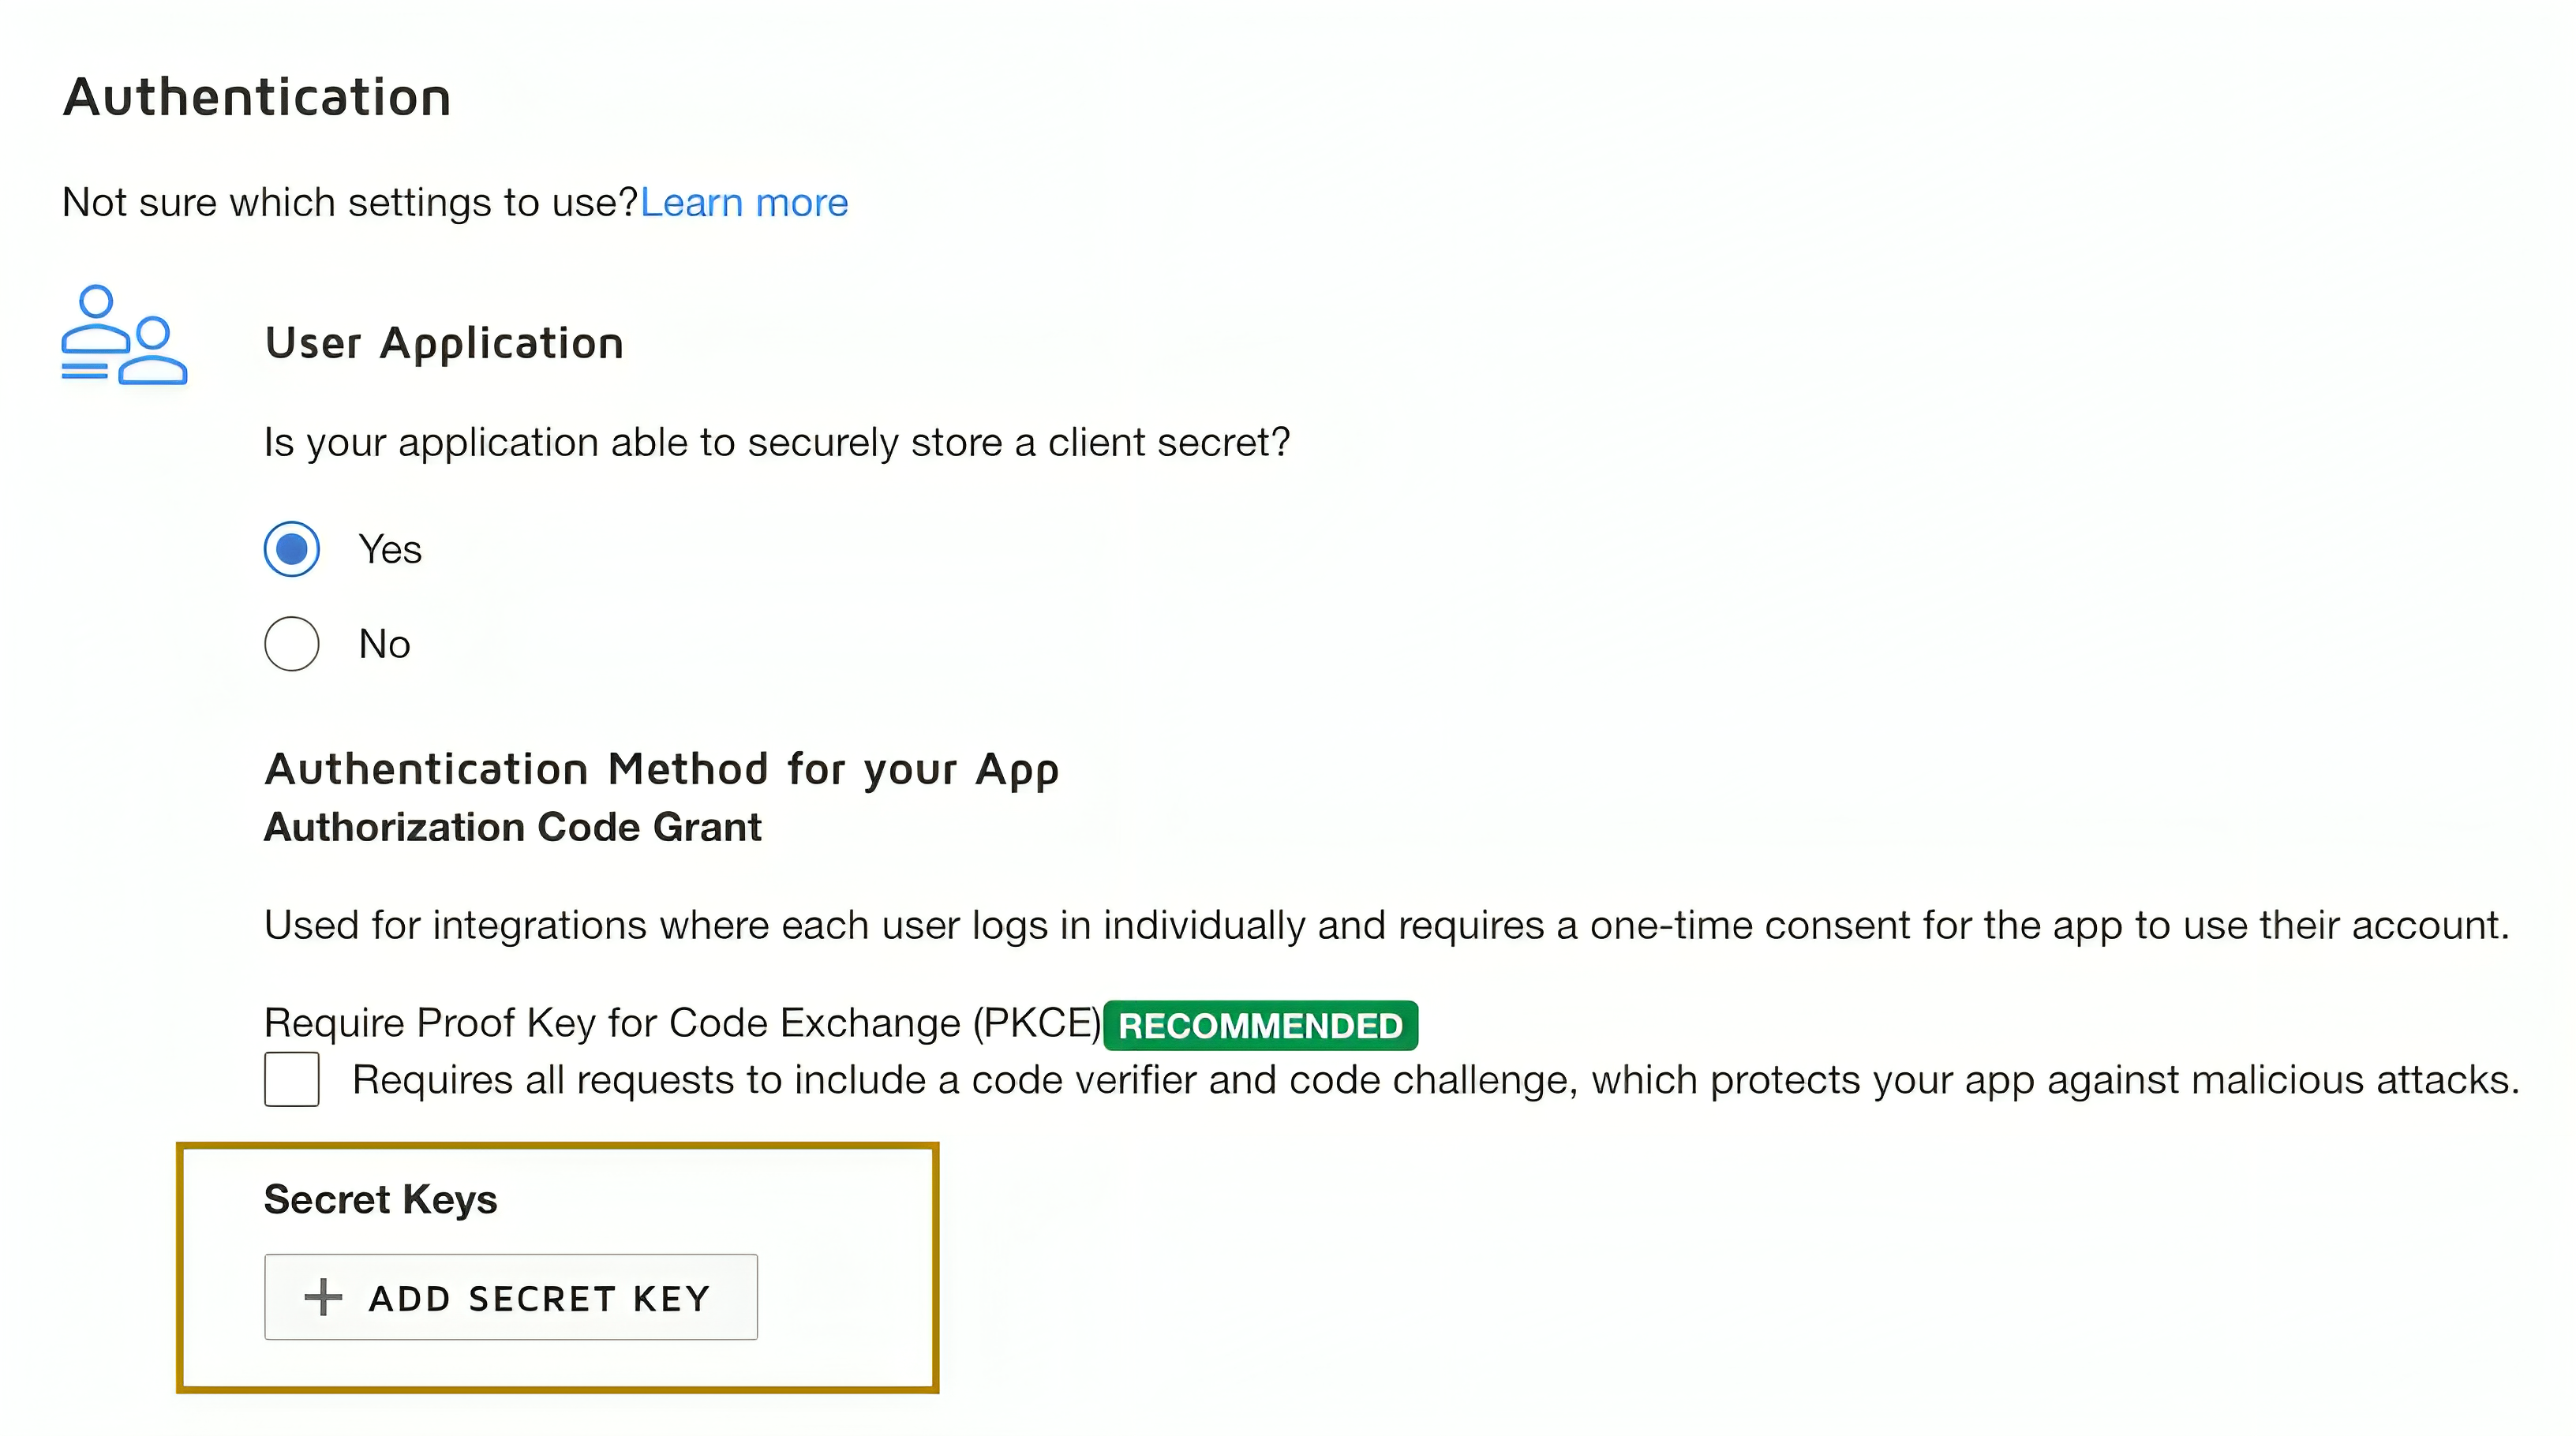
Step 3: Generate refresh token
-
Add a redirect URI: Click on
Add URIand enter your redirect URI (e.g., http://www.example.com/callback).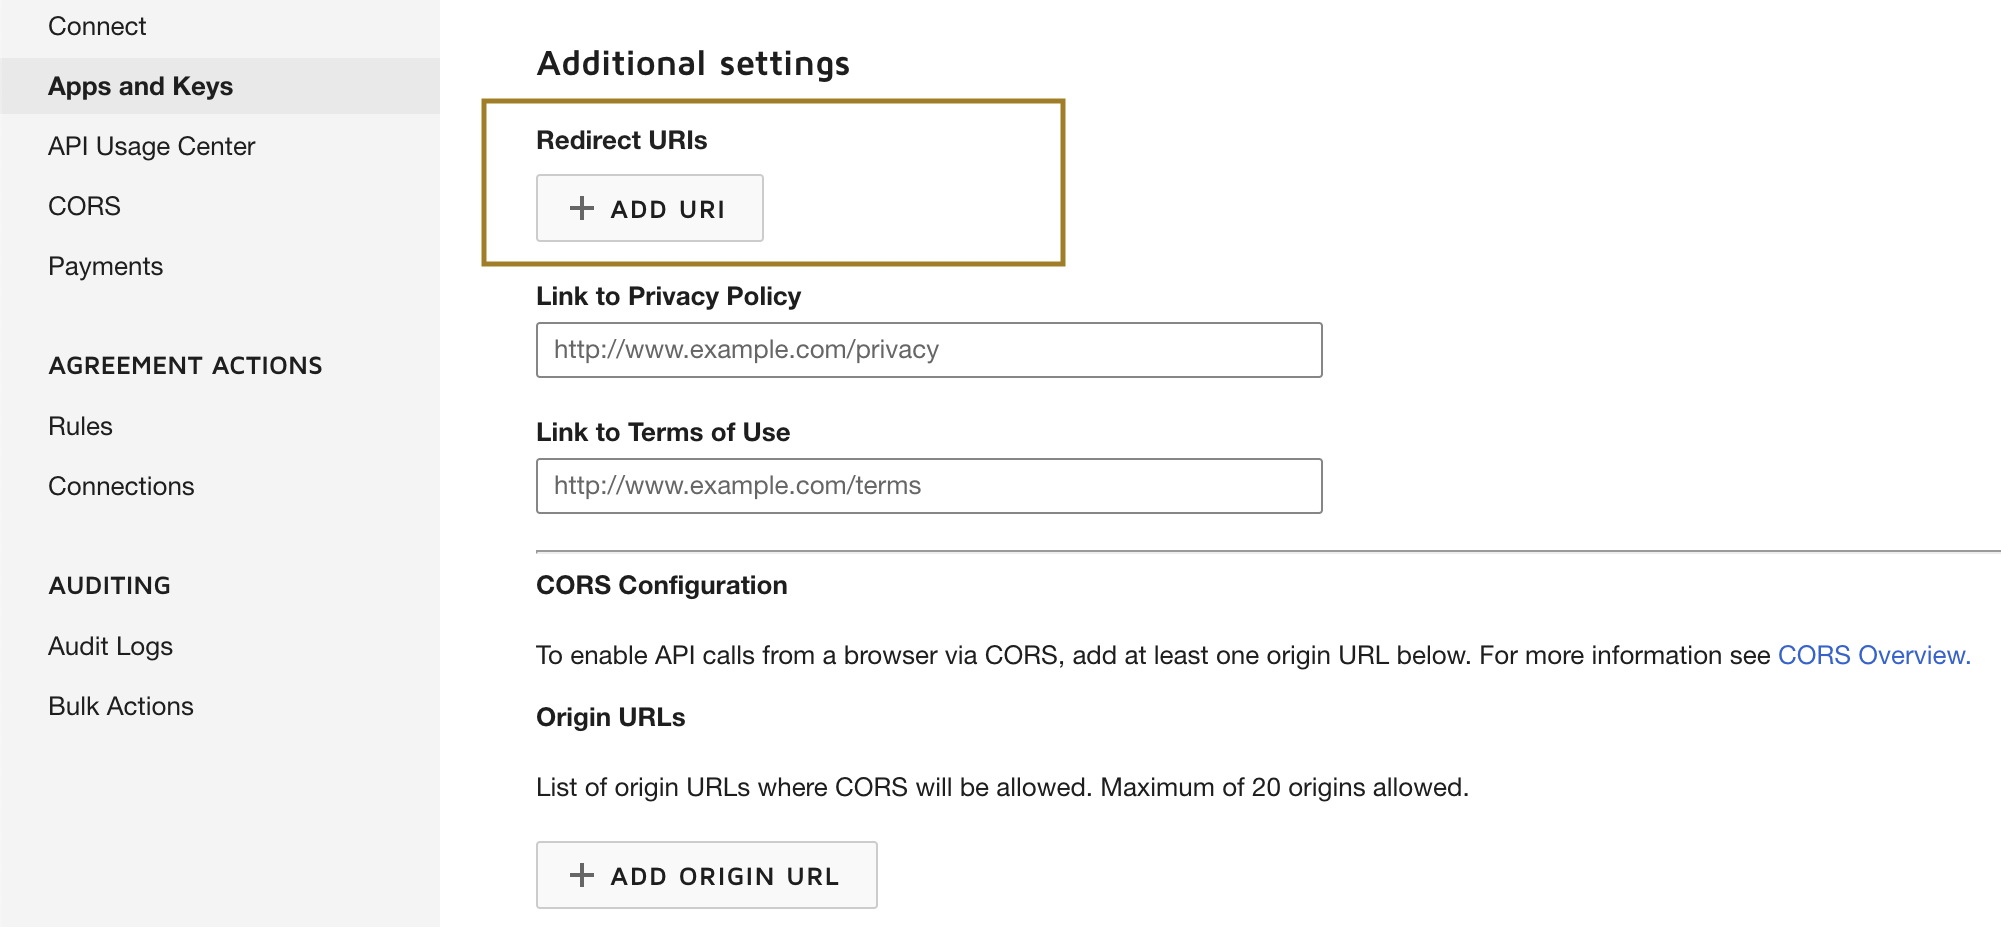
-
Generate the encoded key: The
Encoded Keyis a base64 encoded string of yourIntegration keyandSecret Keyin the format{IntegrationKey:SecretKey}. You can generate this in your web browser's console using thebtoa()function:btoa('IntegrationKey:SecretKey'). You can either generate the encoded key from an online base64 encoder. -
Get the authorization code: Visit the following URL in your web browser, replacing
{iKey}with your Integration Key and{redirectUri}with your redirect URI.https://account-d.docusign.com/oauth/auth?response_type=code&scope=signature%20organization_read%20click.manage&client_id={iKey}&redirect_uri={redirectUri}This will redirect you to your redirect URI with a
codequery parameter. This is yourauthorization code. -
Get the refresh token: Use the following
curlcommand to get the refresh token, replacing{encodedKey}with your Encoded Key and{codeFromUrl}with yourauthorization code.curl --location 'https://account-d.docusign.com/oauth/token' \ --header 'Authorization: Basic {encodedKey}' \ --header 'Content-Type: application/x-www-form-urlencoded' \ --data-urlencode 'code={codeFromUrl}' \ --data-urlencode 'grant_type=authorization_code'The response will contain your refresh token. Use
https://account-d.docusign.com/oauth/tokenas the refresh URL.
Remember to replace {IntegrationKey:SecretKey}, {iKey}, {redirectUri}, {encodedKey}, and {codeFromUrl} with your actual values.
Above is about using the DocuSign Click APIs in the developer mode. If your app is ready to go live, you need to follow the guidelines given here to make it work.
Quickstart
To use the DocuSign Click connector in your Ballerina project, modify the .bal file as follows.
Step 1: Import the module
Import the ballerinax/docusign.dsclick module into your Ballerina project.
import ballerinax/docusign.dsclick;
Step 2: Instantiate a new connector
Create a dsclick:ConnectionConfig with the obtained OAuth2.0 tokens and initialize the connector with it.
configurable string clientId = ?; configurable string clientSecret = ?; configurable string refreshToken = ?; configurable string refreshUrl = ?; dsclick:Client docuSignClient = check new({ auth: { clientId, clientSecret, refreshToken, refreshUrl } });
Step 3: Invoke the connector operation
You can now utilize the operations available within the connector.
public function main() returns error? { // Prepare the clickwrap request payload dsclick:ClickwrapRequest returnPolicyPayload = { clickwrapName: "ReturnPolicy", documents: [ { documentName: "Test Doc", documentBase64: "base64-encoded-pdf-file", fileExtension: "pdf" } ], displaySettings: { displayName: "Return Policy", consentButtonText: "I Agree", downloadable: true, format: "modal", requireAccept: true, documentDisplay: "document", sendToEmail: true } }; // Create a new clickwrap dsclick:ClickwrapVersionSummaryResponse newClickWrap = check docuSignClient->/v1/accounts/[accountId]/clickwraps.post(returnPolicyPayload); }
Hint: To apply a value to the
documentBase64field, you can either use an online tool designed to convert a PDF file into a base64-encoded string, or you can refer to the provided example code
Step 4: Run the Ballerina application
Use the following command to compile and run the Ballerina program.
bal run
Examples
The DocuSign Click connector provides practical examples illustrating usage in various scenarios. Explore these examples.
-
Managing return policy agreement clickwrap with DocuSign This example shows how to use DocuSign Click API to to implement a clickwrap agreement for a return policy to ensure customers acknowledge and agree to the terms before making a purchase.
-
Managing terms and conditions clickwrap with DocuSign This example shows how to use DocuSign Click API to to implement a clickwrap agreement for a terms and condition application and users can agree them with just one click.
Clients
docusign.dsclick: Client
DocuSign Click lets you capture consent to standard agreement terms with a single click: terms and conditions, terms of service, terms of use, privacy policies, and more. The Click API lets you include this customizable clickwrap solution in your DocuSign integrations.
Constructor
Gets invoked to initialize the connector.
init (string serviceUrl, *ConnectionConfig config)- serviceUrl string - URL of the target service
- config *ConnectionConfig - The configurations to be used when initializing the
connector
get service_information
function get service_information() returns ServiceInformation|errorGets the current version and other information about the Click API.
Return Type
- ServiceInformation|error - A successful response or an error.
get v1/accounts/[string accountId]/clickwraps
function get v1/accounts/[string accountId]/clickwraps(string? from_date, string? ownerUserId, string? page_number, string? shared, string? status, string? to_date) returns ClickwrapVersionsResponse|errorGets all the clickwraps for an account.
Parameters
- from_date string? (default ()) - Optional. The earliest date to return agreements from.
- ownerUserId string? (default ()) - Optional. The user ID of the owner.
- page_number string? (default ()) - Optional. The page number to return.
- shared string? (default ()) -
- status string? (default ()) - Optional. The status of the clickwraps to filter by. One of:
activeinactive
- to_date string? (default ()) - Optional. The latest date to return agreements from.
Return Type
- ClickwrapVersionsResponse|error - A successful response or an error.
post v1/accounts/[string accountId]/clickwraps
function post v1/accounts/[string accountId]/clickwraps(ClickwrapRequest payload) returns ClickwrapVersionSummaryResponse|errorCreates a clickwrap for an account.
Parameters
- payload ClickwrapRequest -
Return Type
- ClickwrapVersionSummaryResponse|error - A successful response or an error.
delete v1/accounts/[string accountId]/clickwraps
function delete v1/accounts/[string accountId]/clickwraps(string? clickwrapIds) returns ClickwrapsDeleteResponse|errorDeletes clickwraps for an account.
Parameters
- clickwrapIds string? (default ()) - A comma-separated list of clickwrap IDs to delete.
Return Type
- ClickwrapsDeleteResponse|error - A successful response or an error.
get v1/accounts/[string accountId]/clickwraps/[string clickwrapId]
function get v1/accounts/[string accountId]/clickwraps/[string clickwrapId]() returns ClickwrapVersionSummaryResponse|errorGets a single clickwrap object.
Return Type
- ClickwrapVersionSummaryResponse|error - A successful response or an error.
put v1/accounts/[string accountId]/clickwraps/[string clickwrapId]
function put v1/accounts/[string accountId]/clickwraps/[string clickwrapId](ClickwrapTransferRequest payload) returns ClickwrapVersionSummaryResponse|errorUpdates the user ID of a clickwrap.
Parameters
- payload ClickwrapTransferRequest -
Return Type
- ClickwrapVersionSummaryResponse|error - A successful response or an error.
delete v1/accounts/[string accountId]/clickwraps/[string clickwrapId]
function delete v1/accounts/[string accountId]/clickwraps/[string clickwrapId](string? versions) returns ClickwrapVersionsDeleteResponse|errorDeletes a clickwrap and all of its versions.
Parameters
- versions string? (default ()) - A comma-separated list of versions to delete.
Return Type
- ClickwrapVersionsDeleteResponse|error - A successful response or an error.
post v1/accounts/[string accountId]/clickwraps/[string clickwrapId]/agreements
function post v1/accounts/[string accountId]/clickwraps/[string clickwrapId]/agreements(UserAgreementRequest payload) returns UserAgreementResponse|errorChecks if a user has agreed to a clickwrap.
Parameters
- payload UserAgreementRequest -
Return Type
- UserAgreementResponse|error - A successful response or an error.
get v1/accounts/[string accountId]/clickwraps/[string clickwrapId]/agreements/[string agreementId]
function get v1/accounts/[string accountId]/clickwraps/[string clickwrapId]/agreements/[string agreementId]() returns UserAgreementResponse|errorGets a specific agreement for a specified clickwrap.
Return Type
- UserAgreementResponse|error - A successful response or an error.
get v1/accounts/[string accountId]/clickwraps/[string clickwrapId]/agreements/[string agreementId]/download
function get v1/accounts/[string accountId]/clickwraps/[string clickwrapId]/agreements/[string agreementId]/download() returns Response|errorGets the completed user agreement PDF.
get v1/accounts/[string accountId]/clickwraps/[string clickwrapId]/users
function get v1/accounts/[string accountId]/clickwraps/[string clickwrapId]/users(string? client_user_id, string? from_date, string? page_number, string? status, string? to_date) returns ClickwrapAgreementsResponse|errorGet user agreements
Parameters
- client_user_id string? (default ()) - The client ID.
- from_date string? (default ()) - Optional. The earliest date to return agreements from.
- page_number string? (default ()) - Optional. The page number to return.
- status string? (default ()) - Optional. The status of the clickwraps to return.
- to_date string? (default ()) - Optional. The latest date to return agreements from.
Return Type
- ClickwrapAgreementsResponse|error - A successful response or an error.
post v1/accounts/[string accountId]/clickwraps/[string clickwrapId]/versions
function post v1/accounts/[string accountId]/clickwraps/[string clickwrapId]/versions(ClickwrapRequest payload) returns ClickwrapVersionSummaryResponse|errorCreates a new clickwrap version.
Parameters
- payload ClickwrapRequest -
Return Type
- ClickwrapVersionSummaryResponse|error - A successful response or an error.
delete v1/accounts/[string accountId]/clickwraps/[string clickwrapId]/versions
function delete v1/accounts/[string accountId]/clickwraps/[string clickwrapId]/versions(string? clickwrapVersionIds) returns ClickwrapVersionsDeleteResponse|errorDeletes the versions of a clickwrap.
Parameters
- clickwrapVersionIds string? (default ()) - A comma-separated list of clickwrap version IDs to delete.
Return Type
- ClickwrapVersionsDeleteResponse|error - A successful response or an error.
get v1/accounts/[string accountId]/clickwraps/[string clickwrapId]/versions/[string version]
function get v1/accounts/[string accountId]/clickwraps/[string clickwrapId]/versions/[string version]() returns ClickwrapVersionResponse|errorGets a specific version from a clickwrap.
Return Type
- ClickwrapVersionResponse|error - A successful response or an error.
put v1/accounts/[string accountId]/clickwraps/[string clickwrapId]/versions/[string version]
function put v1/accounts/[string accountId]/clickwraps/[string clickwrapId]/versions/[string version](ClickwrapRequest payload) returns ClickwrapVersionSummaryResponse|errorUpdates a specific version of a clickwrap.
Parameters
- payload ClickwrapRequest -
Return Type
- ClickwrapVersionSummaryResponse|error - A successful response or an error.
delete v1/accounts/[string accountId]/clickwraps/[string clickwrapId]/versions/[string version]
function delete v1/accounts/[string accountId]/clickwraps/[string clickwrapId]/versions/[string version]() returns ClickwrapVersionDeleteResponse|errorDeletes a specific version of a clickwrap.
Return Type
- ClickwrapVersionDeleteResponse|error - A successful response or an error.
get v1/accounts/[string accountId]/clickwraps/[string clickwrapId]/versions/[string version]/users
function get v1/accounts/[string accountId]/clickwraps/[string clickwrapId]/versions/[string version]/users(string? client_user_id, string? from_date, string? page_number, string? status, string? to_date) returns ClickwrapAgreementsResponse|errorGets the agreement responses for a clickwrap version.
Parameters
- client_user_id string? (default ()) -
- from_date string? (default ()) - Optional. The earliest date to return agreements from.
- page_number string? (default ()) - Optional. The page number to return.
- status string? (default ()) - Clickwrap status. Possible values:
activeinactivedeleted
- to_date string? (default ()) - Optional. The latest date to return agreements from.
Return Type
- ClickwrapAgreementsResponse|error - A successful response or an error.
Records
docusign.dsclick: BadRequestAnydata
Fields
- Fields Included from * BadRequest
- body anydata -
docusign.dsclick: ClickwrapAgreementsResponse
Fields
- beginCreatedOn record {}? - User agreements from this datetime.
- minimumPagesRemaining Signed32? - Number of pages remaining in the response.
- page Signed32? - The number of the current page.
- pageSize Signed32? - The number of items per page.
- userAgreements UserAgreementResponse[]? - An array of user agreements.
docusign.dsclick: ClickwrapDeleteResponse
Fields
- clickwrapId string? - The ID of the clickwrap.
- clickwrapName string? - The name of the clickwrap.
- deletionMessage string? - A message describing the result of deletion request. One of:
alreadyDeleted: Clickwrap is already deleted.deletionSuccess: Successfully deleted the clickwrap.deletionFailure: Failed to delete the clickwrap.cannotDelete: Active clickwrap version cannot be deleted.
- deletionSuccess boolean? - True if the clickwrap was deleted successfully. False otherwise.
- status string? - Clickwrap status. Possible values:
activeinactivedeleted
docusign.dsclick: ClickwrapRequest
Request body for working with clickwrap.
Fields
- clickwrapName string? - The name of the clickwrap.
- displaySettings DisplaySettings? - Information about how an agreement is displayed.
- documents Document[]? - An array of documents.
- fieldsToNull string? - Specifies whether
scheduledReacceptanceandscheduledDateshould be cleared. May be one of:"scheduledReacceptance""scheduledDate""scheduledReacceptance,scheduledDate"
- isMajorVersion boolean? - When true, the next version created is a major version. When false the next version created is minor.
- name string? - Name of the clickwrap.
- requireReacceptance boolean? - When true, requires signers who have previously agreed to this clickwrap to sign again. The version number is incremented.
- scheduledDate string? - The time and date when this clickwrap is activated.
- scheduledReacceptance ClickwrapScheduledReacceptance? -
- status string? - Clickwrap status. Possible values:
activeinactivedeleted
- transferFromUserId string? - The user ID of current owner of the clickwrap.
- transferToUserId string? - The user ID of the new owner of the clickwrap.
docusign.dsclick: ClickWraps
A paged collection of clickwraps.
Fields
- clickwraps ClickwrapVersionSummaryResponse[]? - An array of clickwraps.
- minimumPagesRemaining Signed32? - Number of pages remaining in the response.
- page Signed32? - The number of the current page.
- pageSize Signed32? - The number of items per page.
docusign.dsclick: ClickwrapScheduledReacceptance
Fields
- recurrenceInterval Signed32? - The time between recurrences specified in
recurrenceIntervalTypeunits. The minimum and maximum values depend onrecurrenceIntervalType:days: 1 - 365weeks: 1 - 52months: 1 - 12years: 1
- recurrenceIntervalType string? - The units of the
recurrenceInterval. Must be one of:daysweeksmonthyears
- startDateTime record {}? - The date when the recurrence interval starts.
docusign.dsclick: ClickwrapsDeleteResponse
Fields
- clickwraps ClickwrapDeleteResponse[]? -
docusign.dsclick: ClickwrapTransferRequest
Fields
- transferFromUserId string? - ID of the user to transfer from.
- transferToUserId string? - ID of the user to transfer to.
docusign.dsclick: ClickwrapVersion
Fields
- clickwrapVersionId string? - The unique version ID, a GUID, of this clickwrap version.
- createdTime record {}? - The time that the clickwrap was created.
- lastModified record {}? - The time that the clickwrap was last modified.
- lastModifiedBy string? - The user ID of the last user who modified this clickwrap.
- ownerUserId string? - The user ID of the owner of this clickwrap.
- requireReacceptance boolean? - When true, requires signers who have previously agreed to this clickwrap to sign again. The version number is incremented.
- scheduledDate record {}? - The time and date when this clickwrap is activated.
- scheduledReacceptance ClickwrapScheduledReacceptance? -
- status string? - Clickwrap status. Possible values:
activeinactivedeleted
- versionId string? - The ID of the version.
- versionNumber string? - Version of the clickwrap.
docusign.dsclick: ClickwrapVersionDeleteResponse
Fields
- clickwrapVersionId string? - The unique version ID, a GUID, of this clickwrap version.
- createdTime string? - The time that the clickwrap was created.
- deletionMessage string? - A message describing the result of deletion request. One of:
alreadyDeleted: Clickwrap is already deleted.deletionSuccess: Successfully deleted the clickwrap.deletionFailure: Failed to delete the clickwrap.cannotDelete: Active clickwrap version cannot be deleted.
- deletionSuccess boolean? - True if the clickwrap was deleted successfully. False otherwise.
- lastModified string? - The time that the clickwrap was last modified.
- lastModifiedBy string? - The user ID of the last user who modified this clickwrap.
- ownerUserId string? - The user ID of the owner of this clickwrap.
- requireReacceptance boolean? - When true, requires signers who have previously agreed to this clickwrap to sign again. The version number is incremented.
- scheduledDate string? - The time and date when this clickwrap is activated.
- scheduledReacceptance ClickwrapScheduledReacceptance? -
- status string? - Clickwrap status. Possible values:
activeinactivedeleted
- versionId string? - The ID of the version.
- versionNumber string? - Version of the clickwrap.
docusign.dsclick: ClickwrapVersionResponse
Fields
- accountId string? - A GUID that identifies your account. This value is automatically generated by DocuSign for any account you create. Copy the value from the API Account ID field in the API and Keys page in eSignature Settings.
- clickwrapId string? - The ID of the clickwrap.
- clickwrapName string? - The name of the clickwrap.
- clickwrapVersionId string? - The unique version ID, a GUID, of this clickwrap version.
- createdTime string? - The time that the clickwrap was created.
- displaySettings DisplaySettings? - Information about how an agreement is displayed.
- documents Document[]? - An array of documents.
- lastModified string? - The time that the clickwrap was last modified.
- lastModifiedBy string? - The user ID of the last user who modified this clickwrap.
- ownerUserId string? - The user ID of the owner of this clickwrap.
- requireReacceptance boolean? - When true, requires signers who have previously agreed to this clickwrap to sign again. The version number is incremented.
- scheduledDate string? - The time and date when this clickwrap is activated.
- scheduledReacceptance ClickwrapScheduledReacceptance? -
- status string? - Clickwrap status. Possible values:
activeinactivedeleted
- versionId string? - The ID of the version.
- versionNumber string? - Version of the clickwrap.
docusign.dsclick: ClickwrapVersionsDeleteResponse
Fields
- clickwrapId string? - The ID of the clickwrap.
- clickwrapName string? - The name of the clickwrap.
- versions ClickwrapVersionDeleteResponse[]? - An array delete responses.
docusign.dsclick: ClickwrapVersionsPagedResponse
Fields
- accountId string? - A GUID that identifies your account. This value is automatically generated by DocuSign for any account you create. Copy the value from the API Account ID field in the API and Keys page in eSignature Settings.
- clickwrapId string? - The ID of the clickwrap.
- clickwrapName string? - The name of the clickwrap.
- minimumPagesRemaining Signed32? - Number of pages remaining in the response.
- page Signed32? - The number of the current page.
- pageSize Signed32? - The number of items per page.
- versions ClickwrapVersion[]? - An array of clickwrap versions.
docusign.dsclick: ClickwrapVersionsResponse
Fields
- clickwraps ClickwrapVersionSummaryResponse[]? - An array of
clickwrapVersionSummaryResponseobjects.
- minimumPagesRemaining Signed32? - Number of pages remaining in the response.
- page Signed32? - The number of the current page.
- pageSize Signed32? - The number of items per page.
docusign.dsclick: ClickwrapVersionSummaryResponse
Fields
- accountId string? - A GUID that identifies your account. This value is automatically generated by DocuSign for any account you create. Copy the value from the API Account ID field in the API and Keys page in eSignature Settings.
- clickwrapId string? - The ID of the clickwrap.
- clickwrapName string? - The name of the clickwrap.
- clickwrapVersionId string? - The unique version ID, a GUID, of this clickwrap version.
- createdTime string? - The time that the clickwrap was created.
- lastModified string? - The time that the clickwrap was last modified.
- lastModifiedBy string? - The user ID of the last user who modified this clickwrap.
- ownerUserId string? - The user ID of the owner of this clickwrap.
- requireReacceptance boolean? - When true, requires signers who have previously agreed to this clickwrap to sign again. The version number is incremented.
- scheduledDate string? - The time and date when this clickwrap is activated.
- scheduledReacceptance ClickwrapScheduledReacceptance? -
- status string? - Clickwrap status. Possible values:
activeinactivedeleted
- versionId string? - The ID of the version.
- versionNumber string? - Version of the clickwrap.
docusign.dsclick: ClientHttp1Settings
Provides settings related to HTTP/1.x protocol.
Fields
- keepAlive KeepAlive(default http:KEEPALIVE_AUTO) - Specifies whether to reuse a connection for multiple requests
- chunking Chunking(default http:CHUNKING_AUTO) - The chunking behaviour of the request
- proxy ProxyConfig? - Proxy server related options
docusign.dsclick: ConnectionConfig
Provides a set of configurations for controlling the behaviours when communicating with a remote HTTP endpoint.
Fields
- httpVersion HttpVersion(default http:HTTP_2_0) - The HTTP version understood by the client
- http1Settings ClientHttp1Settings? - Configurations related to HTTP/1.x protocol
- http2Settings ClientHttp2Settings? - Configurations related to HTTP/2 protocol
- timeout decimal(default 60) - The maximum time to wait (in seconds) for a response before closing the connection
- forwarded string(default "disable") - The choice of setting
forwarded/x-forwardedheader
- poolConfig PoolConfiguration? - Configurations associated with request pooling
- cache CacheConfig? - HTTP caching related configurations
- compression Compression(default http:COMPRESSION_AUTO) - Specifies the way of handling compression (
accept-encoding) header
- circuitBreaker CircuitBreakerConfig? - Configurations associated with the behaviour of the Circuit Breaker
- retryConfig RetryConfig? - Configurations associated with retrying
- responseLimits ResponseLimitConfigs? - Configurations associated with inbound response size limits
- secureSocket ClientSecureSocket? - SSL/TLS-related options
- proxy ProxyConfig? - Proxy server related options
- validation boolean(default true) - Enables the inbound payload validation functionality which provided by the constraint package. Enabled by default
- auth ClientAuthConfig?(default ()) - Configurations related to client authentication
docusign.dsclick: DisplaySettings
Information about how an agreement is displayed.
Fields
- actionButtonAlignment string? - Position of the Accept button in the agreement. One of
rightleft
- allowClientOnly boolean? - When true, this agreement can be be used in client-only integrations
- allowedHosts string[]? - Hosts that can host the clickwrap. It is an error if the clickwrap didn't come from one of these hosts.
- brandId string? - The signing brand ID.
- consentButtonText string? - Text on the agree button.
- consentText string? - The text on agree button.
- declineButtonText string? - The text on the decline button.
- displayName string? - The display name of the user agreement.
- documentDisplay string? - Display type: link or document
- downloadable boolean? - True if the agreement is downloadable.
- format string? - Display format: inline or modal.
- hasDeclineButton boolean? - True if the agreement has a decline checkbox.
- hostOrigin string? - The host origin.
- mustRead boolean? - True if the user needs to scroll to the end of the document.
- mustView boolean? - True if the user must view the document.
- recordDeclineResponses boolean? - When true, this agreement records decline actions.
- requireAccept boolean? - True if accept is required.
- sendToEmail boolean? - True if send to email is applicable.
docusign.dsclick: Document
Information about a document.
Fields
- documentBase64 string? - The base64-encoded contents of the document.
- documentHtml string? - The HTML representation of the document.
- documentName string? - The name of the document.
- fileExtension string? - The file extension of the document.
- 'order Signed32? - The order of document layout.
docusign.dsclick: ErrorDetails
Error details.
Fields
- errorCode string? - The error code.
- message string? - The error message.
docusign.dsclick: ProxyConfig
Proxy server configurations to be used with the HTTP client endpoint.
Fields
- host string(default "") - Host name of the proxy server
- port int(default 0) - Proxy server port
- userName string(default "") - Proxy server username
- password string(default "") - Proxy server password
docusign.dsclick: ServiceInformation
Fields
- buildBranch string? -
- buildBranchDeployedDateTime string? -
- buildSHA string? -
- buildVersion string? - The internal build version information.
- linkedSites string[]? - An array of URLs (strings) of related sites.
- serviceVersions ServiceVersion[]? - An array of
serviceVersionobjects.
docusign.dsclick: ServiceVersion
Fields
- version string? - The human-readable semver version string.
- versionUrl string? - The URL where this version of the API can be found.
docusign.dsclick: UserAgreementRequest
Fields
- clientUserId string? - The user ID of the client.
- hostOrigin string? - The host origin.
- metadata string? - A customer-defined string you can use in requests. This string will appear in the corresponding response.
docusign.dsclick: UserAgreementResponse
Fields
- accountId string? - A GUID that identifies your account. This value is automatically generated by DocuSign for any account you create. Copy the value from the API Account ID field in the API and Keys page in eSignature Settings.
- agreedOn record {}? - Date that the client last completed the agreement.
This property is null if
agreementUrlis not null andstatusis notagreed.
- agreementId string? - The agreement ID.
- agreementUrl string? - When not null, an agreement is required for user specified by
clientUserId. When missing the user specified byclientUserIdhas already agreed and does not require a new acceptance. Use this URL to render the agreement in a web page. <!-- or redirected to when providing redirect_url as a query paramter. -->
- clickwrapId string? - The ID of the clickwrap.
- clientUserId string? - The user ID of the client.
- consumerDisclosureHtml string? - The customer-branded HTML with the Electronic Record and Signature Disclosure information
- createdOn record {}? - The date when the clickwrap was created. May be null.
- declinedOn record {}? - The date when the user declined the most recent required agreement.
This property is valid only when
statusisdeclined. Otherwise it is null.
- documents Document[]? - An array of documents.
- metadata string? - A customer-defined string you can use in requests. This string will appear in the corresponding response.
- settings DisplaySettings? - Information about how an agreement is displayed.
- status string? - User agreement status. One of:
createdagreeddeclined
- version string? - The human-readable semver version string.
- versionId string? - The ID of the version.
- versionNumber Signed32? - Version of the clickwrap.
Import
import ballerinax/docusign.dsclick;Other versions
2.0.0