Module docusign.dsadmin

ballerinax/docusign.dsadmin Ballerina library
Overview
DocuSign is a digital transaction management platform that enables users to securely sign, send, and manage documents electronically.
The Ballerina DocuSign Admin connector integrates with the DocuSign platform, provides APIs to efficiently manages DocuSign users and permissions across all the accounts and domains within Ballerina applications. It supports DocuSign Admin API V2.
Setup guide
To utilize the DocuSign Admin connector, you must have access to the DocuSign REST API through a DocuSign account.
Step 1: Create a DocuSign account
In order to use the DocuSign Admin connector, you need to first create the DocuSign credentials for the connector to interact with DocuSign.
-
You can create an account for free at the Developer Center.

Step 2: Create integration key and secret key
-
Create an integration key: Visit the Apps and Keys page on DocuSign. Click on
Add App and Integration Key,provide a name for the app, and clickCreate App. This will generate anIntegration Key.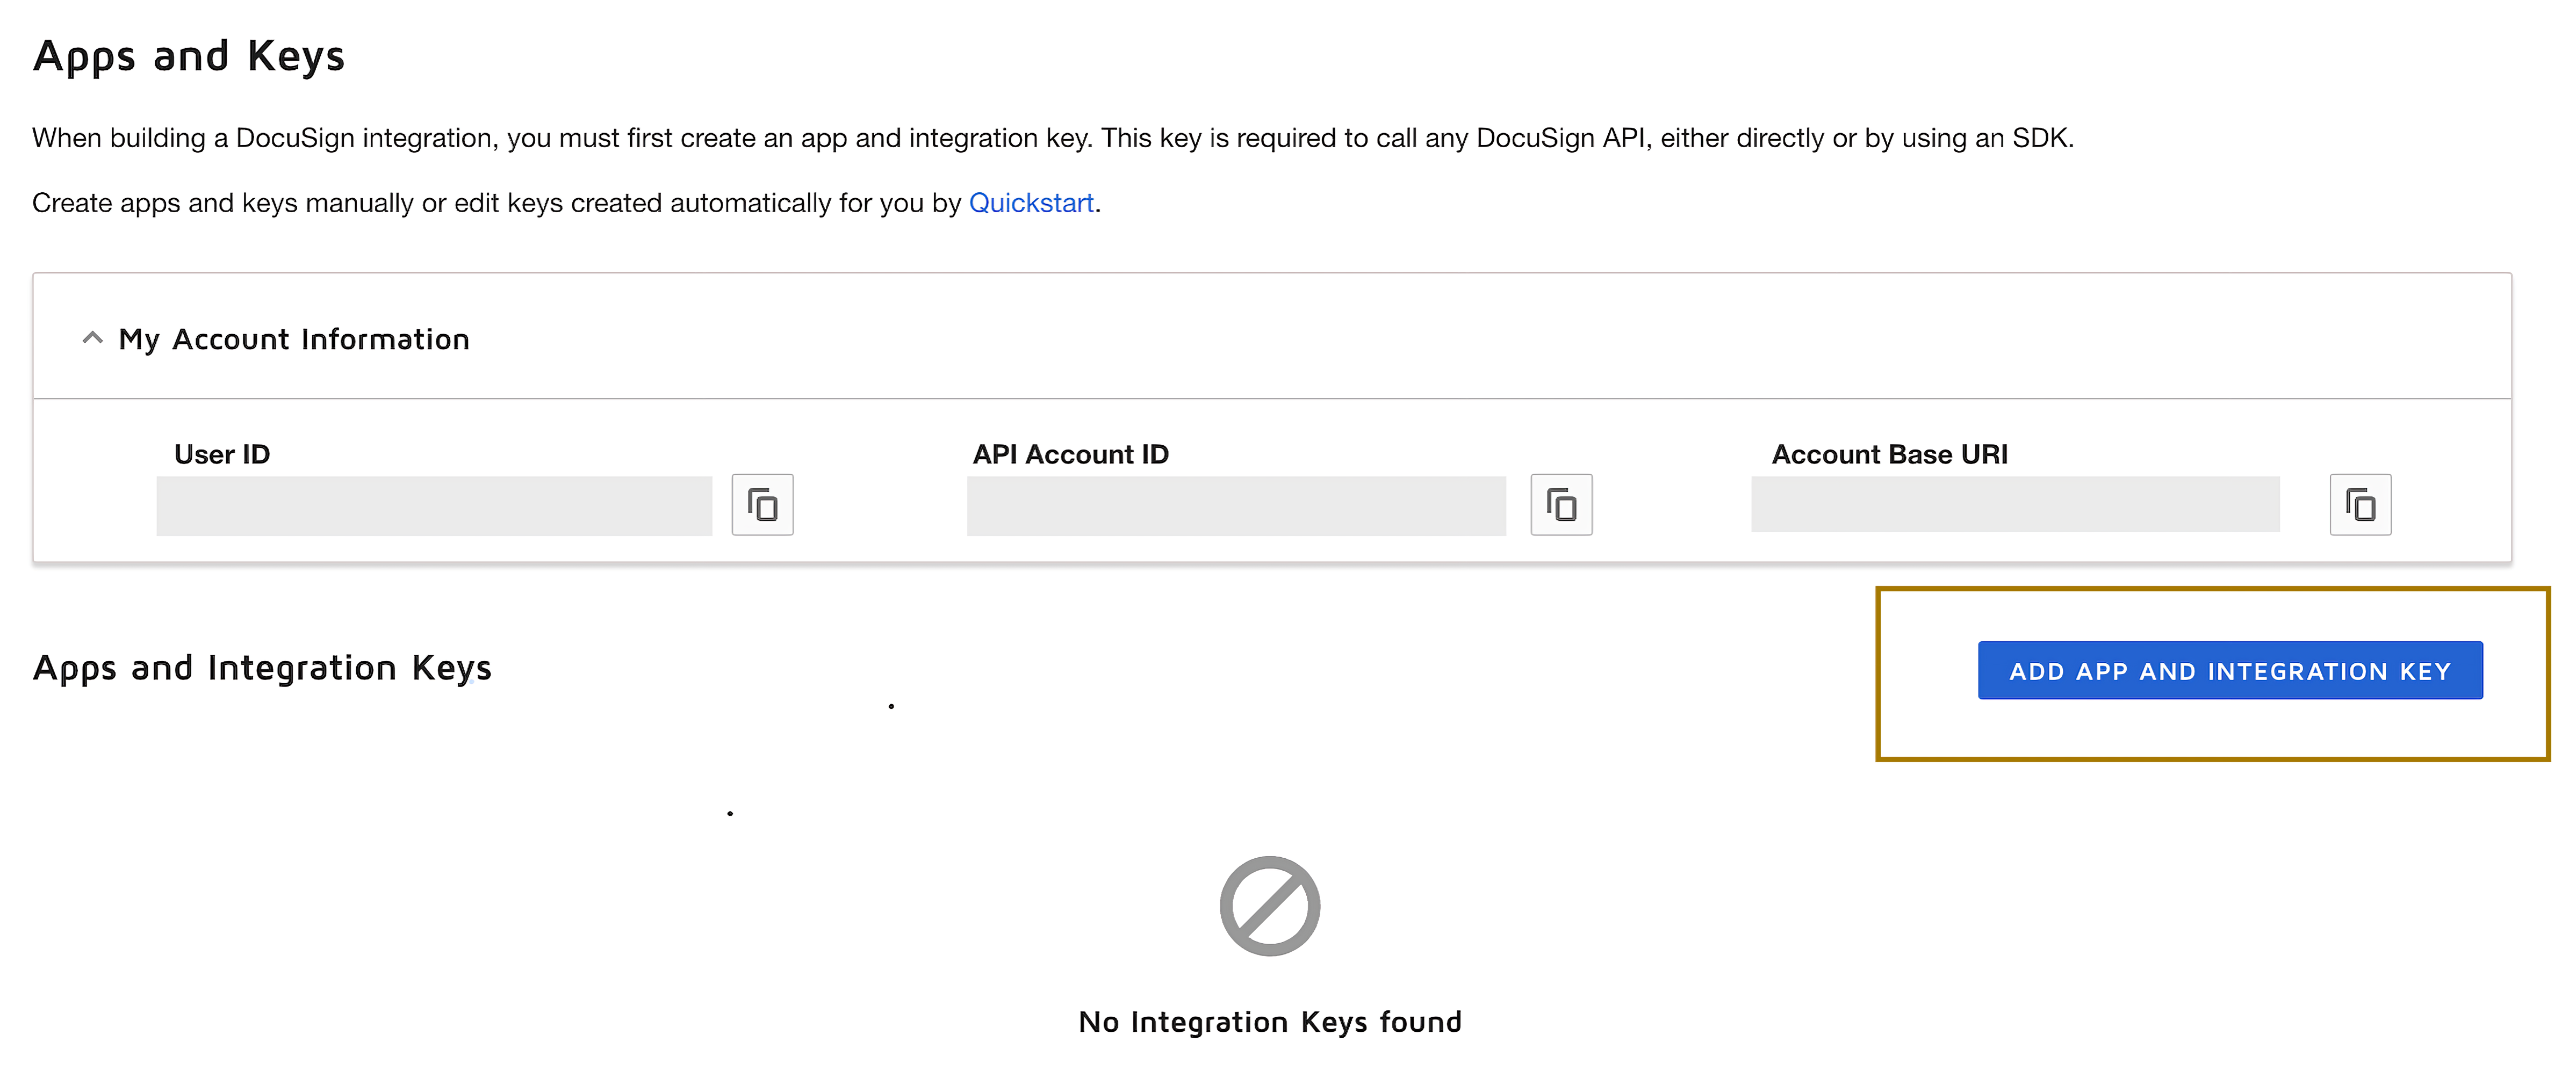
-
Generate a secret key: Under the
Authenticationsection, click onAdd Secret Key. This will generate a secret Key. Make sure to copy and save both theIntegration KeyandSecret Key.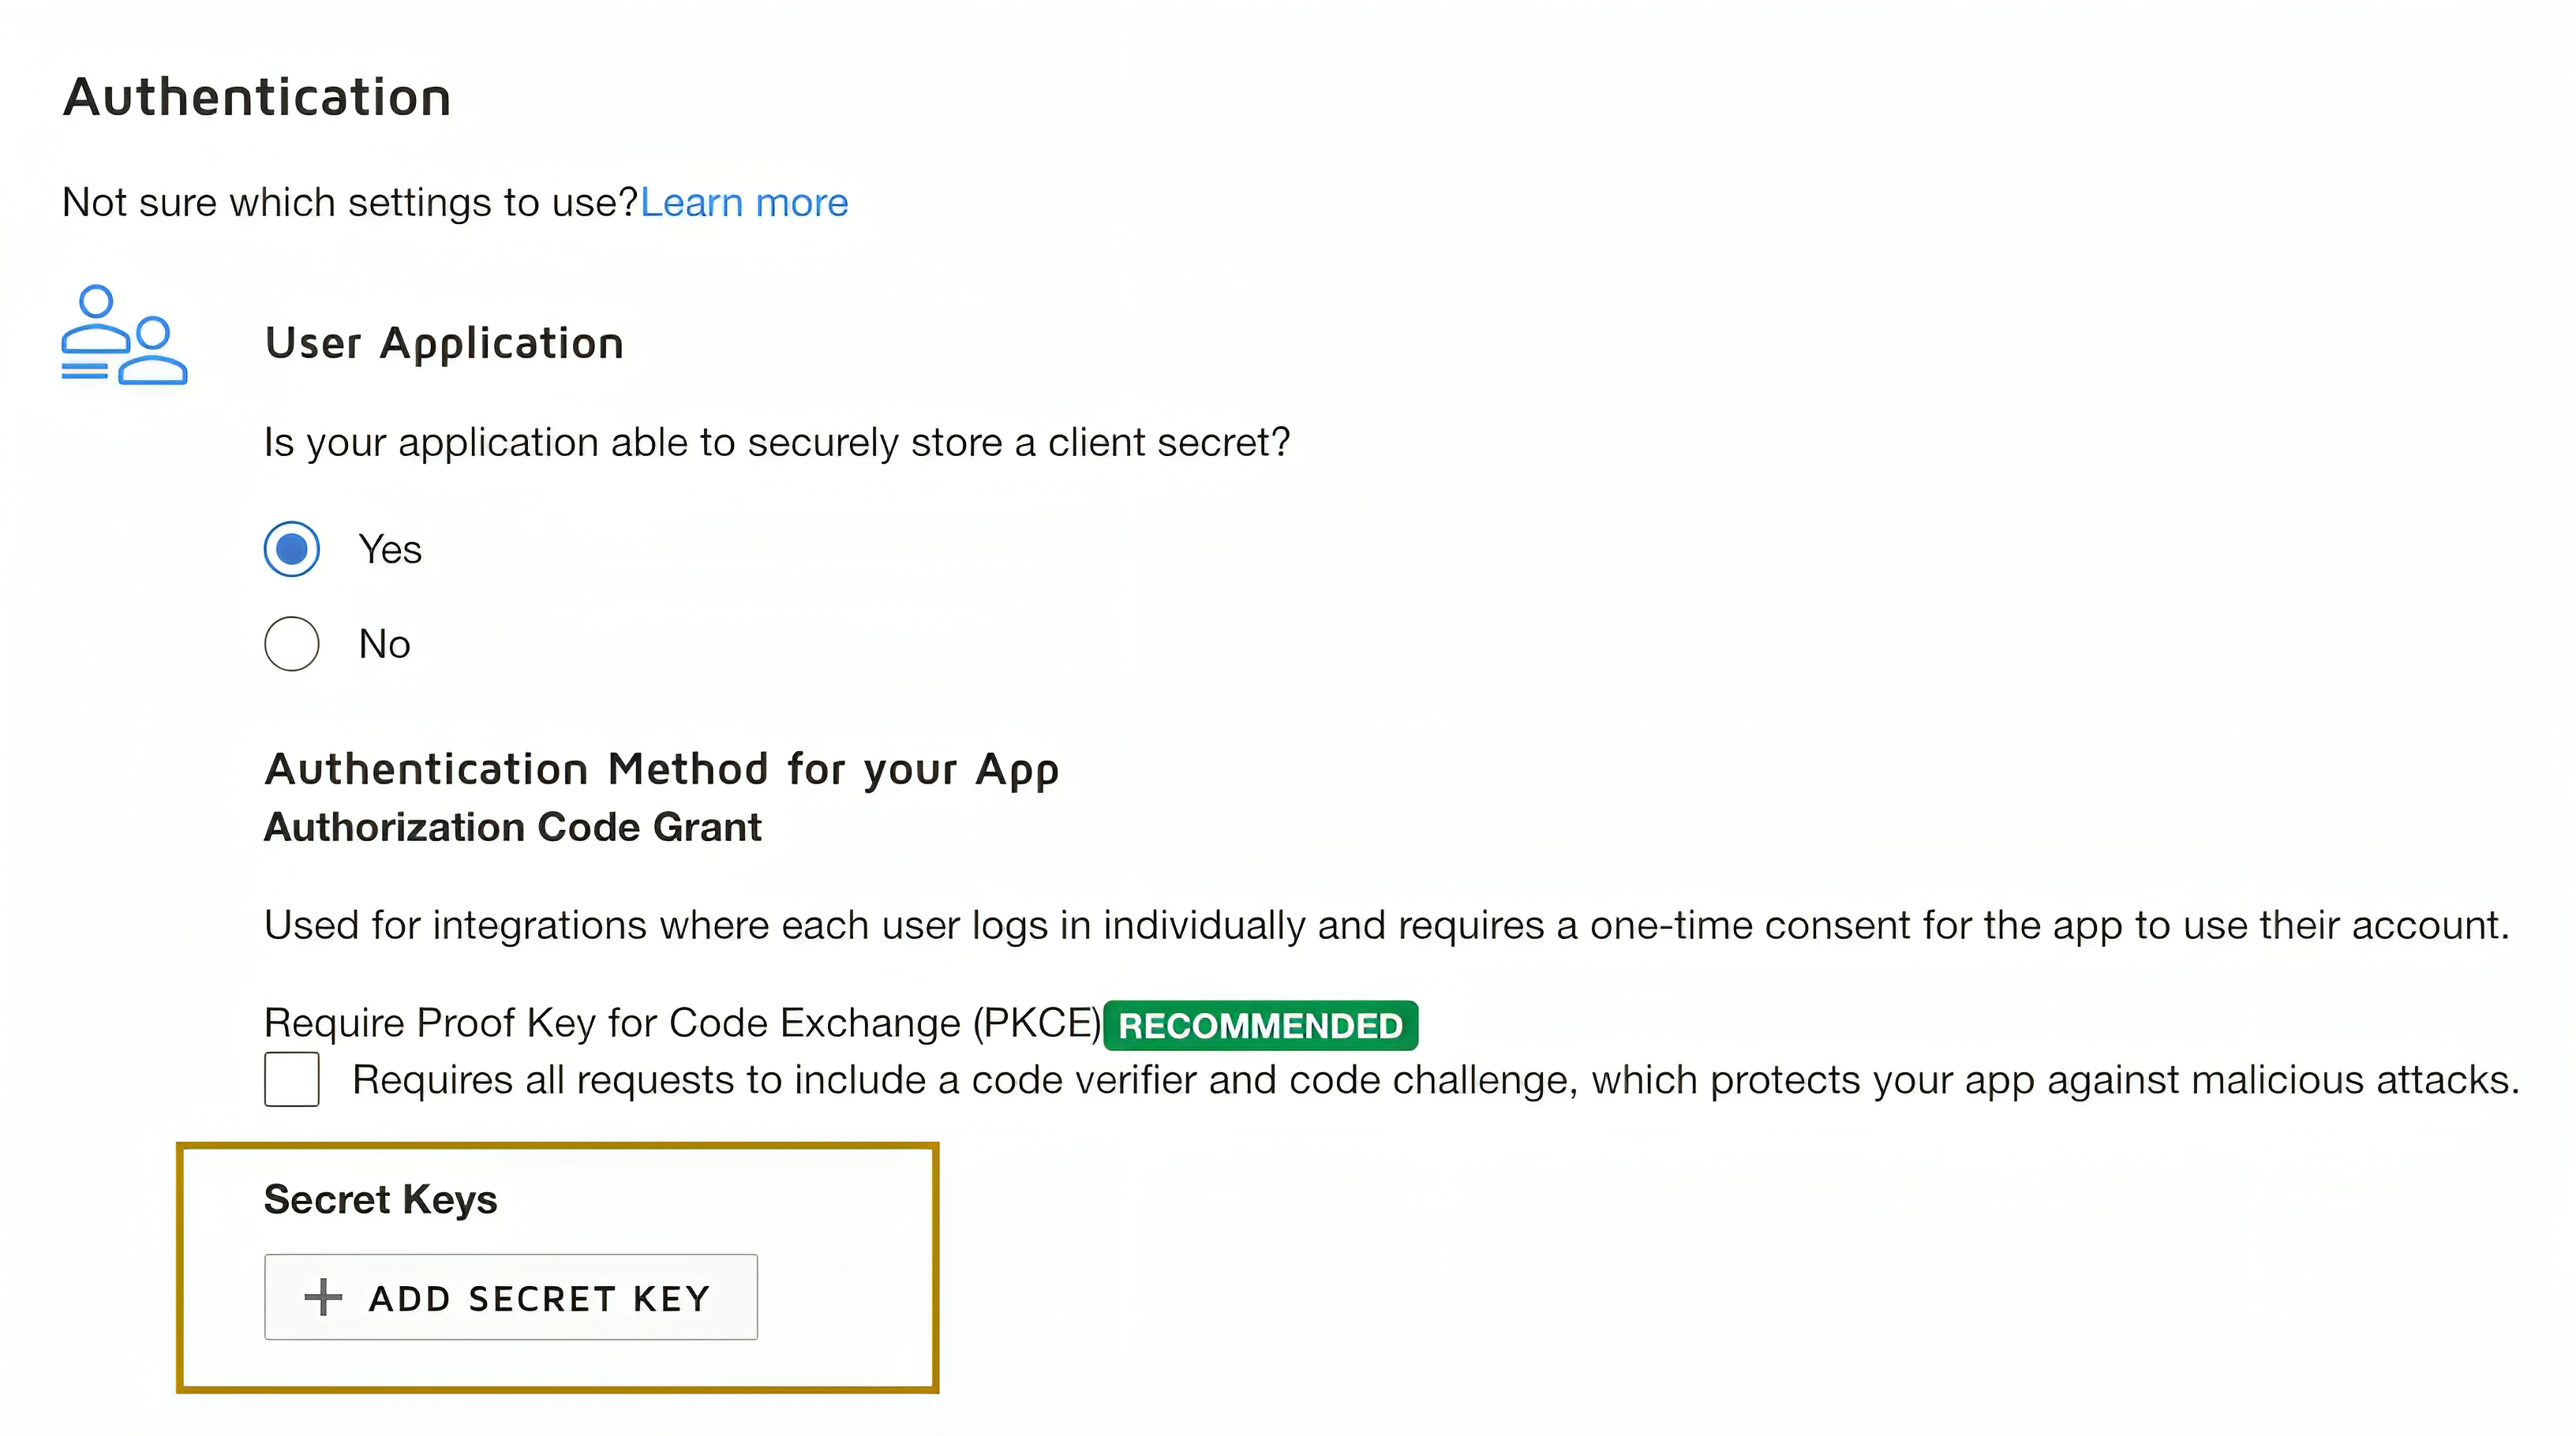
Step 3: Generate refresh token
-
Add a redirect URI: Click on
Add URIand enter your redirect URI (e.g., http://www.example.com/callback).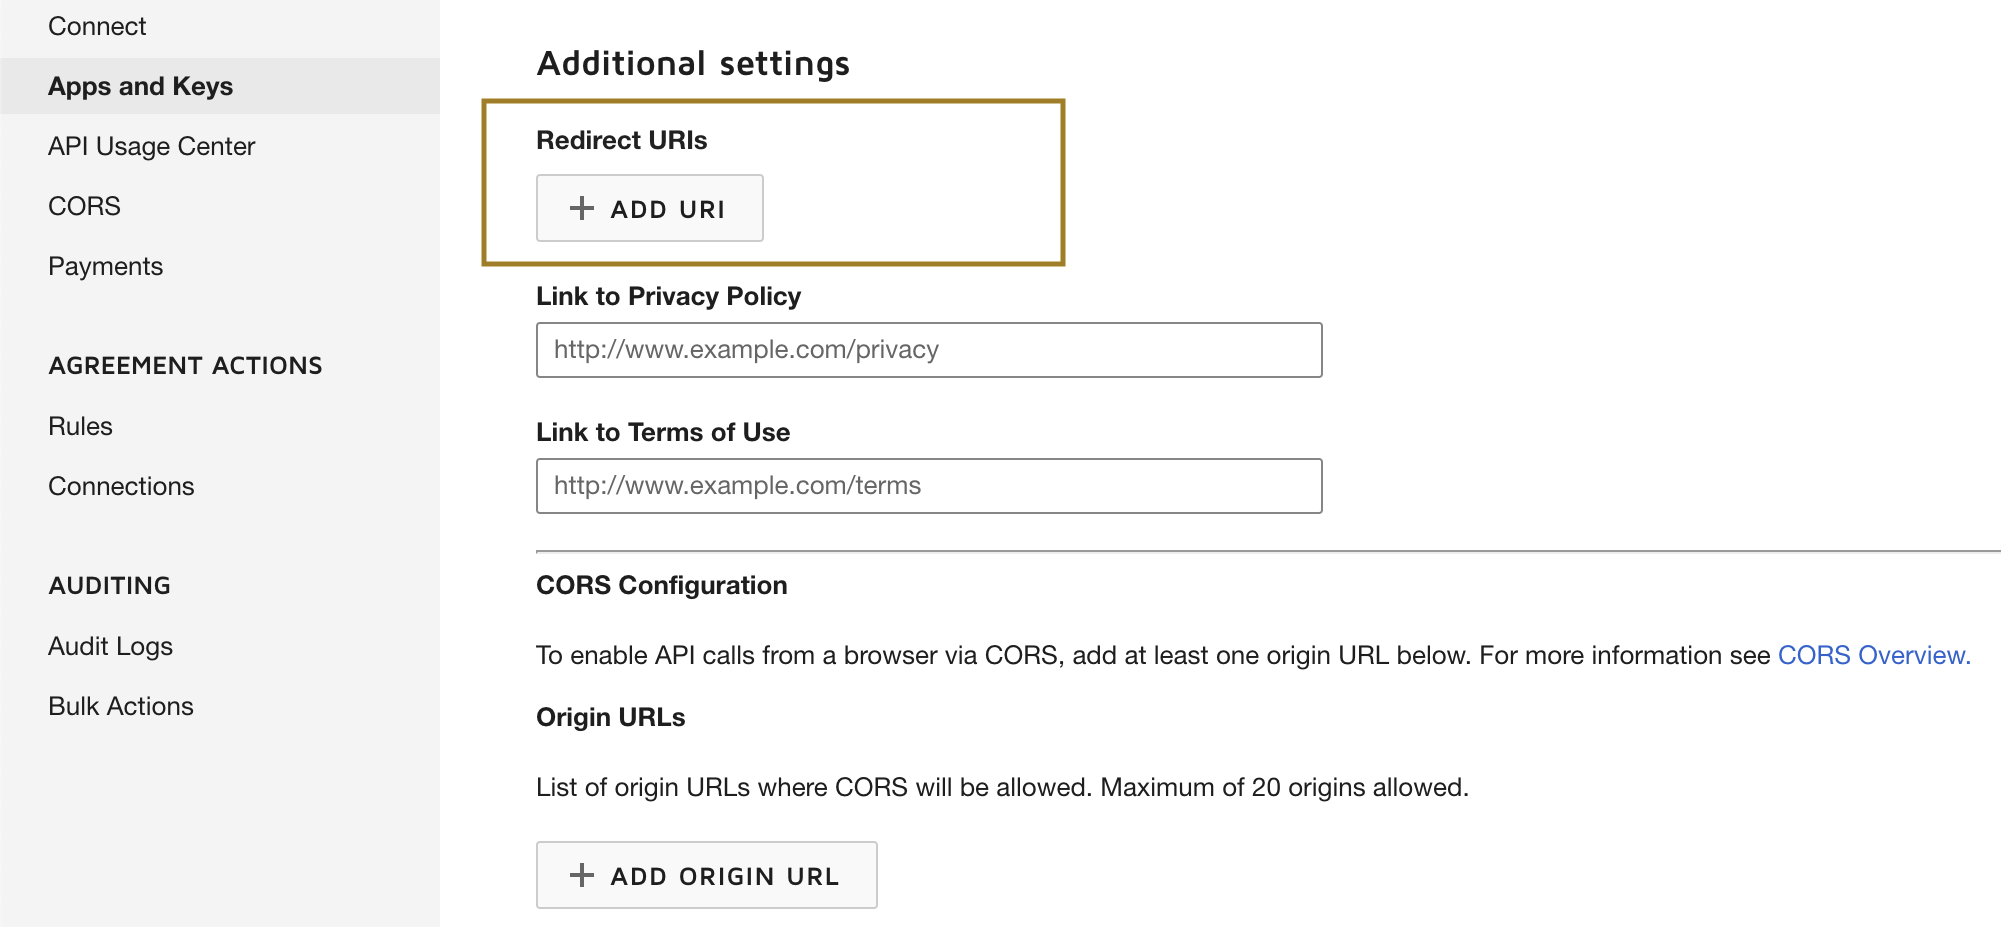
-
Generate the encoded key: The
Encoded Keyis a base64 encoded string of yourIntegration keyandSecret Keyin the format{IntegrationKey:SecretKey}. You can generate this in your web browser's console using thebtoa()function:btoa('IntegrationKey:SecretKey'). You can either generate the encoded key from an online base64 encoder. -
Get the authorization code: Visit the following URL in your web browser, replacing
{iKey}with your Integration Key and{redirectUri}with your redirect URI.https://account-d.docusign.com/oauth/auth?response_type=code&scope=signature%20organization_read%20group_read%20account_read%20permission_read%20user_read%20user_write&client_id={iKey}&redirect_uri={redirectUri}This will redirect you to your Redirect URI with a
codequery parameter. This is yourauthorization code. -
Get the refresh token: Use the following
curlcommand to get the refresh token, replacing{encodedKey}with your Encoded Key and{codeFromUrl}with yourauthorization code.curl --location 'https://account-d.docusign.com/oauth/token' \ --header 'Authorization: Basic {encodedKey}' \ --header 'Content-Type: application/x-www-form-urlencoded' \ --data-urlencode 'code={codeFromUrl}' \ --data-urlencode 'grant_type=authorization_code'The response will contain your refresh token. Use
https://account-d.docusign.com/oauth/tokenas the refresh URL.
Remember to replace {IntegrationKey:SecretKey}, {iKey}, {redirectUri}, {encodedKey}, and {codeFromUrl} with your actual values.
Above is about using the DocuSign Admin API in the developer mode. If your app is ready to go live, you need to follow the guidelines given here to make it work.
Quickstart
To use the DocuSign Click connector in your Ballerina project, modify the .bal file as follows.
Step 1: Import the module
Import the ballerinax/docusign.dsadmin module into your Ballerina project.
import ballerinax/docusign.dsadmin;
Step 2: Instantiate a new connector
Create a dsadmin:ConnectionConfig with the obtained OAuth2.0 tokens and initialize the connector with it.
configurable string clientId = ?; configurable string clientSecret = ?; configurable string refreshToken = ?; configurable string refreshUrl = ?; dsadmin:Client docuSignClient = check new({ auth: { clientId, clientSecret, refreshToken, refreshUrl } });
Step 3: Invoke the connector operation
You can now utilize the operations available within the connector.
public function main() returns error? { dsadmin:OrganizationsResponse orgResponse = check docuSignClient->/v2/organizations(); io:println("Organizations: ", orgResponse); dsadmin:OrganizationResponse[]? organizations = orgResponse.organizations; if organizations !is dsadmin:OrganizationResponse[] { io:println("Error: organizations not found"); return; } dsadmin:OrganizationResponse organization = organizations[0]; dsadmin:NewUserResponse newUserResponse = check docuSignClient->/v2/organizations/[<string>organization.id]/users.post( { user_name: "user1", first_name: "name1", email: "user1@docusignmail.com", accounts: [ { id: accountId, company_name: "Company" } ] } ); io:println("New user created: ", newUserResponse); }
Step 4: Run the Ballerina application
Use the following command to compile and run the Ballerina program.
bal run
Examples
The DocuSign Admin connector provides practical examples illustrating usage in various scenarios. Explore these examples.
-
Manage user information with DocuSign Admin This example shows how to use DocuSign Admin API to to create users and retrieve user informations related to eSignature tasks.
-
Access permissions in user accounts This example shows how to use DocuSign Admin API to to view permission details of the user accounts.
Clients
docusign.dsadmin: Client
An API for an organization administrator to manage organizations, accounts and users
Constructor
Gets invoked to initialize the connector.
init (string serviceUrl, *ConnectionConfig config)- serviceUrl string - URL of the target service
- config *ConnectionConfig - The configurations to be used when initializing the
connector
get v2/organizations
function get v2/organizations(string? mode) returns OrganizationsResponse|errorReturns a list of organizations that the authenticated user belongs to.
Parameters
- mode string? (default ()) - Specifies how to select the organizations. Valid values:
org_admin: Returns organizations for which the authenticated user is an admin.account_membership: Returns organizations that contain an account of which the authenticated user is a member Default value:org_admin
Return Type
- OrganizationsResponse|error - A successful response or an error
post v2/data_redaction/accounts/[string accountId]/user
function post v2/data_redaction/accounts/[string accountId]/user(IndividualMembershipDataRedactionRequest payload) returns IndividualUserDataRedactionResponse|errorDeletes membership data for a user on an account.
Parameters
- payload IndividualMembershipDataRedactionRequest -
Return Type
- IndividualUserDataRedactionResponse|error - A successful response or an error
get v2/organizations/[string organizationId]/accounts/[string accountId]/permissions
function get v2/organizations/[string organizationId]/accounts/[string accountId]/permissions() returns PermissionsResponse|errorReturns the list of permission profiles in an account.
Return Type
- PermissionsResponse|error - A successful response or an error
get v2/organizations/[string organizationId]/accounts/[string accountId]/groups
function get v2/organizations/[string organizationId]/accounts/[string accountId]/groups(Signed32? 'start, Signed32? take, Signed32? end) returns MemberGroupsResponse|errorReturns the list of groups in an account.
Parameters
- 'start Signed32? (default ()) - Index of first item to include in the response. The default value is 0.
- take Signed32? (default ()) - Page size of the response. The default value is 20.
- end Signed32? (default ()) - Index of the last item to include in the response. Ignored if
takeparameter is specified.
Return Type
- MemberGroupsResponse|error - A successful response or an error
get v2/organizations/[string organizationId]/exports/user_list
function get v2/organizations/[string organizationId]/exports/user_list() returns OrganizationExportsResponse|errorReturns a list of pending and completed export requests.
Return Type
- OrganizationExportsResponse|error - A successful response or an error
post v2/organizations/[string organizationId]/exports/user_list
function post v2/organizations/[string organizationId]/exports/user_list(OrganizationExportRequest payload) returns OrganizationExportResponse|errorCreates a user list export request.
Parameters
- payload OrganizationExportRequest -
Return Type
- OrganizationExportResponse|error - A successful response or an error
get v2/organizations/[string organizationId]/exports/account_settings
function get v2/organizations/[string organizationId]/exports/account_settings() returns OrganizationExportsResponse|errorReturns a list of pending and completed account settings export request.
Return Type
- OrganizationExportsResponse|error - A successful response or an error
post v2/organizations/[string organizationId]/exports/account_settings
function post v2/organizations/[string organizationId]/exports/account_settings(OrganizationAccountsRequest payload) returns OrganizationExportResponse|errorCreates a new account settings export request.
Parameters
- payload OrganizationAccountsRequest -
Return Type
- OrganizationExportResponse|error - A successful response or an error
get v2/organizations/[string organizationId]/exports/user_list/[string exportId]
function get v2/organizations/[string organizationId]/exports/user_list/[string exportId]() returns OrganizationExportResponse|errorReturns the results for single user list export request.
Return Type
- OrganizationExportResponse|error - A successful response or an error
delete v2/organizations/[string organizationId]/exports/user_list/[string exportId]
function delete v2/organizations/[string organizationId]/exports/user_list/[string exportId]() returns json|errorDeletes a single user list export request.
Return Type
- json|error - A successful response or an error
get v2/organizations/[string organizationId]/exports/account_settings/[string exportId]
function get v2/organizations/[string organizationId]/exports/account_settings/[string exportId]() returns OrganizationExportResponse|errorReturns the results for a single account settings export request.
Return Type
- OrganizationExportResponse|error - A successful response or an error
delete v2/organizations/[string organizationId]/exports/account_settings/[string exportId]
function delete v2/organizations/[string organizationId]/exports/account_settings/[string exportId]() returns json|errorDeletes a single account settings export request.
Return Type
- json|error - A successful response or an error
get v2/organizations/[string organizationId]/imports/account_settings
function get v2/organizations/[string organizationId]/imports/account_settings() returns OrganizationAccountSettingsImportResponse[]|errorReturns the details and metadata for Bulk Account Settings Import requests in the organization.
Return Type
- OrganizationAccountSettingsImportResponse[]|error - A successful response or an error
post v2/organizations/[string organizationId]/imports/account_settings
function post v2/organizations/[string organizationId]/imports/account_settings(Imports_account_settings_body payload) returns OrganizationAccountSettingsImportResponse|errorCreates a new account settings import request.
Parameters
- payload Imports_account_settings_body -
Return Type
- OrganizationAccountSettingsImportResponse|error - A successful response or an error
get v2/organizations/[string organizationId]/imports/account_settings/[string importId]
function get v2/organizations/[string organizationId]/imports/account_settings/[string importId]() returns OrganizationAccountSettingsImportResponse|errorReturns the details/metadata for a Bulk Account Settings Import request.
Return Type
- OrganizationAccountSettingsImportResponse|error - A successful response or an error
delete v2/organizations/[string organizationId]/imports/account_settings/[string importId]
function delete v2/organizations/[string organizationId]/imports/account_settings/[string importId]() returns json|errorDeletes a Bulk Account Settings Import request.
Return Type
- json|error - A successful response or an error
post v2/organizations/[string organizationId]/imports/bulk_users/add
function post v2/organizations/[string organizationId]/imports/bulk_users/add(Bulk_users_add_body payload) returns OrganizationImportResponse|errorCreates a request to import new users into an account.
Parameters
- payload Bulk_users_add_body -
Return Type
- OrganizationImportResponse|error - A successful response or an error
post v2/organizations/[string organizationId]/accounts/[string accountId]/imports/bulk_users/add
function post v2/organizations/[string organizationId]/accounts/[string accountId]/imports/bulk_users/add(Bulk_users_add_body_1 payload) returns OrganizationImportResponse|errorImport request for adding a user to a single account within the organization.
Parameters
- payload Bulk_users_add_body_1 -
Return Type
- OrganizationImportResponse|error - A successful response or an error
post v2/organizations/[string organizationId]/imports/bulk_users/update
function post v2/organizations/[string organizationId]/imports/bulk_users/update(Bulk_users_update_body payload) returns OrganizationImportResponse|errorBulk updates information for existing users.
Parameters
- payload Bulk_users_update_body -
Return Type
- OrganizationImportResponse|error - A successful response or an error
post v2/organizations/[string organizationId]/accounts/[string accountId]/imports/bulk_users/update
function post v2/organizations/[string organizationId]/accounts/[string accountId]/imports/bulk_users/update(Bulk_users_update_body_1 payload) returns OrganizationImportResponse|errorImport request for updating users for a single account within the organization.
Parameters
- payload Bulk_users_update_body_1 -
Return Type
- OrganizationImportResponse|error - A successful response or an error
post v2/organizations/[string organizationId]/imports/bulk_users/close
function post v2/organizations/[string organizationId]/imports/bulk_users/close(Bulk_users_close_body payload) returns OrganizationImportResponse|errorCreates a request to close the accounts of existing users.
Parameters
- payload Bulk_users_close_body -
Return Type
- OrganizationImportResponse|error - A successful response or an error
post v2/organizations/[string organizationId]/imports/bulk_users/close_external
function post v2/organizations/[string organizationId]/imports/bulk_users/close_external() returns OrganizationImportResponse|errorCloses external memberships.
Return Type
- OrganizationImportResponse|error - A successful response or an error
get v2/organizations/[string organizationId]/imports/bulk_users
function get v2/organizations/[string organizationId]/imports/bulk_users() returns OrganizationImportsResponse|errorGets a list of all of the user import requests.
Return Type
- OrganizationImportsResponse|error - A successful response or an error
get v2/organizations/[string organizationId]/imports/bulk_users/[string importId]
function get v2/organizations/[string organizationId]/imports/bulk_users/[string importId]() returns OrganizationImportResponse|errorReturns the details of a single user import request.
Return Type
- OrganizationImportResponse|error - A successful response or an error
delete v2/organizations/[string organizationId]/imports/bulk_users/[string importId]
function delete v2/organizations/[string organizationId]/imports/bulk_users/[string importId]() returns json|errorDeletes a specific user import request.
Return Type
- json|error - A successful response or an error
get v2/organizations/[string organizationId]/imports/bulk_users/[string importId]/results_csv
function get v2/organizations/[string organizationId]/imports/bulk_users/[string importId]/results_csv() returns string|errorGiven the ID of a user import request, return the CSV file that was imported.
get v2/organizations/[string organizationId]/identity_providers
function get v2/organizations/[string organizationId]/identity_providers() returns IdentityProvidersResponse|errorReturns the list of identity providers for an organization.
Return Type
- IdentityProvidersResponse|error - A successful response or an error
post v2/data_redaction/organizations/[string organizationId]/user
function post v2/data_redaction/organizations/[string organizationId]/user(IndividualUserDataRedactionRequest payload) returns IndividualUserDataRedactionResponse|errorDeletes data for one or more of a user's account memberships.
Parameters
- payload IndividualUserDataRedactionRequest -
Return Type
- IndividualUserDataRedactionResponse|error - A successful response or an error
get v2/organizations/[string organizationId]/reserved_domains
function get v2/organizations/[string organizationId]/reserved_domains() returns DomainsResponse|errorReturns the list of reserved domains for the organization.
Return Type
- DomainsResponse|error - A successful response or an error
post v2/organizations/[string organizationId]/users/profiles
function post v2/organizations/[string organizationId]/users/profiles(UpdateUsersRequest payload) returns UsersUpdateResponse|errorUpdates a user's information.
Parameters
- payload UpdateUsersRequest -
Return Type
- UsersUpdateResponse|error - A successful response or an error
post v2/organizations/[string organizationId]/users/email_addresses
function post v2/organizations/[string organizationId]/users/email_addresses(UpdateUsersEmailRequest payload) returns UsersUpdateResponse|errorUpdates a user's email address.
Parameters
- payload UpdateUsersEmailRequest -
Return Type
- UsersUpdateResponse|error - A successful response or an error
delete v2/organizations/[string organizationId]/users/[string userId]/accounts
function delete v2/organizations/[string organizationId]/users/[string userId]/accounts(DeleteMembershipsRequest payload) returns DeleteMembershipsResponse|errorCloses a user's memberships.
Parameters
- payload DeleteMembershipsRequest -
Return Type
- DeleteMembershipsResponse|error - A successful response or an error
get v2/organizations/[string organizationId]/users
function get v2/organizations/[string organizationId]/users(Signed32? 'start, Signed32? take, Signed32? end, string? email, string? email_user_name_like, string? status, string? membership_status, string? account_id, string? organization_reserved_domain_id, string? last_modified_since) returns OrganizationUsersResponse|errorReturns information about the users in an organization.
Parameters
- 'start Signed32? (default ()) - Index of first item to include in the response. The default value is 0.
- take Signed32? (default ()) - Page size of the response. The default value is 20.
- end Signed32? (default ()) - Index of the last item to include in the response. Ignored if
takeparameter is specified.
- email string? (default ()) - Email address of the desired user. At least one of
email,account_idororganization_reserved_domain_idmust be specified.
- email_user_name_like string? (default ()) - Selects users by pattern matching on the user's email address
- status string? (default ()) - Status.
- membership_status string? (default ()) - The user's membership status. One of:
activation_requiredactivation_sentactivecloseddisabled
- account_id string? (default ()) - Select users that are members of the specified account. At least one of
email,account_idororganization_reserved_domain_idmust be specified.
- organization_reserved_domain_id string? (default ()) - Select users that are in the specified domain. At least one of
email,account_idororganization_reserved_domain_idmust be specified.
- last_modified_since string? (default ()) - Select users whose data have been modified since the date specified.
account_idororganization_reserved_domain_idmust be specified.
Return Type
- OrganizationUsersResponse|error - A successful response or an error
post v2/organizations/[string organizationId]/users
function post v2/organizations/[string organizationId]/users(NewUserRequest payload) returns NewUserResponse|errorCreates a new user.
Parameters
- payload NewUserRequest -
Return Type
- NewUserResponse|error - A successful response or an error
post v2/organizations/[string organizationId]/users/[string userId]/memberships/[string membershipId]
function post v2/organizations/[string organizationId]/users/[string userId]/memberships/[string membershipId](ForceActivateMembershipRequest payload) returns UpdateResponse|errorActivates user memberships.
Parameters
- payload ForceActivateMembershipRequest -
Return Type
- UpdateResponse|error - A successful response or an error
get v2/organizations/[string organizationId]/users/profile
function get v2/organizations/[string organizationId]/users/profile(string? email) returns UsersDrilldownResponse|errorReturns historical information about users with a specific email address.
Parameters
- email string? (default ()) - The email address associated with the users you want to retrieve. Note: This property is required.
Return Type
- UsersDrilldownResponse|error - A successful response or an error
delete v2/organizations/[string organizationId]/users/[string userId]/identities
function delete v2/organizations/[string organizationId]/users/[string userId]/identities(DeleteUserIdentityRequest payload) returns DeleteResponse|errorDeletes user identities.
Parameters
- payload DeleteUserIdentityRequest -
Return Type
- DeleteResponse|error - A successful response or an error
post v2/organizations/[string organizationId]/accounts/[string accountId]/users
function post v2/organizations/[string organizationId]/accounts/[string accountId]/users(NewAccountUserRequest payload) returns NewUserResponse|errorAdds users to an account.
Parameters
- payload NewAccountUserRequest -
Return Type
- NewUserResponse|error - A successful response or an error
get organizations/[string organizationId]/accounts/[string accountId]/dsgroups
function get organizations/[string organizationId]/accounts/[string accountId]/dsgroups(Signed32? page, Signed32? page_size) returns DSGroupListResponse|errorReturns a list of DSGroups.
Parameters
- page Signed32? (default ()) - Start page of DSGroups.
- page_size Signed32? (default ()) - Page size of DSGroups.
Return Type
- DSGroupListResponse|error - A successful response or an error
post organizations/[string organizationId]/accounts/[string accountId]/dsgroups
function post organizations/[string organizationId]/accounts/[string accountId]/dsgroups(DSGroupAddRequest payload) returns DSGroupResponse|errorCreates a new DSGroup.
Parameters
- payload DSGroupAddRequest -
Return Type
- DSGroupResponse|error - A successful response or an error
get organizations/[string organizationId]/accounts/[string accountId]/dsgroups/[string dsGroupId]
function get organizations/[string organizationId]/accounts/[string accountId]/dsgroups/[string dsGroupId]() returns DSGroupResponse|errorReturns details about a single DSGroup.
Return Type
- DSGroupResponse|error - A successful response or an error
delete organizations/[string organizationId]/accounts/[string accountId]/dsgroups/[string dsGroupId]
function delete organizations/[string organizationId]/accounts/[string accountId]/dsgroups/[string dsGroupId]() returns error?Deletes a DSGroup.
Return Type
- error? - No Content
get organizations/[string organizationId]/accounts/[string accountId]/dsgroups/[string dsGroupId]/users
function get organizations/[string organizationId]/accounts/[string accountId]/dsgroups/[string dsGroupId]/users(Signed32? page, Signed32? page_size) returns DSGroupAndUsersResponse|errorGets a list of users in a DSGroup.
Parameters
- page Signed32? (default ()) - Start page of DSGroups.
- page_size Signed32? (default ()) - Page size of DSGroups.
Return Type
- DSGroupAndUsersResponse|error - A successful response or an error
post organizations/[string organizationId]/accounts/[string accountId]/dsgroups/[string dsGroupId]/users
function post organizations/[string organizationId]/accounts/[string accountId]/dsgroups/[string dsGroupId]/users(DSGroupUsersAddRequest payload) returns AddDSGroupAndUsersResponse|errorAdds a list of users to a DSGroup.
Parameters
- payload DSGroupUsersAddRequest -
Return Type
- AddDSGroupAndUsersResponse|error - A successful response or an error
delete organizations/[string organizationId]/accounts/[string accountId]/dsgroups/[string dsGroupId]/users
function delete organizations/[string organizationId]/accounts/[string accountId]/dsgroups/[string dsGroupId]/users(DSGroupUsersRemoveRequest payload) returns RemoveDSGroupUsersResponse|errorRemoves a list of users from a DSGroup.
Parameters
- payload DSGroupUsersRemoveRequest -
Return Type
- RemoveDSGroupUsersResponse|error - A successful response or an error
get organizations/[string organizationId]/accounts/[string accountId]/products/permission_profiles
function get organizations/[string organizationId]/accounts/[string accountId]/products/permission_profiles() returns ProductPermissionProfilesResponse|errorGets products associated with the account and the available permission profiles.
Return Type
- ProductPermissionProfilesResponse|error - A successful response or an error
get organizations/[string organizationId]/accounts/[string accountId]/products/users/[string userId]/permission_profiles
function get organizations/[string organizationId]/accounts/[string accountId]/products/users/[string userId]/permission_profiles() returns ProductPermissionProfilesResponse|errorRetrieves a user's product permission profiles by user ID.
Return Type
- ProductPermissionProfilesResponse|error - A successful response or an error
post organizations/[string organizationId]/accounts/[string accountId]/products/users/[string userId]/permission_profiles
function post organizations/[string organizationId]/accounts/[string accountId]/products/users/[string userId]/permission_profiles(ProductPermissionProfilesRequest payload) returns UserProductPermissionProfilesResponse|errorAssigns permission profiles for a user by user ID.
Parameters
- payload ProductPermissionProfilesRequest -
Return Type
- UserProductPermissionProfilesResponse|error - A successful response or an error
post organizations/[string organizationId]/accounts/[string accountId]/users
function post organizations/[string organizationId]/accounts/[string accountId]/users(NewMultiProductUserAddRequest payload) returns AddUserResponse|errorCreates and updates a multi-product user.
Parameters
- payload NewMultiProductUserAddRequest -
Return Type
- AddUserResponse|error - A successful response or an error
get organizations/[string organizationId]/users/dsprofile
function get organizations/[string organizationId]/users/dsprofile(string? email, boolean? sort) returns UsersDrilldownResponse|errorRetrieves the DS profile for a user specified by email address.
Parameters
- email string? (default ()) - The email address of the user. Note: This property is required.
- sort boolean? (default ()) - When true, sorts the results in ascending order by account name.
Return Type
- UsersDrilldownResponse|error - A successful response or an error
get organizations/[string organizationId]/users/[string userId]/dsprofile
function get organizations/[string organizationId]/users/[string userId]/dsprofile(boolean? sort) returns UsersDrilldownResponse|errorRetrieves the DS profile for a user specified by ID.
Parameters
- sort boolean? (default ()) - When true, sorts the results in ascending order by account name.
Return Type
- UsersDrilldownResponse|error - A successful response or an error
delete organizations/[string organizationId]/accounts/[string accountId]/products/users
function delete organizations/[string organizationId]/accounts/[string accountId]/products/users(UserProductProfileDeleteRequest payload) returns RemoveUserProductsResponse|errorRevokes a user's access to one or more products.
Parameters
- payload UserProductProfileDeleteRequest -
Return Type
- RemoveUserProductsResponse|error - A successful response or an error
get organizations/[string organizationId]/accounts/[string accountId]/products/permission_profiles/users
function get organizations/[string organizationId]/accounts/[string accountId]/products/permission_profiles/users(string? email) returns UserProductPermissionProfilesResponse|errorRetrieves a user's product permission profiles by email address.
Parameters
- email string? (default ()) - The email address of the user. Note: This property is required.
Return Type
- UserProductPermissionProfilesResponse|error - A successful response or an error
post organizations/[string organizationId]/accounts/[string accountId]/products/permission_profiles/users
function post organizations/[string organizationId]/accounts/[string accountId]/products/permission_profiles/users(UserProductPermissionProfilesRequest payload) returns UserProductPermissionProfilesResponse|errorAssigns permission profiles for a user by email address.
Parameters
- payload UserProductPermissionProfilesRequest -
Return Type
- UserProductPermissionProfilesResponse|error - A successful response or an error
get v1/organizations/[string organizationId]/assetGroups/accounts
function get v1/organizations/[string organizationId]/assetGroups/accounts(boolean? compliant) returns AssetGroupAccountsResponse|errorGet asset group accounts for an organization.
Parameters
- compliant boolean? (default ()) - When true, only compliant accounts are returned and account responses do not include the
compliantfield. The default value is false.
Return Type
- AssetGroupAccountsResponse|error - A successful response or an error
post v1/organizations/[string organizationId]/assetGroups/accountClone
function post v1/organizations/[string organizationId]/assetGroups/accountClone(AssetGroupAccountClone payload) returns AssetGroupAccountClone|errorClone an existing DocuSign account.
Parameters
- payload AssetGroupAccountClone -
Return Type
- AssetGroupAccountClone|error - A successful response or an error
get v1/organizations/[string organizationId]/assetGroups/accountClones
function get v1/organizations/[string organizationId]/assetGroups/accountClones(string? since_updated_date, boolean? include_details) returns AssetGroupAccountClones|errorGets all asset group account clones for an organization.
Parameters
- since_updated_date string? (default ()) - Use this parameter to retrieve only account clones that were created on or after a specified date.
- include_details boolean? (default ()) - When true, include additional details for the asset group account clones. The default value is false.
Return Type
- AssetGroupAccountClones|error - A successful response or an error
get v1/organizations/[string organizationId]/assetGroups/[string assetGroupId]/accountClones/[string assetGroupWorkId]
function get v1/organizations/[string organizationId]/assetGroups/[string assetGroupId]/accountClones/[string assetGroupWorkId](boolean? include_details) returns AssetGroupAccountClone|errorGets information about a single cloned account.
Parameters
- include_details boolean? (default ()) - When true, include additional details about the cloned account. The default value is false.
Return Type
- AssetGroupAccountClone|error - A successful response or an error
Records
docusign.dsadmin: AccountCloning
Methods to clone accounts.
Fields
- assetGroupAccounts AssetGroupAccountResponse[]? - The list of asset group accounts.
docusign.dsadmin: AccountSettingsExport
Methods and objects to get account information.
docusign.dsadmin: AccountSettingsImport
Methods and objects to update account settings.
docusign.dsadmin: AddDSGroupAndUsersResponse
Fields
- group DSGroupResponse? -
- group_users AddDSGroupUsersResponse? -
docusign.dsadmin: AddDSGroupUsersResponse
Fields
- is_success boolean? -
- TotalCount Signed32? -
- users DSGroupUserResponse[]? - A list of users.
docusign.dsadmin: AddUserResponse
Fields
- id string? -
- site_id Signed32? -
- user_name string? - The full name of the user.
- first_name string? - The user's first name.
- last_name string? - The user's last name.
- email string? - The email address.
- language_culture string? - The language and culture of the user.
- Chinese Simplified:
zh_CN - Chinese Traditional:
zh_TW - Dutch:
nl - English:
en - French:
fr - German:
de - Italian:
it - Japanese:
ja - Korean:
ko - Portuguese:
pt - Portuguese Brazil:
pt_BR - Russian:
ru - Spanish:
es
- Chinese Simplified:
- federated_status string? - The user's federated status. One of:
RemoveStatusFedAuthRequiredFedAuthBypassEvicted
- accounts AddUserResponseAccountProperties[]? -
docusign.dsadmin: AddUserResponseAccountProperties
Fields
- id string? -
- site_id Signed32? -
- product_permission_profiles ProductPermissionProfileResponse[]? - A list of one or more products and their respective permissions.
- ds_groups DSGroupResponse[]? -
- company_name string? - The user's company name.
- job_title string? - The user's job title.
docusign.dsadmin: AssetGroupAccountClone
The account that is cloned.
Fields
- sourceAccount AssetGroupAccountCloneSourceAccount -
- targetAccount AssetGroupAccountCloneTargetAccount - An object describing the target cloned account.
- assetGroupWorkId string? - The ID of the job that is created by the request. Use this value to retrieve information about the clone request with the getAssetGroupAccountClone endpoint.
- assetGroupId string? - The ID of the asset group to which the account belongs. Use this value to retrieve information about the clone request with the getAssetGroupAccountClone endpoint.
- assetGroupWorkType "Undefined"|"GroupAssetFulfillment"|"AccountAssetFulfillment"|"AccountAssetClone"|"AccountAssetCreate" ? - The type of asset group work.
- status "Undefined"|"Pending"|"Processing"|"PendingError"|"ProcessingError"|"Completed"|"Canceled"|"PermanentFailure" ? - The status of the clone request. Valid values:
PendingProcessingPendingErrorProcessingErrorCompletedCanceledPermanentFailure
- cloneRequestId string? - Reserved for DocuSign.
- orderId string? - Reserved for DocuSign.
- attempts Signed32? - The number of retries.
- createdDate string? - The date that the clone request was initiated.
- createdByName string? - The name of the user who initiated the clone request.
- createdByEmail string? - The email address of the user who initiated the clone request.
- message string? - A message providing information about the clone request. If the request resulted in an error, this message includes specific information about the error.
- cloneProcessingFailureDetails CloneErrorDetails? -
docusign.dsadmin: AssetGroupAccountClones
Fields
- assetGroupWorks AssetGroupAccountClone[]? - The list of asset group accounts.
docusign.dsadmin: AssetGroupAccountCloneSourceAccount
Fields
- id string - The ID of the account to clone. This property is required in POST requests.
- externalAccountId int? - The external account ID of the source account.
- site string? - The site the source account is on.
- name string? - The name of the source account.
docusign.dsadmin: AssetGroupAccountCloneTargetAccount
An object describing the target cloned account.
Fields
- id string? - The ID of the target account.
- name string? - The name of the target account. This property is required in the request body when cloning an account.
- region string? - The region of the target account.
Note: When cloning an account, you must include this property or
countryCodein the request. If both are provided,regionwill be used.
- countryCode string? - The country code of the target account. The country code for the United States is
en. Note: When cloning an account, you must include this property orregion. If both are provided,regionwill be used.
- site string? - The data center site of the account. This property is read-only.
- admin AssetGroupAccountCloneTargetAccountAdmin? - An object describing the administrator of the cloned account.
docusign.dsadmin: AssetGroupAccountCloneTargetAccountAdmin
An object describing the administrator of the cloned account.
Fields
- email string? - The email address of the target account administrator. This property is required in the request body when cloning an account.
- firstName string? - The first name of the target account administrator. This property is required in the request body when cloning an account.
- lastName string? - The last name of the target account administrator. This property is required in the request body when cloning an account.
- locale "None"|"zh_cn"|"zh_tw"|"nl"|"en"|"fr"|"de"|"it"|"ja"|"ko"|"pt"|"pt_br"|"ru"|"es"|"pl" ? - The locale of the target account administrator. The locale code for the United States is
en.
docusign.dsadmin: AssetGroupAccountResponse
Fields
- assetGroupId string? - The asset group ID.
- assetGroupName string? - Reserved for DocuSign.
- accountId string? - The ID of the account.
- accountName string? - The name of the account.
- externalAccountId int? - The external account ID.
- compliant boolean? - When true, indicates that the account is compliant.
- siteId Signed32? - Reserved for DocuSign.
- siteName string? - Reserved for DocuSign.
docusign.dsadmin: AssetGroupAccountsResponse
A list of asset group accounts.
Fields
- assetGroupAccounts AssetGroupAccountResponse[]? - The list of asset group accounts.
docusign.dsadmin: Bulk_users_add_body
Fields
- file\.csv record { fileContent byte[], fileName string } - CSV file.
docusign.dsadmin: Bulk_users_add_body_1
Fields
- file\.csv record { fileContent byte[], fileName string } - CSV file.
docusign.dsadmin: Bulk_users_close_body
Fields
- file\.csv record { fileContent byte[], fileName string } - CSV file.
docusign.dsadmin: Bulk_users_update_body
Fields
- file\.csv record { fileContent byte[], fileName string } - CSV file.
docusign.dsadmin: Bulk_users_update_body_1
Fields
- file\.csv record { fileContent byte[], fileName string } - CSV file.
docusign.dsadmin: CertificateResponse
Information about a single certificate.
Fields
- id string? - The unique ID of the certificate.
- issuer string? - The certificate issuer.
- thumbprint string? - The thumbprint of the certificate.
- expiration_date string? - The date when the certificate expires.
- is_valid boolean? - When true, the certificate is valid.
- links LinkResponse[]? - A list of useful links.
docusign.dsadmin: ClientHttp1Settings
Provides settings related to HTTP/1.x protocol.
Fields
- keepAlive KeepAlive(default http:KEEPALIVE_AUTO) - Specifies whether to reuse a connection for multiple requests
- chunking Chunking(default http:CHUNKING_AUTO) - The chunking behaviour of the request
- proxy ProxyConfig? - Proxy server related options
docusign.dsadmin: CloneErrorDetails
Fields
- 'error string? - The error code.
- errorDescription string? - The error description.
- isSystemError boolean? - When true, indicates that the error was caused by the system. When false, indicates that the error was caused by the user.
docusign.dsadmin: ConnectionConfig
Provides a set of configurations for controlling the behaviours when communicating with a remote HTTP endpoint.
Fields
- auth BearerTokenConfig|OAuth2RefreshTokenGrantConfig - Configurations related to client authentication
- httpVersion HttpVersion(default http:HTTP_2_0) - The HTTP version understood by the client
- http1Settings ClientHttp1Settings? - Configurations related to HTTP/1.x protocol
- http2Settings ClientHttp2Settings? - Configurations related to HTTP/2 protocol
- timeout decimal(default 60) - The maximum time to wait (in seconds) for a response before closing the connection
- forwarded string(default "disable") - The choice of setting
forwarded/x-forwardedheader
- poolConfig PoolConfiguration? - Configurations associated with request pooling
- cache CacheConfig? - HTTP caching related configurations
- compression Compression(default http:COMPRESSION_AUTO) - Specifies the way of handling compression (
accept-encoding) header
- circuitBreaker CircuitBreakerConfig? - Configurations associated with the behaviour of the Circuit Breaker
- retryConfig RetryConfig? - Configurations associated with retrying
- responseLimits ResponseLimitConfigs? - Configurations associated with inbound response size limits
- secureSocket ClientSecureSocket? - SSL/TLS-related options
- proxy ProxyConfig? - Proxy server related options
- validation boolean(default true) - Enables the inbound payload validation functionality which provided by the constraint package. Enabled by default
docusign.dsadmin: DataDeletion
Methods to delete data for closed users.
Fields
- user_id string? -
- status "unknown"|"pending"|"failure"|"success"|"already_redacted" ? - Status.
- membership_results MembershipDataRedactionResponse[]? -
docusign.dsadmin: DeleteMembershipRequest
Fields
- id string - The ID of a user's account you want to close.
docusign.dsadmin: DeleteMembershipResponse
Results of closing accounts.
Fields
- id string? - The ID of an account that could not be closed.
- error_details ErrorDetails? - Errors.
docusign.dsadmin: DeleteMembershipsRequest
A list of accounts to close for a user.
Fields
- accounts DeleteMembershipRequest[] - A list of accounts to close for a user.
docusign.dsadmin: DeleteMembershipsResponse
The results of closing a user's account.
Fields
- success boolean? - When true, the request to close the accounts succeeded.
- accounts DeleteMembershipResponse[]? - A list of accounts that were closed.
docusign.dsadmin: DeleteResponse
Results of deleting identities.
Fields
- success boolean? - When true, the request succeeded.
- identities UserIdentityResponse[]? - A list of identities to delete.
docusign.dsadmin: DeleteUserIdentityRequest
Request to delete a user's identities,
Fields
- identities UserIdentityRequest[] - A list of identities.
docusign.dsadmin: DomainResponse
Information about a reserved domain.
Fields
- id string? - The ID of the reserved domain.
- status string? - The status of the request. One of:
unknownpendingactivedeactivatedrejected
- host_name string? - The host name of the reserved domain.
- txt_token string? - A token in form of text of the reserved domain.
- identity_provider_id string? - The identity provider ID of the reserved domain.
- settings SettingResponse[]? - A list of settings for the reserved domain.
- links LinkResponse[]? - A list of useful links.
docusign.dsadmin: DomainsResponse
A response about reserved domains.
Fields
- reserved_domains DomainResponse[]? - Information about reserved domains.
docusign.dsadmin: DSGroupAddRequest
Fields
- group_name string -
- description string? -
docusign.dsadmin: DSGroupAndUsersResponse
Fields
- group DSGroupResponse? -
- group_users DSGroupUsersResponse? -
docusign.dsadmin: DSGroupListResponse
Fields
- page Signed32? - The page number.
- page_size Signed32? - The number of items per page.
- total_count Signed32? -
- account_id string? - Select users that are members of the specified account. At least one of
email,account_idororganization_reserved_domain_idmust be specified.
- ds_groups DSGroupResponse[]? -
docusign.dsadmin: DSGroupRequest
Fields
- ds_group_id string -
docusign.dsadmin: DSGroupResponse
Fields
- ds_group_id string? -
- account_id string? - Select users that are members of the specified account. At least one of
email,account_idororganization_reserved_domain_idmust be specified.
- source_product_name string? -
- group_id string? -
- group_name string? -
- description string? -
- is_admin boolean? -
- last_modified_on string? -
- user_count Signed32? -
- external_account_id int? -
- account_name string? -
docusign.dsadmin: DSGroupUserResponse
Fields
- user_id string? -
- account_id string? - Select users that are members of the specified account. At least one of
email,account_idororganization_reserved_domain_idmust be specified.
- user_name string? - The full name of the user.
- first_name string? - The user's first name.
- last_name string? - The user's last name.
- middle_name string? -
- status string? - Status.
- error_details ErrorDetails? - Errors.
docusign.dsadmin: DSGroupUsersAddRequest
Fields
- user_ids string[] -
docusign.dsadmin: DSGroupUsersRemoveRequest
Information about users to remove from the group.
Fields
- user_ids string[]? - An array of IDs corresponding to users to remove from the group.
- user_emails string[]? - An array of emails associated with users to remove from the group. Note: If
user_idsis also specified, this parameter will be ignored.
docusign.dsadmin: DSGroupUsersResponse
Fields
- page Signed32? - The page number.
- page_size Signed32? - The number of items per page.
- total_count Signed32? -
- users DSGroupUserResponse[]? - A list of users.
docusign.dsadmin: ErrorDetails
Errors.
Fields
- 'error string? - The code for the error.
- error_description string? - A description of the error.
docusign.dsadmin: ESignUserManagement
Methods to manage eSignature users in an account.
docusign.dsadmin: ForceActivateMembershipRequest
Fields
- site_id Signed32 -
docusign.dsadmin: GroupRequest
A group for a user to belong to.
Fields
- id int - The ID of the group.
- name string? - The name of the group.
- 'type string? - The type of group. One of:
invalidadmin_groupeveryone_groupcustom_group
docusign.dsadmin: IdentityProviderResponse
Information about a single identity provider.
Fields
- id string? - The unique ID of the identity provider.
- friendly_name string? - The human-readable name of the identity provider.
- auto_provision_users boolean? - When true, users who use this identity provider are automatically provisioned.
- 'type string? - The type of the identity provider. One of:
nonesaml_20saml_11saml_10ws_federationopen_id_connect
- saml_20 Saml2IdentityProviderResponse? - Information about a SAML 2.0 identity provider.
- links LinkResponse[]? - A list of useful URLs.
docusign.dsadmin: IdentityProviders
Methods to get a list of identity providers.
docusign.dsadmin: IdentityProvidersResponse
Fields
- identity_providers IdentityProviderResponse[]? -
docusign.dsadmin: Imports_account_settings_body
Fields
- file\.csv record { fileContent byte[], fileName string } - CSV file.
docusign.dsadmin: IndividualMembershipDataRedactionRequest
Fields
- user_id string? - The ID of the user whose data you want to delete.
docusign.dsadmin: IndividualUserDataRedactionRequest
Fields
- user_id string? - The ID of the user whose data you want to delete.
- memberships MembershipDataRedactionRequest[]? - A list of accounts from which you want to delete the user's data. At least one account is required.
docusign.dsadmin: IndividualUserDataRedactionResponse
Fields
- user_id string? - The ID of the user.
- status "unknown"|"pending"|"failure"|"success"|"already_redacted" ? - The overall status of the data deletion request.
- membership_results MembershipDataRedactionResponse[]? - A list of objects describing the status of the deletion request for each account.
docusign.dsadmin: LinkResponse
A link to a useful URL.
Fields
- rel string? - The kind of linked item.
- href string? - The URL of the linked item.
docusign.dsadmin: MemberGroupResponse
And individual group responses,.
Fields
- id int? - The unique ID of the group.
- name string? - The name of the group.
- 'type int? - The type of group. One of:
1 - invalid2 - admin_group3 - everyone_group4 - custom_group
docusign.dsadmin: MemberGroupsResponse
A response about member groups. It contains the groups and paging information.
Fields
- groups MemberGroupResponse[]? - A list of the responses.
- paging PagingResponseProperties? -
docusign.dsadmin: MembershipDataRedactionRequest
Fields
- account_id string? - The ID of the account from which to delete the user's data.
docusign.dsadmin: MembershipDataRedactionResponse
An object describing the status of the data deletion request for a specific account.
Fields
- account_id string? - The ID of the account.
- status "unknown"|"pending"|"failure"|"success"|"already_redacted" ? - The status of the data deletion request. Valid values:
successpendingfailurealready_redacted
docusign.dsadmin: MembershipResponse
Information about group membership.
Fields
- email string? - The email address.
- account_id string? - The ID of the account.
- external_account_id string? - The external account ID.
- account_name string? - The name of the account.
- is_external_account boolean? - When true, this is an external account.
- status string? - The status of the user's membership.
- permission_profile PermissionProfileResponse? - This object is an individual permission profile response.
- created_on string? - The date the user's account was created.
- groups MemberGroupResponse[]? - A list of groups the user is a member of in this account,
- is_admin boolean? - When true, the user has administration privileges on the account.
docusign.dsadmin: MultiProductUserManagement
Methods to manage multi-product users in an account.
Fields
- id string? -
- site_id Signed32? -
- user_name string? - The full name of the user.
- first_name string? - The user's first name.
- last_name string? - The user's last name.
- email string? - The email address.
- language_culture string? - The language and culture of the user.
- Chinese Simplified:
zh_CN - Chinese Traditional:
zh_TW - Dutch:
nl - English:
en - French:
fr - German:
de - Italian:
it - Japanese:
ja - Korean:
ko - Portuguese:
pt - Portuguese Brazil:
pt_BR - Russian:
ru - Spanish:
es
- Chinese Simplified:
- federated_status string? - The user's federated status. One of:
RemoveStatusFedAuthRequiredFedAuthBypassEvicted
- accounts AddUserResponseAccountProperties[]? -
docusign.dsadmin: NewAccountUserRequest
A new user request.
Fields
- permission_profile PermissionProfileRequest? - A permission profile.
- groups GroupRequest[]? - The new user's requested groups.
- user_name string? - The full name of the user.
- first_name string? - The user's first name.
- last_name string? - The user's last name.
- email string - The email address of the user.
- default_account_id string? - The account ID of the user's default account.
- language_culture string? - The language and culture of the user.
- Chinese Simplified:
zh_CN - Chinese Traditional:
zh_TW - Dutch:
nl - English:
en - French:
fr - German:
de - Italian:
it - Japanese:
ja - Korean:
ko - Portuguese:
pt - Portuguese Brazil:
pt_BR - Russian:
ru - Spanish:
es
- Chinese Simplified:
- selected_languages string? -
- access_code string? - The access code that the user needs to activate an account.
- federated_status string? - The user's federated status. One of:
RemoveStatusFedAuthRequiredFedAuthBypassEvicted
- auto_activate_memberships boolean? - When true, the user's account is activated automatically.
docusign.dsadmin: NewMultiProductUserAddRequest
Fields
- product_permission_profiles ProductPermissionProfileRequest[] - A list of one or more products and their respective permissions.
- ds_groups DSGroupRequest[]? -
- user_name string? - The full name of the user.
- first_name string? - The user's first name.
- last_name string? - The user's last name.
- email string - The email address.
- default_account_id string? -
- language_culture string? - The language and culture of the user.
- Chinese Simplified:
zh_CN - Chinese Traditional:
zh_TW - Dutch:
nl - English:
en - French:
fr - German:
de - Italian:
it - Japanese:
ja - Korean:
ko - Portuguese:
pt - Portuguese Brazil:
pt_BR - Russian:
ru - Spanish:
es
- Chinese Simplified:
- access_code string? - The access code that the user needs to activate an account.
- federated_status string? - The user's federated status. One of:
RemoveStatusFedAuthRequiredFedAuthBypassEvicted
- auto_activate_memberships boolean? - When true, the user's account is activated automatically.
docusign.dsadmin: NewUserRequest
Information about a new user.
Fields
- accounts NewUserRequestAccountProperties[] - A list of accounts the user will belong to.
- user_name string? - The full name of the user.
- first_name string? - The user's first name.
- last_name string? - The user's last name.
- email string - The email address.
- default_account_id string? - The account ID of the user's default account.
- language_culture string? - The language and culture of the user.
- Chinese Simplified:
zh_CN - Chinese Traditional:
zh_TW - Dutch:
nl - English:
en - French:
fr - German:
de - Italian:
it - Japanese:
ja - Korean:
ko - Portuguese:
pt - Portuguese Brazil:
pt_BR - Russian:
ru - Spanish:
es
- Chinese Simplified:
- selected_languages string? -
- access_code string? - The access code that the user needs to activate an account.
- federated_status string? - The user's federated status. One of:
RemoveStatusFedAuthRequiredFedAuthBypassEvicted
- auto_activate_memberships boolean? - When true, the user's account is activated automatically.
docusign.dsadmin: NewUserRequestAccountProperties
An individual new account user.
Fields
- id string - The account ID.
- permission_profile PermissionProfileRequest? - A permission profile.
- groups GroupRequest[]? - The new user's requested groups.
- company_name string? - The user's company name.
- job_title string? - The user's job title.
docusign.dsadmin: NewUserResponse
Information about a newly created user.
Fields
- id string? - The ID of the added user
- site_id Signed32? - The site ID of the added user.
- user_name string? - The full name of the user.
- first_name string? - The user's first name.
- last_name string? - The user's last name.
- email string? - The primary email address of the user.
- language_culture string? - The language and culture of the user.
- Chinese Simplified:
zh_CN - Chinese Traditional:
zh_TW - Dutch:
nl - English:
en - French:
fr - German:
de - Italian:
it - Japanese:
ja - Korean:
ko - Portuguese:
pt - Portuguese Brazil:
pt_BR - Russian:
ru - Spanish:
es
- Chinese Simplified:
- federated_status string? - The user's federated status. One of:
RemoveStatusFedAuthRequiredFedAuthBypassEvicted
- accounts NewUserResponseAccountProperties[]? - A list of accounts the user belongs to.
docusign.dsadmin: NewUserResponseAccountProperties
Information about a newly created user.
Fields
- id string? - The user's unique ID.
- site_id Signed32? - The site ID of the account.
- permission_profile PermissionProfileResponse? - This object is an individual permission profile response.
- groups MemberGroupResponse[]? - A list of groups that the user belongs to.
- company_name string? - The user's company name.
- job_title string? - The job title of the user.
docusign.dsadmin: OASIRR_ErrorDetails
Fields
- 'error string? - The error number.
- error_description string? - A longer description of the error.
docusign.dsadmin: OASIRR_OrganizationAccountSettingsErrorDataResponse
Fields
- account_id string? - Select users that are members of the specified account. At least one of
email,account_idororganization_reserved_domain_idmust be specified.
- account_name string? -
- 'error string? - The error number.
- error_key string? -
- setting_key string? -
docusign.dsadmin: OAuth2RefreshTokenGrantConfig
OAuth2 Refresh Token Grant Configs
Fields
- Fields Included from * OAuth2RefreshTokenGrantConfig
- refreshUrl string(default "https://account.docusign.com/oauth/auth") - Refresh URL
docusign.dsadmin: OETR_ErrorDetails
Fields
- 'error string? - The error number.
- error_description string? - A longer description of the error.
docusign.dsadmin: OkAddDSGroupAndUsersResponse
Fields
- Fields Included from * Ok
- body AddDSGroupAndUsersResponse -
docusign.dsadmin: OkAddUserResponse
Fields
- Fields Included from * Ok
- body AddUserResponse -
docusign.dsadmin: OkAssetGroupAccountClone
Fields
- Fields Included from * Ok
- body AssetGroupAccountClone -
docusign.dsadmin: OkDSGroupResponse
Fields
- Fields Included from * Ok
- body DSGroupResponse -
docusign.dsadmin: OkIndividualUserDataRedactionResponse
Fields
- Fields Included from * Ok
docusign.dsadmin: OkNewUserResponse
Fields
- Fields Included from * Ok
- body NewUserResponse -
docusign.dsadmin: OkOrganizationAccountSettingsImportResponse
Fields
- Fields Included from * Ok
docusign.dsadmin: OkOrganizationExportResponse
Fields
- Fields Included from * Ok
- body OrganizationExportResponse -
docusign.dsadmin: OkOrganizationImportResponse
Fields
- Fields Included from * Ok
- body OrganizationImportResponse -
docusign.dsadmin: OkUpdateResponse
Fields
- Fields Included from * Ok
- body UpdateResponse -
docusign.dsadmin: OkUserProductPermissionProfilesResponse
Fields
- Fields Included from * Ok
docusign.dsadmin: OkUsersUpdateResponse
Fields
- Fields Included from * Ok
- body UsersUpdateResponse -
docusign.dsadmin: Organization
Methods for working with organizations.
docusign.dsadmin: OrganizationAccountRequest
Fields
- account_id string - Select users that are members of the specified account. At least one of
email,account_idororganization_reserved_domain_idmust be specified.
docusign.dsadmin: OrganizationAccountResponse
Information about an account.
Fields
- id string? - The unique ID of the account.
- name string? - The name of the account.
- external_account_id int? - The external account ID.
- site_id Signed32? - The site ID.
docusign.dsadmin: OrganizationAccountSettingsImportRequestorResponse
Fields
- id string? -
- 'type string? -
- name string? -
- email string? - The email address.
docusign.dsadmin: OrganizationAccountSettingsImportResponse
Fields
- created string? -
- last_modified string? -
- completed string? -
- expires string? -
- percent_completed Signed32? -
- number_processed_accounts int? -
- number_unprocessed_accounts int? -
- results OrganizationAccountSettingsImportResultResponse[]? -
- success boolean? -
- skipped_settings_by_account record { string[]... }? -
- id string? -
- organization_id string? -
- status string? - Status.
- 'type string? -
- requestor OrganizationAccountSettingsImportRequestorResponse? -
docusign.dsadmin: OrganizationAccountSettingsImportResultResponse
Fields
- id string? -
- site_id Signed32? -
- url string? -
- number_processed_accounts int? -
- error_details OASIRR_ErrorDetails? -
- processing_issues_by_account OASIRR_OrganizationAccountSettingsErrorDataResponse[]? -
- number_unprocessed_accounts int? -
docusign.dsadmin: OrganizationAccountsRequest
Fields
- accounts OrganizationAccountRequest[]? -
docusign.dsadmin: OrganizationExportAccount
Fields
- account_id string? - Select users that are members of the specified account. At least one of
email,account_idororganization_reserved_domain_idmust be specified.
docusign.dsadmin: OrganizationExportDomain
Fields
- domain string? -
docusign.dsadmin: OrganizationExportRequest
Enables you to specify the kind of export request.
Fields
- 'type string? - The type of export requested. One of:
organization_domain_users_export: All users of the reserved domains.organization_external_memberships_export: Users whose email address domain is not linked to the organization.organization_memberships_export: Every user in every account in the organization. Users in multiple accounts will appear more than once.organization_account_settings_export: This value only applies to requests to export account settings.
- accounts OrganizationExportAccount[]? -
- domains OrganizationExportDomain[]? -
docusign.dsadmin: OrganizationExportRequestorResponse
Fields
- name string? - The name of the requestor.
- id string? - The unique ID of the requestor.
If
typeisuser, this is the requestor's user ID.
- 'type string? - The type of the requestor. One of:
userclient_app
- email string? - The email address of the requestor.
docusign.dsadmin: OrganizationExportResponse
Fields
- id string? - The unique ID of this request.
- 'type string? - The type of export requested. One of:
organization_domain_users_export: All users of the reserved domains.organization_external_memberships_export: Users whose email address domain is not linked to the organization.organization_memberships_export: Every user in every account in the organization. Users in multiple accounts will appear more than once.organization_account_settings_export: This value only applies to requests to export account settings.
- requestor OrganizationExportRequestorResponse? -
- created string? - The time and date the request was created. This is a date in ISO 8601 format.
Example:
2019-03-26T19:02:09.8957715Z
- last_modified string? - The time and date when the request was modified. This is typically the same as
created.
- completed string? - The time and date when the request completed. Null if the request is still in progress.
- expires string? - The time and date when the request expires.
- status string? - The status of the request. One of:
failedin_processqueuedcompleted
- selected_accounts OrgExportSelectedAccount[]? -
- selected_domains OrgExportSelectedDomain[]? -
- metadata_url string? - A pre-configured GET request to get the status of the export. Generally this is the same URI used to access this endpoint.
- percent_completed Signed32? - An integer between 0 to 100 (inclusive) that reports the progress of the request.
- number_rows int? - The number of rows returned in this request.
- size_bytes int? - The size of the request in bytes.
- results OrganizationExportTaskResponse[]? - An array of results. There is one set of results for each server an account is in.
- success boolean? - When true, the request succeeded.
docusign.dsadmin: OrganizationExportsResponse
Fields
- exports OrganizationExportResponse[]? -
docusign.dsadmin: OrganizationExportTaskResponse
Fields
- id string? - The unique ID of the task request.
- site_id Signed32? - The ID of the site the response is for.
- url string? - The URL that returns the results as a CSV text stream.
- number_rows int? - The number of rows returned in the result.
- size_bytes int? - The size of the response in bytes.
- error_details OETR_ErrorDetails? -
docusign.dsadmin: OrganizationImportResponse
Fields
- id string? -
- 'type string? -
- requestor OrganizationImportResponseRequestor? -
- created string? -
- last_modified string? -
- status string? - Status.
- user_count Signed32? -
- processed_user_count Signed32? -
- added_user_count Signed32? -
- updated_user_count Signed32? -
- closed_user_count Signed32? -
- no_action_required_user_count Signed32? -
- error_count Signed32? -
- warning_count Signed32? -
- invalid_column_headers string? -
- imports_not_found_or_not_available_for_accounts string? -
- imports_failed_for_accounts string? -
- imports_timed_out_for_accounts string? -
- imports_not_found_or_not_available_for_sites string? -
- imports_failed_for_sites string? -
- imports_timed_out_for_sites string? -
- file_level_error_rollups OrganizationImportResponseErrorRollup[]? -
- user_level_error_rollups OrganizationImportResponseErrorRollup[]? -
- user_level_warning_rollups OrganizationImportResponseWarningRollup[]? -
- has_csv_results boolean? -
- results_uri string? -
docusign.dsadmin: OrganizationImportResponseErrorRollup
Fields
- error_type string? - The type of error. One of:
no_action_taken_user_existsuser_addeduser_updatedinvalid_column_headerinvalid_row_datainsufficient_row_data_foundextra_row_data_foundblank_usernameinvalid_characters_in_usernameinvalid_useremail_addressemail_domain_is_reservednew_name_with_existing_useremail_not_allowedinvalid_characters_in_jobtitleinvalid_membership_idmembership_not_in_accountmaximum_users_exceededinvalid_permissionsetuser_permissionset_problemsinvalid_groupuser_group_problemsgroup_and_permissionset_problemscolumn_headers_missinginvalid_csv_data_or_syntaxinvalid_characters_in_companynameinvalid_language_codeusername_column_header_missinguseremail_column_header_missingpermissionset_column_header_missingmembership_id_column_header_usage_not_permittedadministrator_group_assignment_not_permitteduser_awaiting_activationaccount_admin_access_deniedinvalid_characters_in_addresspermissionset_requiredapiusername_column_header_missinginvalid_apiusernameuseremail_username_combination_existspermissionset_change_not_allowedusername_language_changes_ignored_warninginvalid_country_warninginvalid_account_idinvalid_autoactivateinvalid_loginpolicyautoactivate_not_allowedmembership_closedmembership_closed_or_disabled_warningcannot_close_last_active_adminno_action_takencannot_close_own_membershipunspecified_error
- count Signed32? - The number of errors of this type.
docusign.dsadmin: OrganizationImportResponseRequestor
Fields
- name string? - The name of the requestor.
- id string? - The unique ID of the requestor.
If
typeisuser, this is the requestor's user ID.
- 'type string? - The type of the requestor. One of:
userclient_app
- email string? - The email address of the requestor.
docusign.dsadmin: OrganizationImportResponseWarningRollup
Fields
- warning_type string? - The type of warning.
- count Signed32? - The number of warnings of this type.
docusign.dsadmin: OrganizationImportsResponse
Fields
- imports OrganizationImportResponse[]? - A list of responses to user import requests.
docusign.dsadmin: OrganizationResponse
Information about an individual organization.
Fields
- id string? - The ID of the organization.
- name string? - The name of the organization.
- description string? - A description of the organization.
- default_account_id string? - The default account ID of the organization.
- default_permission_profile_id int? - The default permission profile ID of the organization.
- created_on string? - The date the organization's account was created.
- created_by string? - The user who created the organization account.
- last_modified_on string? - The date the organization's account was last updated.
- last_modified_by string? - The user who last updated the organization's account.
- accounts OrganizationAccountResponse[]? - A list of organization accounts.
- users OrganizationSimpleIdObject[]? - A list of the organization accounts users.
- reserved_domains DomainResponse[]? - A list of reserved domains for the organization.
- identity_providers IdentityProvidersResponse[]? - A list of identity providers for the organization.
- links LinkResponse[]? - A list of links for the organization.
docusign.dsadmin: OrganizationSalesforceAccountManagersResponse
Fields
- account_id string? - Select users that are members of the specified account. At least one of
email,account_idororganization_reserved_domain_idmust be specified.
- account_name string? -
- account_type string? -
- account_owner OSAMR_Contact? -
- account_manager OSAMR_Contact? -
- parent_account OrganizationSalesforceAccountManagersResponse? -
docusign.dsadmin: OrganizationSimpleIdObject
An ID object.
Fields
- id string? - The ID.
docusign.dsadmin: OrganizationsResponse
Organization list.
Fields
- organizations OrganizationResponse[]? - A list of organizations of which the authenticated user is a member.
docusign.dsadmin: OrganizationUserResponse
Information about a user.
Fields
- id string? - The user's unique ID.
- user_name string? - The full name of the user.
- first_name string? - The user's first name.
- last_name string? - The user's last name.
- user_status string? - The user's status. One of:
activecreatedclosed
- membership_status string? - The user's membership status. One of:
activation_requiredactivation_sentactivecloseddisabled
- email string? - The email address.
- created_on string? - The date the user's account was created.
- membership_created_on string? - The date on which the user became a member of the organization.
- ds_groups DSGroupResponse[]? -
- membership_id string? -
docusign.dsadmin: OrganizationUsersResponse
A response containing information about users.
Fields
- users OrganizationUserResponse[]? - A list of users.
- paging PagingResponseProperties? -
docusign.dsadmin: OrgExportSelectedAccount
Fields
- account_id string? - Select users that are members of the specified account. At least one of
email,account_idororganization_reserved_domain_idmust be specified.
docusign.dsadmin: OrgExportSelectedDomain
Fields
- domain string? -
docusign.dsadmin: OrgReportConfigurationResponse
Fields
- is_account_limit_disabled boolean? -
- custom_dates_enabled boolean? -
- enabled_report_types Signed32[]? -
docusign.dsadmin: OrgReportCreateResponse
Fields
- report_correlation_id string? -
docusign.dsadmin: OrgReportListResponse
Fields
- reports OrgReportListResponse_OrgReport[]? -
docusign.dsadmin: OrgReportListResponse_OrgReport
Fields
- complete boolean? -
- report_correlation_id string? -
- site_id Signed32? -
- report_id string? -
- requestor OrgReportListResponse_Requestor? -
- created_on string? -
- account_export_count Signed32? -
- url string? -
- report_type_id string? -
- report_date_range string? -
- custom_start_date string? -
- custom_end_date string? -
docusign.dsadmin: OrgReportListResponse_Requestor
Fields
- id string? -
- name string? -
docusign.dsadmin: OrgReportRequest
Fields
- report_type string? -
- report_date_range string? -
- account_ids string[]? -
- custom_start_date string? -
- custom_end_date string? -
docusign.dsadmin: OSAMR_Contact
Fields
- name string? -
- email string? - The email address.
- title string? -
docusign.dsadmin: PagingResponseProperties
Fields
- result_set_size Signed32? - The number of items in a result set (page).
- result_set_start_position Signed32? - The index position of the first result in this set.
- result_set_end_position Signed32? - The index position of the last result in this set.
- total_set_size Signed32? - The total number of results.
- next string? - A URL to the next set of results.
- previous string? - A URL to the previous set of results.
docusign.dsadmin: PermissionProfileRequest
A permission profile.
Fields
- id int - The ID of the permission profile.
- name string? - The name of the permission profile.
docusign.dsadmin: PermissionProfileResponse
This object is an individual permission profile response.
Fields
- id int? - The ID of the permission profile.
- name string? - The name of the permission profile.
Example:
DocuSign Sender
docusign.dsadmin: PermissionProfileResponse2_1
Fields
- permission_profile_id string? - The ID of the permission profile.
- permission_profile_name string? - The human-readable name of the permission profile.
docusign.dsadmin: PermissionsResponse
A list of permission profiles for a given account.
Fields
- permissions PermissionProfileResponse[]? - An array of permission profile responses.
docusign.dsadmin: ProductPermissionProfileRequest
Identifies a product and an associated permission profile.
Fields
- product_id string - The ID of the product. This property is required.
- permission_profile_id string - The ID of the permission profile for the given product. This property is required.
docusign.dsadmin: ProductPermissionProfileResponse
Fields
- product_id string? - The ID of the product.
- product_name string? - The human-readable name of the product.
- permission_profiles PermissionProfileResponse2_1[]? -
- error_message string? -
docusign.dsadmin: ProductPermissionProfilesRequest
Fields
- product_permission_profiles ProductPermissionProfileRequest[] - A list of one or more products and their respective permissions.
docusign.dsadmin: ProductPermissionProfilesResponse
Fields
- product_permission_profiles ProductPermissionProfileResponse[]? - A list of one or more products and their respective permissions.
docusign.dsadmin: ProxyConfig
Proxy server configurations to be used with the HTTP client endpoint.
Fields
- host string(default "") - Host name of the proxy server
- port int(default 0) - Proxy server port
- userName string(default "") - Proxy server username
- password string(default "") - Proxy server password
docusign.dsadmin: RemoveDSGroupUsersResponse
Fields
- is_success boolean? -
- failed_users DSGroupUserResponse[]? -
docusign.dsadmin: RemoveUserProductsResponse
Fields
- is_success boolean - When true, indicates that the user's access to the specified products was successfully revoked.
- user_email string? - The user's email address.
- user_id string? - The user's ID.
- user_product_results record { string... } - The results of the request to revoke product access.
Each key in the object is the ID of a product specified in the request. Each corresponding value indicates whether the user's access for that product was successfully revoked. If successful, the value is
deleted. Otherwise, the value describes the error that occurred. For example:{ "230546a7-xxxx-xxxx-xxxx-af205d5494ad"": "deleted", "984800b7-xxxx-xxxx-xxxx-kt374a5922lk": "Invalid product id" }
docusign.dsadmin: RequiredAttributeMappingResponse
A single attribute mapping response.
Fields
- required_attribute_id Signed32? - The unique ID of the attribute.
- required_attribute_name string? - The name of the attribute.
- required_attribute_friendly_name string? - The human-readable name of the attribute.
- substitute_attribute_name string? - The name of the substitute attribute.
docusign.dsadmin: ReservedDomains
Methods to get a list of reserved domains.
docusign.dsadmin: Saml2IdentityProviderResponse
Information about a SAML 2.0 identity provider.
Fields
- issuer string? - The name of the certificate issuer.
- settings SettingResponse[]? - A list of settings.
- certificates CertificateResponse[]? - A list of certificates responses.
- attribute_mappings RequiredAttributeMappingResponse[]? - A list of attribute mappings.
docusign.dsadmin: SettingResponse
A key/value list of settings.
Fields
- 'key string? - The key of the setting.
- value record {}? - The value of the setting.
- 'type string? - The type of the setting. One of:
unknownguidtextintegerbooleandatetimeenumeration
docusign.dsadmin: SingleAccountUserImport
Methods to import users.
Fields
- id string? -
- 'type string? -
- requestor OrganizationImportResponseRequestor? -
- created string? -
- last_modified string? -
- status string? - Status.
- user_count Signed32? -
- processed_user_count Signed32? -
- added_user_count Signed32? -
- updated_user_count Signed32? -
- closed_user_count Signed32? -
- no_action_required_user_count Signed32? -
- error_count Signed32? -
- warning_count Signed32? -
- invalid_column_headers string? -
- imports_not_found_or_not_available_for_accounts string? -
- imports_failed_for_accounts string? -
- imports_timed_out_for_accounts string? -
- imports_not_found_or_not_available_for_sites string? -
- imports_failed_for_sites string? -
- imports_timed_out_for_sites string? -
- file_level_error_rollups OrganizationImportResponseErrorRollup[]? -
- user_level_error_rollups OrganizationImportResponseErrorRollup[]? -
- user_level_warning_rollups OrganizationImportResponseWarningRollup[]? -
- has_csv_results boolean? -
- results_uri string? -
docusign.dsadmin: UpdateMembershipRequest
A request to update group membership.
Fields
- account_id string - The user's unique ID.
- permission_profile PermissionProfileRequest? - A permission profile.
- groups GroupRequest[]? - The user's requested groups.
- company_name string? - The user's company name.
- job_title string? - The user's job title.
- send_activation boolean? - When true, send an activation request after the update.
- access_code string? - The access code that the user needs to activate an account.
docusign.dsadmin: UpdateResponse
A response.
Fields
- status string? - The status of the request.
docusign.dsadmin: UpdateUserEmailRequest
And individual change of email.
Fields
- id string - The ID of the users whose email address you want to change.
- site_id Signed32 - The site ID.
- email string - The new email address.
docusign.dsadmin: UpdateUserRequest
Request to change a user's information.
Fields
- id string - The user's unique ID.
- site_id Signed32 - The site ID.
- user_name string? - The full name of the user.
- first_name string? - The user's first name.
- last_name string? - The user's last name.
- email string? - The email address.
- default_account_id string? - The account ID of the user's default account.
- language_culture string? - The language and culture of the user.
- Chinese Simplified:
zh_CN - Chinese Traditional:
zh_TW - Dutch:
nl - English:
en - French:
fr - German:
de - Italian:
it - Japanese:
ja - Korean:
ko - Portuguese:
pt - Portuguese Brazil:
pt_BR - Russian:
ru - Spanish:
es
- Chinese Simplified:
- selected_languages string? -
- federated_status string? - The user's federated status. One of:
RemoveStatusFedAuthRequiredFedAuthBypassEvicted
- force_password_change boolean? - When true, the user will be required to change the account password.
- memberships UpdateMembershipRequest[]? - A list of group membership requests.
- device_verification_enabled boolean? -
docusign.dsadmin: UpdateUsersEmailRequest
A change email request.
Fields
- users UpdateUserEmailRequest[]? - A list of users whose email address to change.
docusign.dsadmin: UpdateUsersRequest
A list of users whose information you want to change.
Fields
- users UpdateUserRequest[]? - A list of users whose information you want to change.
docusign.dsadmin: UserDrilldownResponse
Information about a user.
Fields
- id string? - The user's unique ID.
- site_id Signed32? - The site ID of the organization.
- site_name string? - The site name of the account.
- user_name string? - The full name of the user.
- first_name string? - The user's first name.
- last_name string? - The user's last name.
- user_status string? - The user's status. One of:
activecreatedclosed
- default_account_id string? - The ID of the user's default account.
- default_account_name string? - The name of the user's default account.
- language_culture string? - The language and culture of the user.
- Chinese Simplified:
zh_CN - Chinese Traditional:
zh_TW - Dutch:
nl - English:
en - French:
fr - German:
de - Italian:
it - Japanese:
ja - Korean:
ko - Portuguese:
pt - Portuguese Brazil:
pt_BR - Russian:
ru - Spanish:
es
- Chinese Simplified:
- selected_languages string? -
- federated_status string? - The user's federated status. One of:
RemoveStatusFedAuthRequiredFedAuthBypassEvicted
- is_organization_admin boolean? - When true, the user has organization administration privileges.
- created_on string? - The date the user's account was created.
- last_login string? - This property has been deprecated.
- memberships MembershipResponse[]? - A list of organizations that have groups that the user is a member of.
- identities UserIdentityResponse[]? - A list of identities associated with the user.
- device_verification_enabled boolean? -
docusign.dsadmin: UserExport
Methods for exporting a user list.
docusign.dsadmin: UserIdentityRequest
User identity,
Fields
- id string? - The ID of the identity.
docusign.dsadmin: UserIdentityResponse
Results of deleting a user identity.
Fields
- id string? - The ID of the result.
- provider_id string? - The ID of the identity provider.
- user_id string? - The user ID.
- immutable_id string? - A unique ID to identify the removed user.
- error_details ErrorDetails? - Errors.
docusign.dsadmin: UserImport
Methods to import users.
docusign.dsadmin: UserProductPermissionProfilesRequest
Fields
- email string - The email address associated with the user whose permissions you want to update. This property is required.
- product_permission_profiles ProductPermissionProfileRequest[] - A list of one or more products and their associated permissions.
docusign.dsadmin: UserProductPermissionProfilesResponse
Fields
- user_id string? - The ID of the user.
- account_id string? - The ID of the account.
- product_permission_profiles ProductPermissionProfileResponse[]? - A list of one or more products and their respective permissions.
docusign.dsadmin: UserProductProfileDeleteRequest
Fields
- user_email string? - The user's email address.
- user_id string? - The user's unique ID.
- product_ids string[] - A list of IDs corresponding to the products for which the user's access will be revoked.
For example:
["230546a7-xxxx-xxxx-xxxx-af205d5494ad", "984800b7-xxxx-xxxx-xxxx-kt374a5922lk"]
docusign.dsadmin: Users
Methods to manage users in an account.
docusign.dsadmin: UsersDrilldownResponse
Information about a list of users.
Fields
- users UserDrilldownResponse[]? - A list of users.
docusign.dsadmin: UsersUpdateResponse
The results of changing a user's information.
Fields
- success boolean? - When true, the request to change user information succeeded.
- users UserUpdateResponse[]? - A list of users whose email addresses have been updated.
docusign.dsadmin: UserUpdateResponse
Error result of attempting to change a user's email address.
Fields
- id string? - The ID of the user whose email address has been updated.
- site_id Signed32? - The site ID.
- email string? - The email address.
- error_details ErrorDetails? - Errors.
Array types
docusign.dsadmin: OrganizationAccountSettingsImportResponseArr
OrganizationAccountSettingsImportResponseArr
Import
import ballerinax/docusign.dsadmin;Other versions
2.0.0